400 Series
EN - 53
7.1.1. dB mode
3. Connect the sound level probe to the instrument’s optical input by means of the optical cable
4.
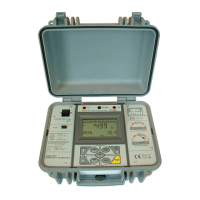
Press the GO/STOP key. The instrument starts
measuring the acoustic pressure. The following
values are displayed:
SPL acoustic pressure
Peak acoustic pressure peak
Duration time elapsed since the
beginning of the recording
AUX
SPL ---- dB
Peak ---- dB
Duration 0000:00:00
dB
Func
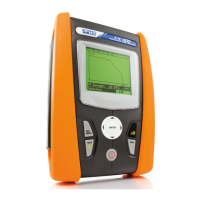
5.
Press the GO/STOP key again. The instrument
stops measuring and displays the following
values:
Leq equivalent level of acoustic
pressure
Peak acoustic pressure peak
Duration duration of the recording
AUX
Leq ---- dB
Peak ---- dB
Duration 0000:00:00
dB
Func
The equivalent level of the acoustic pressure is defined as:
2
0
0
2
10
1
log10
P
dtP
T
Leq
T
i
where: P
0
is the reference pressure, ca. 210
5
Pa
P
i
is the instant pressure of the acoustic range
In praxis, the following formula is used:
N
N
Leq
N
i
L
i
i
1
10
10
10
log10
where: L
i
is the sampled level [dB]
N
i
is the number of samples measured for the L
i
level
N is the number of samples measured
6.
7. Please note that Lep, the personal exposure level, is defined as the equivalent level of
the acoustic range a person is exposed to during a normal workshift (8 hours). "Lep"
coincides therefore with "Leq" calculated for 8 hours.
8.
Once recording is completed, measures can be saved by pressing the SAVE
key twice or the SAVE key and, subsequently, the ENTER key (§ 9.1)