Do you have a question about the Huawei ETP48400-C3B1 and is the answer not in the manual?
Details cross-sectional area requirements for power cables based on current and voltage drop.
Lists essential tools and instruments for installation, emphasizing insulated handles.
Provides physical dimensions and clearance requirements for installing the ETP48400-C3B1 unit.
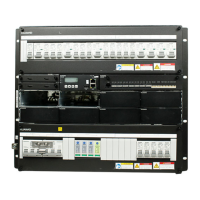
Guide for installing the ETP48400-C3B1 unit into a 19-inch rack and connecting its ground cable.
Instructions for installing the DCDB48-400-4C unit into a 19-inch rack and connecting its ground cable.
Procedure for installing the power system rectifiers into their designated slots.
Detailed steps for connecting various cables to the ETP48400-C3B1 unit.
Guide for connecting DC power cables from the DCDB48-400-4C to a third-party monitoring device.
Instructions for installing lead-acid batteries and their associated cables, with safety precautions.
Procedure for installing lithium batteries and cables, including safety warnings and quantity considerations.
Checks to ensure all screws, washers, and rectifier installations are secure and proper.
Verifies circuit breakers are off, terminals are intact, and battery/power cables are correctly connected.
Confirms all cables are securely connected, neatly arranged, and properly labeled.
Procedure for connecting the AC power supply, including voltage checks and indicator status.
Instructions for navigating the SMU interface to select and set the display language.
Guides through setting system parameters like language, time, battery model, and capacity.
Details for configuring battery parameters such as float voltage, boost voltage, and cable specifications.
Steps to connect the site monitoring unit via a network cable and access the WebUI.
Instructions on how to import a configuration file via the WebUI for quick site parameter setup.
Procedure to check and troubleshoot the dry contact alarm cable connection.
Steps for connecting the lead-acid battery supply, including voltage measurements.
Procedure for connecting lithium batteries, verifying communication, and observing operation.
Final steps include reinstalling panels, checking subrack paint, and cleaning the site.
Presents the overall electrical conceptual diagram of the power system.
Illustrated guide on preparing a cable by attaching a cord end terminal using a crimping tool.
Visual steps for preparing an OT terminal on a cable using hydraulic pliers and heat shrink tubing.
| Brand | Huawei |
|---|---|
| Model | ETP48400-C3B1 |
| Category | Power Supply |
| Language | English |