Do you have a question about the Husqvarna Classica 90 and is the answer not in the manual?
Guide for correctly threading the bobbin case with the lower thread for sewing.
Steps for properly inserting the threaded bobbin case into the shuttle.
Explanation of how to set and identify proper upper thread tension for quality stitches.
Guidance on selecting the appropriate stitch length for various sewing tasks.
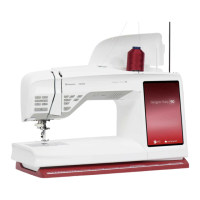
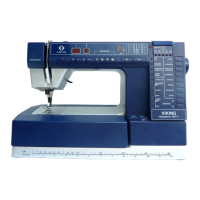
This document describes the Husqvarna Classica 90 sewing machine, providing a comprehensive guide to its functions, usage, and maintenance.
The machine is designed for various sewing tasks, from basic straight stitching to more complex operations like buttonholes and darning. It features a free arm, which is particularly useful for sewing cylindrical items such as trouser legs, sleeves, collars, and cuffs, as well as for darning socks and stockings. The free arm enhances versatility and ease of use for specific garment types.
The Husqvarna Classica 90 operates with both upper and lower threads, requiring careful threading for optimal performance. The upper thread tension is adjustable via a dial, ranging from 0 to 10, allowing users to fine-tune the tension based on fabric thickness and thread type. A specific mark on the dial indicates the recommended tension for buttonholes, satin stitching, topstitching, and embroidery. Correct thread tension is crucial for a balanced stitch where the threads interlock in the middle of both fabric layers. Incorrect tension can lead to loose stitches, puckering, or the upper thread being drawn underneath the fabric.
The machine offers a variety of stitch types, including straight stitch, zig-zag, and three-step zig-zag. Stitch selection is made by turning a dial to the letter or symbol corresponding to the desired stitch. The straight stitch can be sewn with the needle in either the center or left position; the left position is recommended for narrow hems and light fabrics, providing better support and easier topstitching close to an edge. The zig-zag stitch comes in three widths (1.5, 3, and 5 mm) and is suitable for joining stretch fabrics, bound edging, appliqués, and gathering over elastic cord. The three-step zig-zag is particularly effective for overcasting, darning, and mending, especially on stretch, lightweight, or loosely woven fabrics, as it offers more elasticity and prevents fabric puckering.
Buttonhole creation is a key feature, utilizing a dedicated buttonhole foot (foot C) with graduated markings for consistent length. The machine automatically sews buttonholes, starting in reverse for the first column, forming a bar tack, sewing the second column, and then forming the final bar tack. For corded buttonholes, a small cord can be attached to the buttonhole foot to reinforce elastic materials or heavy garments.
The feed dog, responsible for moving the fabric, can be lowered using a push-button. This is necessary for certain darning techniques, sewing on buttons, and when placing thick garments under the presser foot. The presser foot pressure is also adjustable via a dial, with a white dot indicating normal pressure. Releasing the pressure (by setting the dial to the symbol) is ideal for free-hand sewing, darning, monogramming, machine embroidery, and quilting.
To begin sewing, the machine must be connected to a wall outlet, ensuring the voltage and frequency match the machine's specifications. The foot control, which regulates sewing speed, is plugged into a socket on the right-hand side. The main switch turns on both the machine and the sewing light.
Threading the machine involves several steps: placing the spool on the spool pin, guiding the thread through various guides and tension discs, and finally threading the needle from the front. The bobbin, which holds the lower thread, is wound on a dedicated spindle and then inserted into the bobbin case. The bobbin case is placed into the shuttle, and the thread is drawn through a slot and under the tension spring. A thread cutter on the back of the presser bar allows for easy trimming of threads after sewing.
The presser feet are interchangeable and marked with letters for different purposes. Presser foot A is a general-purpose foot for straight, zig-zag, and three-step zig-zag stitching, featuring notches for guiding seams. Zipper foot E can be attached to either side of the needle, facilitating zipper insertion.
When sewing, it's important to guide the fabric gently without pulling, allowing the machine's feed dog to move the material. For fine or soft fabrics, starting the seam a few millimeters from the edge and sewing a few reverse stitches can prevent the fabric from being pulled into the needle plate slot. Fastening off seams is done by depressing the reverse feed button and sewing a few reverse stitches.
Regular maintenance ensures the machine's longevity and optimal performance. This includes cleaning and needle replacement.
To clean the machine, the presser foot should be removed, and the feed dog lowered. The stitch plate can be removed by pushing it upward and backward from a recess in the free arm, allowing access to clean between the teeth of the feed dog with a brush. The hook area, where the bobbin case resides, should also be cleaned of dust and lint. When replacing the stitch plate, it is inserted from behind into the arm, eased onto a small pin, and pushed forward until it snaps into place.
Needle replacement is crucial for consistent stitch quality. The machine uses needles coded 130/705H, with a No. 80 needle typically fitted. Stretch needles are recommended for stretch fabrics and soft leather, and denim needles for denim. Needles should be changed if they are bent, damaged, or if sewing results are unsatisfactory. To change the needle, the screw in the needle clamp is loosened, the old needle removed, and a new one inserted with the flat side of the shank facing away from the user, pushed as far as it will go into the socket, and then tightened with a screwdriver.
The light bulb, located to the left of the needle, can be changed by pressing it upward, turning it a quarter turn in the direction of the arrow to remove, and reversing the process to insert a new bulb. The wattage of the bulb is indicated on the rear of the machine.
The machine's belts do not require adjustment.
In case of sewing issues, a troubleshooting guide is provided, covering common problems such as unattractive stitches, needle breaks, thread breaks, uneven tension, irregular bobbin winding, fabric puckering, and the machine not feeding fabric or running sluggishly. These issues are often resolved by checking thread tension, threading, bobbin insertion, needle condition, or cleaning.
| Type | Mechanical |
|---|---|
| Buttonhole | 4-step |
| Needle Threader | No |
| Stitch Length | Adjustable |
| Stitch Width | Adjustable |
| Free Arm | Yes |
| Weight | 6.7 kg |