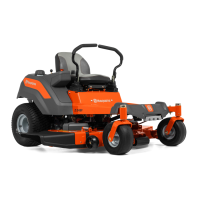
Park
Brake
Forward
Neutral
Reverse
13
CONTROLS
Steering Control Levers
The machine’s speed and direction are
continuously variable using the two steering
controls. The steering controls can be moved
forward or backward about a neutral position.
There is a neutral position, which is locked if the
steering controls are moved out.
When both controls are in the neutral position (N),
the machine stands still.
By equally moving both controls forward or
backward, the machine moves in a straight line
forward or backward.
For example, to turn right while moving forward,
move the right control towards the neutral
position. The rotation of the right wheel is reduced
and the machine turns to the right.
WARNING! The machine can turn very
rapidly if one steering control is moved much
further forward than the other.
Park Brake
IMPORTANT INFORMATION Failure to bring
the steering / park brake controls inward at the
same time will cause the unit's safety system to
shut the unit down.
The park brake is integrated with the steering
control levers. Move both levers out from the
neutral position to engage the park brake.
To release the park brake, pull both steering
control levers inwards to the neutral position at
the same time. Do not try to operate the unit
without both levers being inwards out of the
engaged position or machine components could
be damaged.
Ignition Switch
The ignition switch is placed on the control panel
and is used to start and stop the engine.
Zero turn can be achieved by moving one control
backward (behind the neutral position) and
carefully moving the other steering control forward
from its neutral position. The rotation direction
when zero turning is determined by which
steering control is moved backward behind the
neutral position. If the left steering control is pulled
backward, the machine turns to the left. Use more
care when using this maneuver.
If the steering controls are in uneven positions
ZKHQVWDQGLQJVWLOORUGRQRW¿WLQWKHVORWVIRU
moving the controls out, they can be adjusted.
64
LUBRICACIÓN
Cambio de aceite del motor
NOTA: Cambie el aceite del motor cuando
el motor esté caliente. Consulte el manual
del propietario del motor para ver las
recomendaciones para realizar un cambio de
DFHLWH\GH¿OWURDGHFXDGR
1. (VWDFLRQH OD PiTXLQD HQ XQD VXSHU¿FLH
nivelada. Aplique el freno de estacionamiento.
2. /LPSLHODVXFLHGDG \ORVGHVHFKRV GHOiUHD
alrededor de la tapa del tanque de llenado de
aceite.
3. Quité la tapa/varilla de nivel.
4. Ubique la manguera de drenado que se
encuentra al lado trasero izquierdo del
motor. Ponga un contenedor de un tamaño
adecuado bajo el extremo de la manguera
de drenado y quite el tapón de vaciado de
aceite.
$'9(57(1&,$! Para prevenir
quemaduras, se debe apagar el motor y dejar
que se enfríe un poco para que aún esté
FDOLHQWHSHURSDUDTXHODViUHDVTXHURGHDQHO
motor no lo estén.
5. Permita que el aceite se drene completamente
del motor.
6. 9XHOYDDSRQHUHOWDSyQGHODPDQJXHUDGH
GUHQDGR\DSULpWHOD¿UPHPHQWH
7. Llene el motor con un aceite nuevo hasta
la parte de abajo de las marcas del tubo de
llenado. Compruebe el nivel con la varilla de
nivel.
8. 9XHOYDDSRQHUODWDSDGHOWDQTXHGHOOHQDGR
GH DFHLWH ¿UPHPHQWH FXDQGR HO QLYHO GH
aceite indique FULL.
9. Consulte el historial de mantenimiento para
YHUORVLQWHUYDORVGHFDPELR\GHYHUL¿FDFLyQ
del aceite.
Engrasadores de rueda y equipo
Utilice únicamente grasa para cojinetes de buena
calidad.
La grasa de marcas reconocidas (empresas
petroquímicas, etc.) generalmente mantiene una
buena calidad.
Montaje de la rueda delantera
Lubrique las carreras 3-4 con una pistola de
engrase en cada juego de cojinetes de las
ruedas.
Cojinetes de las ruedas delanteras
Lubrique las carreras 3-4 con una pistola de
engrase en cada juego de cojinetes de las
ruedas.
Ejes del equipo
Baje el equipo de corte completamente. Lubrique
con una pistola de engrase, 2-3 recorridos por
el eje a través las aberturas que hay en las
protecciones de la correa.
Si usa una pistola de engrase sin manguera de
goma, debe retirar la placa de pie para acceder al
eje central.
 Loading...