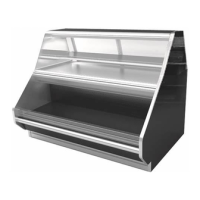
This document provides installation and operation guidelines for Hussmann R3B, R3D, R3P, and R3TO refrigerated bakery, service-self-service merchandisers, and refrigerated deli service units. The R3TO model is specifically designed for in-counter installation.
General Instructions
Upon receipt, thoroughly inspect all equipment for shipping damage. If damage is found, immediately file a claim with the carrier. Hussmann Chino maintains a product control system, recording serial numbers and replacement part dates. For parts correspondence, provide the serial number of the equipment.
Installation
- Location: Cases should be placed in a store location free from air currents caused by open doors, windows, electric fans, or air conditioning vents. Maintain a minimum distance of 15 feet from such sources. Cases are designed to operate at 55% relative humidity and 75°F ambient temperature. Product temperature should be maintained at a constant and proper temperature.
- Uncrating: Remove the top of the crate, detach the walls, and unbolt the case from the skid. Lift the case only at the base.
- Exterior Loading: These models are not designed to support excessive external loading. Do not walk on their tops to avoid serious personal injury and damage to the fixture.
- Glass Adjustment: To compress silicone at joints, use two Jurgenson wood clamps. Ensure the case is level from front to back and side to side on inside bulkheads at the joint. Attach sections together with two bolts in the base of the case. Secure the overhead structure by bolting the bracket behind the lights. Apply silicone to the top of bulkheads and slip on stainless steel bulkhead caps. Apply silicone to the seam between overhead light tubes and smooth it with a finger.
- Corner Wedges: Attach corner wedges using front and rear camlocks. Use a 7mm allen wrench to turn the locks, but do not overtighten. Join the top with a joint bracket (included in the joint kit) using 3/8" bolts.
- Joint Trim: After leveling, joining, and completing refrigeration, electrical, and waste piping, install splashguards. Fasten along the top edge or center with #10 X 3/3" sheet metal screws. Do not seal joint trim to the floor.
- Scale Stand Installation: Set the scale stand in the desired location. Drill holes and screw in place using provided Hex Tek S/S 10-16 X 1½" screws.
- Wrapping Boards Installation: Measure 6 inches from the wrapping board end and 10 inches from the top of the case. Align the bracket center hole with the cross mark and mark the hole pattern. Drill holes (7/32") and install the bracket with provided #14 X 1" screws. Mount the wrap board on top of the bracket using a ¼" spacer to create a gap between the rear wall and the board. Screw the bracket into the wrap board using #8 X 1¼" screws.
- Bumper Installation: Ensure aluminum channels and end caps are installed. Use silicone lubricant to help the bumper slide into the channel. Start inserting the bumper from one end, pushing it up against the end cap to prevent shrinking after installation (especially when cold). With two hands, pull the bumper toward you, opening the inside lips, and slowly apply pressure by rolling the bumper into the track.
Plumbing
- Waste Outlet and P-TRAP: The waste outlet is located at the center of the case. Ensure a minimum slope of 1/8 inch per foot for the drain line. PVC-DWV solvent cement is recommended.
- Installing Condensate Drain: Hussmann recommends installing condensate drains to prevent air leakage and insect entry. Use a minimum of 1½", 1¾", and 2" P-TRAPS and threaded adapters.
- Prevent Condensate Drains from Freezing: Avoid installing condensate drains in contact with non-insulated suction lines. Suction lines should be insulated with a non-absorbent insulation material. Condensate drains located in dead air spaces (between refrigerators or between a refrigerator and a wall) should be insulated to prevent freezing.
Refrigeration
- Refrigerant Type: Standard refrigerant is R-404A. Check the serial plate for specific information.
- Piping: Refrigerant line outlets are located under the case. Locate the first electrical box, then the outlets. Insulate suction lines to prevent condensation.
- Control Settings: Maintain these parameters to achieve near constant product temperatures. Product temperature should be measured first thing in the morning, after having been refrigerated overnight. Defrost times and duration should be set according to the manual.
- Access to TX Valves and Drain Lines: Remove product racks, refrigeration and drain access panels. TX valve (mechanical only) and drain are located under each access panel at the end of the case. Electronic TX valve and slave cylinder are located within the electrical access panel(s).
- Electronic Expansion Valve (Optional): Hussmann cases with electronic expansion valves use sensors for electronic expansion valves installed on the coil inlet, coil outlet, and in the discharge air. Some supermarkets require a 4th sensor in the return air. Case controllers are located in the electrical raceway or under the case. The Front Self Service Evaporator has an EPR valve installed to maintain a constant discharge temperature.
- Thermostatic Expansion Valve Location: This device is located on the same side as the refrigeration stub. A Sporlan balanced port expansion valve model is furnished as standard equipment, unless otherwise specified.
- Expansion Valve Adjustment: Expansion valves must be adjusted to fully feed the evaporator. Ensure there is clear or very lightly covered frost, and that the fixture is within 10°F of its expected operating temperature.
- Measuring the Operating Superheat: Determine the suction pressure with an accurate pressure gauge at the evaporator outlet. From the refrigerant pressure temperature chart, determine the saturation temperature at the observed suction pressure. Measure the temperature of the suction gas at the thermostatic remote bulb location. Subtract the saturation temperature obtained in step 3 from the temperature measured in step 4. The superheat is superheat. Set the superheat for 5°F-7°F.
- Evaporator Pressure Regulator: An Evaporator Pressure Regulator is installed in the front of the self-service section to maintain a constant discharge temperature. It is located at the front right side of the case, under the fan plenum near the TX Valve.
- Service Case Temperature Control: Temperature control in the upper section of the R3 with the Service Option is done by means of a thermostat and suction solenoid valve. This controls both temperature and humidity.
- T-STAT Location: T-STATS are located within the electrical raceway. Refer to diagram below.
Electrical
- Wiring Color Code: Standard color codes are used for wiring.
- Case Must Be Grounded: Refer to the label affixed to the case to determine the actual configuration as checked in the "TYPE INSTALLED" boxes.
- Electrical Circuit Identification: Standard lighting for all refrigerated models will be full length fluorescent lamps located within the case at the top. The switch controlling the lights, the plug provided for digital scale, and the thermometer are located at the rear of the case mullion. The receptacle on the exterior back of these models is intended for computerized scales with a five amp maximum load, not for large motors or other high wattage appliances.
- Electrical Service Receptacles (When Applicable): Receptacles are intended for scales and lighter displays. They are not intended for large motors or other external appliances.
- Field Wiring and Serial Plate Amperage: Field wiring must be sized for component amperes print-ed on the serial plate. Actual ampere draw may be less than specified. Field wiring from the refrigeration control panel to the merchandisers is required for refrigeration thermostats. Case amperes are listed on the wiring diagram, but always check the serial plate.
- LED Driver Location: Drivers are located within the access panel that runs the length of the rear of the case.
- Stocking: Improper temperature and lighting will cause serious product loss. Hussmann cases are designed to maintain an item's proper temperature for maximum shelf life. Minimize processing time to avoid damaging temperature rise. Keep the air in and around the case area free of foreign gasses and fumes. Maintain display merchandisers temperature controls. Do not place any product into these refrigerators until all controls have been adjusted and they are operating at the proper temperature. Allow merchandiser to operate a minimum of 6 hours before stocking. Never allow product to extend beyond the recommended load limit. Air discharge and return air flow must be unobstructed. Refrigeration performance will be seriously affected if left open for a prolonged period. Avoid the use of supplemental flood or spot lighting. Display light intensity has been designed for maximum visibility and product life.
- Cleaning Glass and Mirrors: Use a soft cloth and mild glass cleaning solution. Never use hot water on cold glass surfaces.
- Non-glare Glass: Windex® or Glass Plus® are the only solutions recommended. Damage to the glass from improper, caustic solutions is irreparable.
- Plexiglass and Acrylic Care: Improper cleaning only accelerates the cleaning cycle but also degrades the quality of this surface. Normal daily buffing motions can generate static cling attracting dust. Incorrect cleaning agents or cleaning cloths can cause micro-scratching of the surface, causing the plastic to haze over time.
- Cleaning: Hussmann recommends using a clean damp chamois, or a paper towel marketed as dust and abrasive free with 2T® Plastic Cleaner and Polish. Hard water spots or paper towels will scratch the acrylic and should not be used.
- Antistatic Coatings: The 2T® Plastic Cleaner and Polish is very effective in not only cleaning and polishing the Plexiglass surface, but also providing antistatic and anti-fog capabilities. This product also seals pores and provides a protective coating.
- Evaporator Fans: Evaporator fans are located at the center front of these merchandisers directly beneath the display pans. Should fans or blades need servicing, always replace fan blades with the raised embossed side of the blade TOWARD THE MOTOR.
- Copper Coils: The copper coils used in Hussmann merchandisers may be repaired in the field. Materials are available from local refrigeration wholesalers. Hussmann recommends using #15 Sil-Fos for repairs.
- Tips and Troubleshooting: Before calling for service, check the following:
- Check electrical power supply to the equipment.
- Check fixture loading. Overstocking cases will affect its proper operation.
- If frost is collecting on fixture and/or product, check that no outside doors or windows are open – allowing moisture to enter store. These merchandisers are designed to use in stores where temperature & humidity does not exceed 75°F and 55% H.
- Stainless Steel Cleaning and Care: Stainless steel is a basic thing, which can break down your stainless steel's passivity layer and allow corrosion.
- Mechanical Abrasion: Mechanical Abrasion means those things that will scratch the steels surface. Steel Pads, Wire Brushes, and Scrapers are prime examples.
- Water: Water comes out of our tap in varying degrees of hardness. Depending on what part of the country you live in, you may have hard or soft water. Hard water may leave spots. Also, when heated, hard water leaves deposits behind that if left to sit, will break down the passive layer and rust your stainless steel. Other deposits from food preparation and service must be properly removed.
- Chlorides: Chlorides are found nearly everywhere. They are in water, food and table salt. One of the worst perpetrators of chlorides can come from household and industrial cleaners. Don't Despair! Here are a few steps that can help prevent stainless steel rust.
- Use the Proper Tools: When cleaning your stainless steel products, take care to use non-abrasive tools. Soft Clothes and plastic scouring pads will NOT harm the steel's passive layer. Stainless steel pads can also be used but the scrubbing motion must be in the same direction of the manufacturer's polishing marks.
- Clean With the Polish Lines: Some stainless steels come with visible polishing lines or "grain". When visible lines are present, you should ALWAYS scrub in a motion that is parallel to them. When the grain cannot be seen, play it safe and use a soft cloth or plastic scouring pad.
- Use Alkaline, Alkaline Chlorinated or Non-chloride Containing Cleaners: While many traditional cleaners are loaded with chlorides, the industry is providing an ever increasing choice of non-chloride cleaners. If you are not sure of your cleaner's chloride content contact your cleaner supplier. If they tell you that your present cleaner contains chlorides, ask for an alternative. Also, avoid cleaners containing quaternary salts as they also can attack stainless steel & cause pitting and rusting.
- Treat your Water: Though this is not always practical, softening hard water can do much to reduce deposits. There are certain filters that can be installed to remove distasteful and corrosive elements. Salts in a properly maintained water softener are your friends. If you are not sure of the proper water treatment, call a treatment specialist.
- Keep your Food Equipment Clean: Use alkaline, alkaline chlorinated or non-chlorinated cleaners at recommended strength. Clean frequently to avoid build-up of hard, stubborn stains. If you boil water in your stainless steel equipment, remember the single most likely cause of damage is chlorides in the water. Heating cleaners that contain chlorides has a similar effect.
- RINSE, RINSE, RINSE: If chlorinated cleaners are used you must rinse, rinse, rinse and wipe dry immediately. The sooner you wipe off standing water, especially when sit contains cleaning agents, the better. After wiping the equipment down, allow it to air dry for the oxygen helps maintain the stainless steel's passivity film.
- Never Use Hydrochloric Acid (Muriatic Acid) on Stainless Steel
- Regularly Restore/Passivate Stainless Steel
Shelf Weight Limits
Hussmann merchandiser shelves are designed to support a maximum load limit of 250 lb (113.4 kg) for all shelf depths (10 in, 12 in, 14 in, 16 in, 18 in) at 0° tilt. Exceeding these limits can damage the shelf, merchandiser, store products, and create hazardous conditions.
Troubleshooting Guide
A detailed troubleshooting guide is provided for common issues such as:
- Case temperature too warm/cold
- Condensation on glass
- Water in the case
- Case not draining properly
- Frost or ice on evaporator coil
- Large gap visible on bottom of front glass or glass can't be opened
- Large gaps visible in between glass panels or glass rubs against end panel
- Front glass does not stay open and falls closed
- Lights do not come on
For further technical information, please log on to http://www.hussmann.com/products/R3D_R3P_R3TO.htm.
California Proposition 65 Warning
This product may expose you to chemicals known to the State of California to cause cancer and reproductive harm. For more information, visit www.P65Warnings.ca.gov. This warning does not mean Hussmann products violate product-safety standards, but rather complies with California's "right to know" law. Hussmann believes its products are not harmful when used as designed.