HYDAC FILTERTECHNIK GmbH Industriegebiet, D-66280 Sulzbach/Saar
Bearbeitung: Bärbel Schön / Abt.: FFVI / Tel.: 06897/509-784, Fax.: 06897/509-300, E-Mail: baerbel.schoen@hydac.com
E_AFLD882_21 / 19.06.13
3. Changing the Filter Element
3.1 Removing the Filter Element
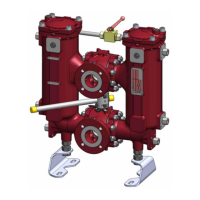
1. Open the ball valve (3.1) of the pressure compensation line (3) in order to
enable pressure equalization between the filter housings. Turn the
change-over lever (2) by 90 degrees the filter is now changed over to
the other side. Close the ball valve (3.1) of the pressure compensation line (3) again.
2. Loosen the air vent screw (A) on the filter side currently not in operation in order to release
the pressure. Open the oil drain port (B) on the filter side currently not in operation and
drain the contaminated oil into a suitable receptacle. (The oil shall not be used for re-filling
unless having been properly filtered/purified first).
3. Open the cover plate screws and lift up the cover.
4. Pull out the filter element (1) by the stirrup (examine the surface of the filter element for
contamination residue and large-sized particles. This may be an indication of damage at
components).
5. Remove filter element.
6. Clean the housing and the cover plate, if necessary.
7. Check the filter for mechanical damage/wear, paying special attention to the sealing
surfaces.
8. Check the O-Rings and if necessary, change them.
3.2 Installing the Filter Element
1. Wet the sealing surfaces on the filter housing and the cover plate including the seals with
clean hydraulic medium.
2. When installing a new filter element check whether the designation of the new filter
element corresponds to that of the old one.
3. Wet the o-rings of the new elements with clean hydraulic fluid.
4. Carefully mount the filter element (1) on the element spigot in the housing (check the
position of the stirrup on the element).
5. Set the cover plate on top and screw in the cover screws by hand; tighten them by
tightening the screws in opposite corners.
6. Close the oil drain port (B).
7. Open the ball valve (3.1) of the filling line (3) and fill the filter side until oil exits the air vent
screw (A).
8. Close the air vent screw (A).
9. Close the ball valve (3.1) of the filling line (3) and check the filter for leakage.
Note:
Filter elements which cannot be cleaned are to be disposed of in an environmentally safe manner
in accordance wirh environmental protection
regulations.