EasyManua.ls Logo

Hydrofarm Autopilot TM01715D User Manual

Hydrofarm Autopilot TM01715D
2 pages
To Next Page IconTo Next Page
Page #1 background imageLoading...
Page #1 background image
www.Hydrofarm.com
INSTRUCTIONS
TM01715D
DUAL OUTLET DIGITAL 7-DAY TIMER
GET STARTED BY PRESSING THE RESET BUTTON
The reset buon is the small round white recessed buon on the right side of the mer face. Use a pointed
object to reach it in order to erase all previous programming.
NOTE: If you nd no display on LCD, please plug mer into power to recharge for 5 minutes, then reset the
mer before seng the programs and current me.
SET THE CLOCK
HOUR: Press the clock button and simultaneously press the HOUR button until you arrive at the correct
hour. (Be aware of AM and PM hours.)
MIN: Again pressing the CLOCK button, simultaneously press the MIN button until you arrive at the
correct minute.
WEEK: Press the clock button and simultaneously press the WEEK button until you arrive at the current
day of the week.
PROGRAM YOUR SETTINGS
Each event is numbered and has a time to come on and a time to go off. You can set 1, 2, or up to 8 different
events using the PROG (program) button.
The PROG display will start at 1 ON. As you keep pressing the button, the display will cycle through all the
events: 1 ON, 1 OFF; 2 ON, 2 OFF; 3 ON, etc. up to 8 OFF.
For each event you must set WEEK, HOUR, MIN and SEC (the ON/AUTO/OFF button sets seconds in PROG
mode).
Question and Answer IconNeed help?

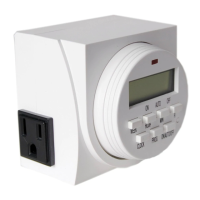
Do you have a question about the Hydrofarm Autopilot TM01715D and is the answer not in the manual?

Hydrofarm Autopilot TM01715D Specifications

General IconGeneral
BrandHydrofarm
ModelAutopilot TM01715D
CategoryTimer
LanguageEnglish

Summary

Get Started with Reset Button

Troubleshooting No Display

Instructions for no display on LCD: plug in for 5 mins, then reset.

Set the Clock

Setting the Hour

Press CLOCK and HOUR buttons together to set the correct hour, noting AM/PM.

Setting the Minute

Press CLOCK and MIN buttons together to set the correct minute.

Setting the Day of the Week

Press CLOCK and WEEK buttons together to set the current day of the week.

Program Your Settings

Using the PROG Button

Cycle through events (1 ON, 1 OFF, etc.) up to 8 using the PROG button.

Setting Event Details

Set WEEK, HOUR, MIN, and SEC for each event; ON/AUTO/OFF button sets seconds.

Select Event Days and Timing

Day Selection Options

Cycle through day combinations (individual, weekdays, weekends, etc.) using WEEK button.

Set Event Time

Use HOUR, MIN, and SEC buttons to set the event's ON or OFF time.

Timer Settings Notes

Sticky/Live Settings

Settings are active immediately and remain until a new setting is chosen.

Using the R Button

Temporarily suspend or inactivate program information for specific events.

Set to Automatic Mode

AUTO Mode Function

Executes programmed events; ON overrides to stay on, OFF overrides to stay off.

Cycling Through Modes

The ON/OFF/AUTO button cycles through ON, AUTO, OFF, and back to AUTO.

Testing Program Schedule

Use an obvious device like a light or fan to easily see programmed changes.

Daylight Savings Mode

Press HOUR and MIN simultaneously to delay settings by one hour.

Random Mode

Press WEEK and HOUR simultaneously for 2-32 min random delays for security.

Related product manuals