,WHP
'HVF
6HULDO
<0/
<0/
')
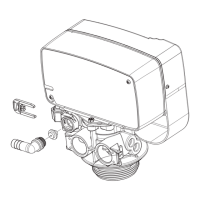
2. Control Valve
Brine
Elbow
Drain Clip
Bypass
Bypass
Cllips X 2
Drain Hose Fitting
Bypass Test Port Clip X 2
CAUTION: Make sure the power cord of the
valve doesnt get caught between the threads
Grease port Orings using brush (not included) or
your finger (Make sure to wear protective gloves)
Product Serial #
1. Tank with Carbon
Media loaded
Spill Cap
D-Tube
D-Tube
3. Parts Kit
Brine line Plug ((used for Filters))
3/4” Elbow
Fitting X 2
1” Straight
Fitting X 2
Bypass Tool
Set of Injectors
Transformer
Grease
Packet
Set of
Washers
Upper Basket/
Strainer
Unscrew Spill Cap
Attach
Upper
Basket
765 Valve Carbon Filter
Quick Set Up Manual
Step 1 – Inspection
Check to make sure you got everything supplied by factory and there is no visible or concealed damage. In case of missing items, please contact customer service immediately
and have the Product Serial # handy. (Product Serial # can be found at the back of the control valve, see below)
The items you will expect are:
1. Tank with Carbon Media loaded
2. Control Valve
3. Parts Kit
Step 2 – Installing Valve to the Tank
Select a Installation location and make sure there
is access to 110V power outlet and drain line. Lube
the bottom Valve Orings with the grease supplied,
Attach the Upper Basket. Unscrew the spill cap.
Carefully Slide the D-Tube inside the Valve and
Screw the Valve inside the Tank such that the power
cord doesnt get caught between the valve and the
tank. Make sure the D-Tube slides inside the valve.