Pressing
the
console release key relocks the keyboard
and
gives
the
computer
an
end-of-I/o
indication. No
record mark is
entered
into core storage
by
pressing
the
release key.
Output
The
typewriter prints
data
from core storage
when
programmed to do so.
When
the right-hand margin
is
reached,
the
carriage returns automatically
and
typ-
ing
continues until a record mark
is
sensed or until
the
release key
is
pressed.
Manual
Adjustments to
Typewriter
(1)
Impression Indicator.
To
determine
the
force
with which the
type
bars strike the paper, posi-
tion
the
lever
under
this window for settings
from 0 to 10.
The
higher
the
indicator setting,
the
harder
the
type
bars strike.
(2)
Tab Clear Lever.
To
clear tab stops, tabulate to
the
point
to
be
cleared
and
press
the
clear lever.
To clear all stops
at
once, position
the
carriage
at
the
right
margin, hold down
the
clear lever,
and
return
the
carriage to the left margin stop.
(3)
Tab Set Lever.
To
set tabular stops, move
the
carriage to
the
desired position and press the
set lever. Set
tab
stops only when the indicator
pointer is in line
with
a white marking on
the
front
paper
scale below it.
(
4)
Carriage Release Lever. Press
the
lever on either
side to free
the
carriage then manually move
the
carriage to
the
right
or
left.
(5)
Paper Release Lever.
To
free the
paper
for posi-
tioning or quick removal, move this lever
forward.
(
6)
Line
Space Lever. Moved to position
1,
2,
or
3,
the
line space lever provides for single, double,
or triple line spacing, respectively.
(
7)
Multiple
Copy
Control. This lever moves
the
platen
backward
to compensate for
the
greater
thickness of additional copies.
As
a general rule
the lever should
be
set
at
"A" for one to three
copies
and
moved
back
one position for each
additional three to five copies.
(8)
Left-Hand
Margin Set.
The
left margin stop
is
set as follows:
l.
Return the carriage to
the
present left mar-
gin stop.
2.
Press
the
margin
set
key.
3.
Manually move the carriage
as
near
as
possible to
the
position desired.
The
back-
space key
and
space
bar
are convenient to
use to obtain the exact position desired,
with
the
margin
set
key depressed.
4.
Release the margin
set
key.
(9)
Right-Hand Margin Set.
The
right margin stop
is
set as follows:
l.
Move
the
carriage to
the
left until stopped
by
the
right
margin stop.
2.
Press
the
margin set key.
3.
Move
the
carriage
right
or left to
the
de-
sired position.
4.
Release
the
margin set key.
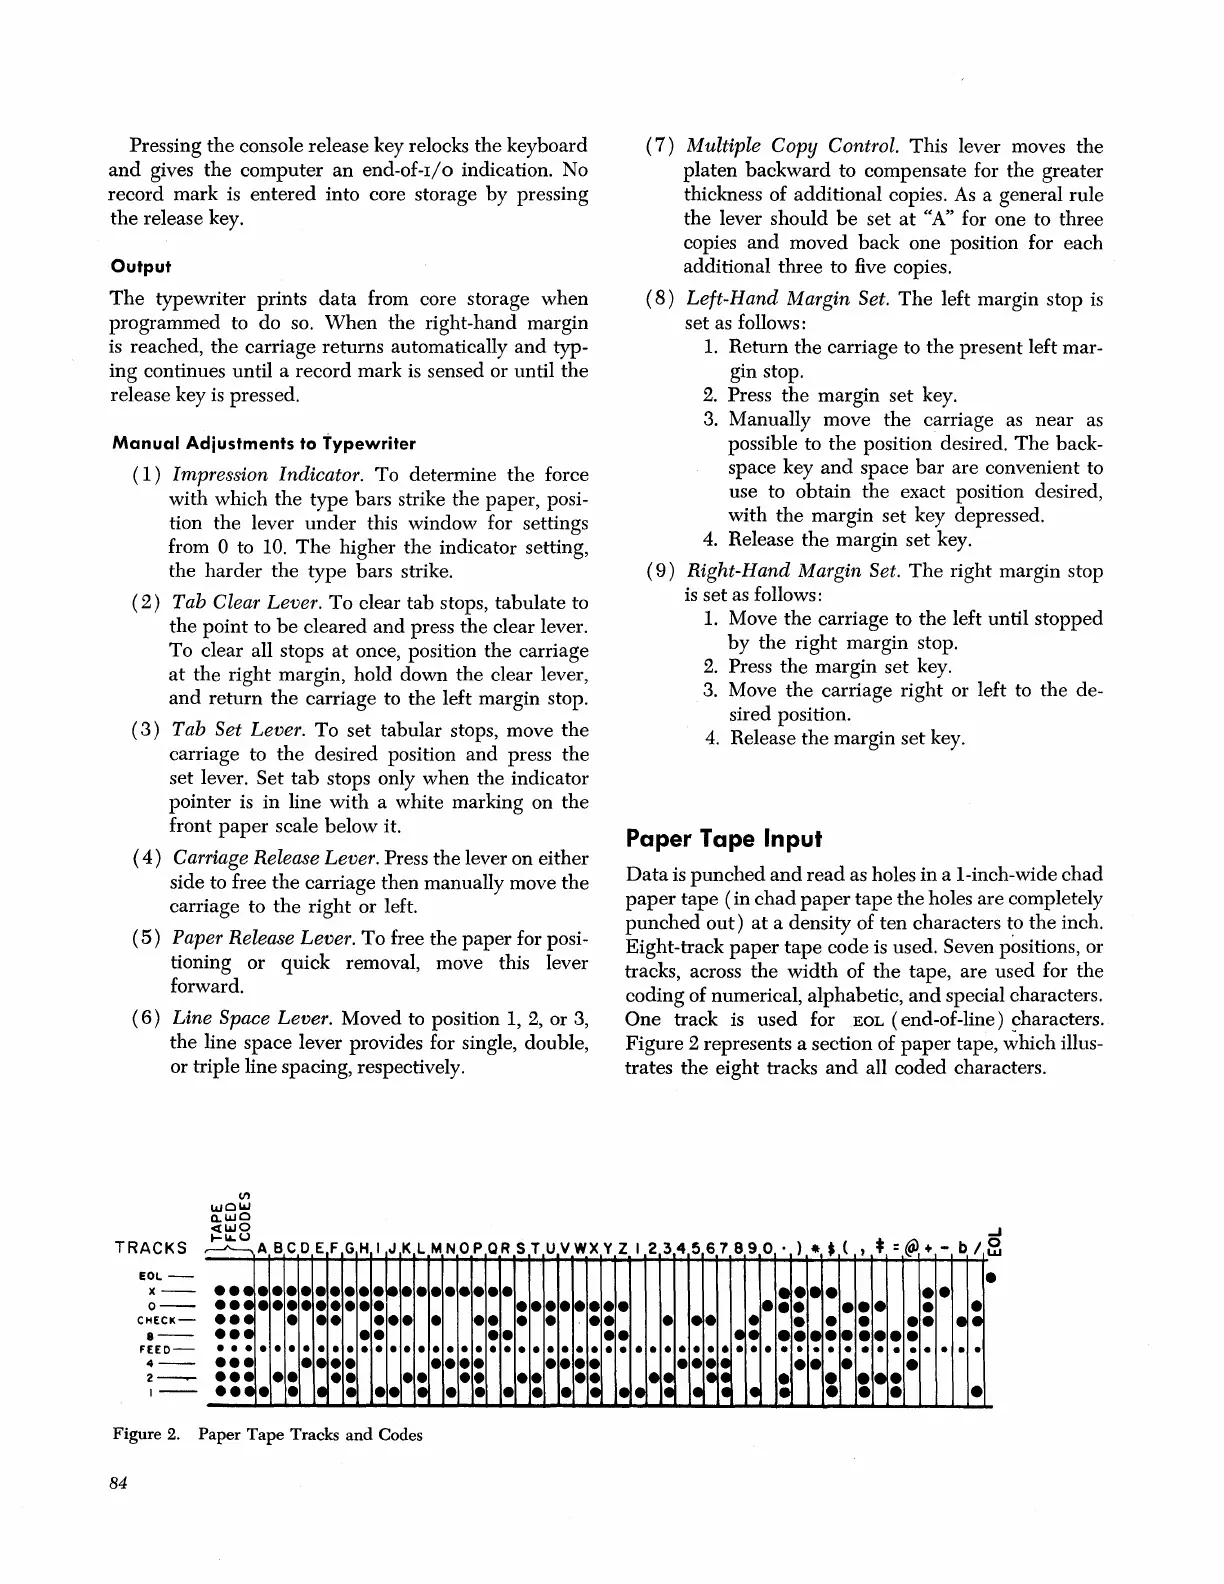
Paper Tape Input
Data
is
punched
and
read
as holes in a 1-inch-wide
chad
paper
tape
(in
chad
paper
tape
the
holes are completely
punched
out)
at
a density of
ten
characters to the inch.
Eight-track
paper
tape
code is used. Seven positions, or
tracks, across the
width
of
the
tape, are used for
the
coding of numerical, alphabetic,
and
special characters.
One
track
is
used for
.EOL
(end-of-line) characters.
Figure
2 represents a section of
paper
tape,
~hich
illus-
trates
the
eight tracks
and
all
coded
characters .
...J
TRACKS
~ABCDEFGHIJKLMNOPQRSTUVWXYZI234567890·
• •
,
:
+ -
b
~
I
EOL-
x--
0--
CHECK-
8--
FEED-
4--
2----
1--
•••
•••
•••
..
-
•••
•••
•••
..
-
••
••
••
••
.~
• •
••
••
••
••
•
•
••
••
•
••
• •
• •
• •
• • • • • •
·1-
••
••
••
••
•
•
,-
•
••
,.
Figure
2.
Paper
Tape
Tracks
and
Codes
84
•• • •
••
••
• •
•
•
••
• •
• • • •
••
••
••
••
••
•
•
• •
•
.i:
-i·
•
• •
••
••
I:·
•
•
••
•
•
•
•
•
I.·
•
•
•
•
••
.1·
••
I-I.
••
I.·
• •
• •
•
• •
• •
• • • •
• •
• •
• •
• •
• • • •
• • • •
••
• • •
• •
••
• •
I:i:
••
•
•
••
I-i:
,:
•
·1··
•
,-
1·1·
,-
I-
,-
•
•
• •