Do you have a question about the Image 5.0 and is the answer not in the manual?
Model and serial number details, customer hot line for assistance, and website information.
Crucial caution to read all instructions before use to prevent injury.
Details on warning decals and how to obtain replacements if missing or illegible.
Essential precautions for safe and proper operation, including user responsibilities and environmental factors.
Recommendation to consult a physician before starting an exercise program, especially for specific demographics.
Thank you message, overview of the IMAGE 5.0 weight bench capabilities, and customer service contact.
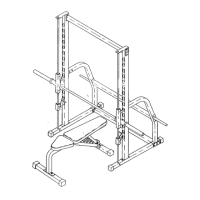
Diagram for familiarizing users with the labeled parts of the weight bench before assembly.
Detailed list of parts and hardware used in assembly, referenced by key numbers.
Guidance on preparing for assembly, listing required tools, and general assembly tips.
Instructions for attaching the right and left uprights to their respective bases.
Attaching the left and right bases to the center base using bolts and locknuts.
Installing the weight carriage onto the center upright and attaching the carriage stop.
Securing the center upright to the center base with bolts, washers, and locknuts.
Attaching safety spotter bumpers and mounting the safety spotter to the center upright.
Installing the right and left weight rests onto their respective uprights.
Connecting the center frame to the left and right uprights using hardware.
Connecting the right and left frames to the center upright and center frame.
Securing the top frame to the right and left frames using bolts and locknuts.
Attaching the pull-up bar to the frames and tightening previous connections.
Installing caps and attaching the back leg to the stabilizer.
Attaching the bench frame to the front leg using bolts, washers, and locknuts.
Mounting the sliding seat frame onto the bench frame after installing caps and bushings.
Connecting the bench frame to the back leg with bolts, washers, and locknuts.
Installing caps on the leg lever and attaching it to the front leg, ensuring pivot action.
Installing caps and attaching the backrest to its frame.
Attaching the support leg to the backrest frame and back leg.
Installing caps and attaching the seat to its frame.
Connecting the seat frame to the backrest frame, allowing for pivoting.
Attaching the power assist legs to the leg lever with bolts and locknuts.
Locating and routing the bench cable through the front leg and attaching it to the leg lever.
Routing the bench cable under a pulley and attaching it to the front leg.
Securing the bench cable to the back leg using a cable clip.
Installing pad tubes and foam pads into the leg lever and front leg.
Routing the high cable through the pulley arm, around a pulley, and securing it.
Wrapping the high cable around an 88mm pulley and attaching it to the left frame.
Wrapping the high cable around a 4 1/2 pulley and attaching it to the U-bracket.
Wrapping the high cable around an 88mm pulley and attaching it to the right frame.
Routing the high cable through the right pulley arm, around a pulley, and securing it.
Attaching the carriage cable to the top frame using hardware.
Wrapping the carriage cable around a 4 1/2 pulley and attaching it to pulley plates.
Wrapping the carriage cable around an 88mm pulley and attaching it inside the top frame.
Wrapping the carriage cable around an 88mm pulley and attaching it between the right and left frames.
Connecting the end of the carriage cable to the welded bolt on the weight carriage.
Laying the low cable inside the center base bracket and attaching a pulley.
Routing the low cable through the center upright and around a pulley on the center base.
Wrapping the low cable around a 4 1/2 pulley and attaching it to pulley plates.
Wrapping the low cable around an 88mm pulley and attaching it to the center base bracket.
Attaching the low cable to the U-bracket with hardware, ensuring proper tension.
Visual diagrams showing the correct routing for all major cables and cable traps.
Instructions for adjusting the backrest to different positions using the knob.
Guidance on setting the height of weight rests and safety spotter for exercises.
How to connect the weight bench to the weight rack for specific exercises.
Instructions for connecting a barbell to the high cable using barbell rings and clips.
Guidance on loading weights onto the weight carriage or barbell and securing them.
How to utilize the power assist legs for assistance during barbell exercises.
Instructions for attaching various accessories like the row bar to the cables.
Procedures for adjusting cable tension if slack occurs after initial use.
Chart detailing bench, weight rest, and safety spotter positions for various exercises.
Information on muscle building, toning, weight loss, and cross-training principles.
Advice on determining workout length, reps, sets, and listening to your body.
Recommended stretching and light exercise routines before and after workouts.
Guidelines for performing exercises with proper form, breathing, and progression.
Recommended rest times between sets for different workout types and practicing form.
Tips for maintaining motivation through workout recording and progress tracking.
Diagram identifying major muscle groups labeled with letters for reference.
Information required when calling customer service to order replacement parts.
Details of the product's 90-day limited warranty, exclusions, and limitations.