Start using your Disc Stakka(s)
Store a new disc
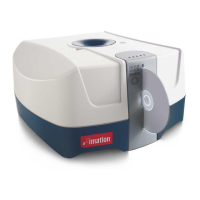
1. Gently place the disc into the Disc Stakka gate. It does not matter which way the disc is facing, The
Disc Stakka grasps the disc and pulls it into the unit.
The OpdiTracker software then asks what you want to do with the inserted disc.
2. Make sure Add the new disc to the OpdiTracker database is selected, and then click OK to record
details about the disc.
3. Type the disc’s name. If you like, edit the disc’s properties.
4. Click OK.
You have now successfully stored the disc.
Locate and eject a disc
1. Open the OpdiTracker Search or OpdiTracker Find window:
• Windows: From the taskbar, right-click the OpdiTracker icon, and then click Search.
• Mac: From the OpdiTracker application window, click the Find toolbar button.
2. Type the text that you want to locate in the OpdiTracker database, for example a disc or file name.
3. If you like, refine your search by selecting the appropriate search options (Windows).
4. Click Search Now (Windows) or Find (Mac). When the search is complete, OpdiTracker displays the
results.
5. Right-click (Windows) or Control-click (Mac) the disc you require, and then click Eject.
You have now successfully ejected the disc.
Returning a disc
1. Gently place your disc into the Disc Stakka gate. It does not matter which way the disc is facing. The
Disc Stakka grasps the disc and pulls it into the unit.
The OpdiTracker software displays a list of discs that are currently ejected.
2. Make sure that Return an existing disc is selected, and then click the name of the disc that you are
returning.
3. Click OK.
You have now successfully returned the disc.