2
Policies, standard documentation, ordering of spare parts and additional product information can be found by:
• Using QR code on your product.
• Visiting our website docs.indesit.eu and parts-selfservice.whirlpool.com
• Alternatively, contact our After-sales Service (See phone number in the warranty booklet). When contacting our After-
sales Service, please state the codes provided on your product‘s identication plate.
The model information can be retrieved using the QR-Code reported in the energy label. The label also includes the model
identier that can be used to consult the portal of the registry at https://eprel.ec.europa.eu.
IEC 436
:
03/2023 ks - Xerox Fabriano
ECO program data is measured under laboratory conditions according to European Standard EN 60436:2020.
Note for Test Laboratories:
For information on comparative EN testing conditions, please send an email to the following address:
dw_test_support@whirlpool.com
Pre-treatment of the dishes is not needed before any of the programs.
*) Not all options can be used simultaneously.
**) Values given for programs other than the program Eco are indicative only. The actual time may vary depending on many factors such as temperature and
pressure of the incoming water, room temperature, amount of detergent, quantity and type of load, load balancing, additional selected options and sensor cali-
bration. The sensor calibration can increase program duration up to 20 min.
PUSH&GO - Push&GO button is an easily distinguishable button that
allows you direct access to the Push&GO program, a wash and dry cycle
that ensures great cleaning performance in a short time. You don’t have to worry
which program to choose, Push&GO cycle will do the work for you.
OPTIONS AND FUNCTIONS
OPTIONS can be selected directly by pressing the corresponding button (see CONTROL PANEL). If an option is not compatible with the selected
program (see PROGRAMS TABLE), the corresponding LED ashes rapidly 3 times and beeps will sound. The option will not be enabled.
Please scan the QR code on your product in order to have more detailed information.
DELAY -The start of the program may be delayed for a period of time
between 1 and 12 hours.
The DELAY function cannot be set once a wash cycle has been started.
TABLET (Tab)- If you use powder or liquid detergent, this option
should be o.
PROBLEMS POSSIBLE CAUSES SOLUTIONS
The dishwasher does
not ll the water.
Display shows: H,
6 and On/O LED is
blinking rapidly
No water in the water supply or the tap is closed.
Make sure there is water in the water supply or the tap running.
The inlet hose is bent.
Make sure the inlet hose is not bent (see INSTALLATION) reprogram the dishwa-
sher and reboot.
The sieve in the water inlet hose is clogged;
it is necessary to clean it
After having carried out the verication and cleaning, turn o and turn on the
dishwasher and restart a new program.
Dishwasher nishes the
cycle prematurely. Display
shows: 15 and On/O
LED is blinking rapidly
Drain hose positioned too low or siphoning
into home sewage system.
Check if end of drain hose is placed at correct height (see INSTALLATION).Check
for siphoning into home sewage system, install air admittance valve if necessary.
Air in water supply. Check water supply for leaks or other issues letting air inside.
In case your dishwasher doesn’t work properly, check if the problem can be solved by going through the following list. For other errors or issues
please contact authorized After-sales Service which contact details can be found in the warranty booklet. Spare parts will be available for a period
of either up to 7 or up to 10 years, according to the specic Regulation requirements.
TROUBLESHOOTING
Please scan the QR code on your product in order to have more detailed information.
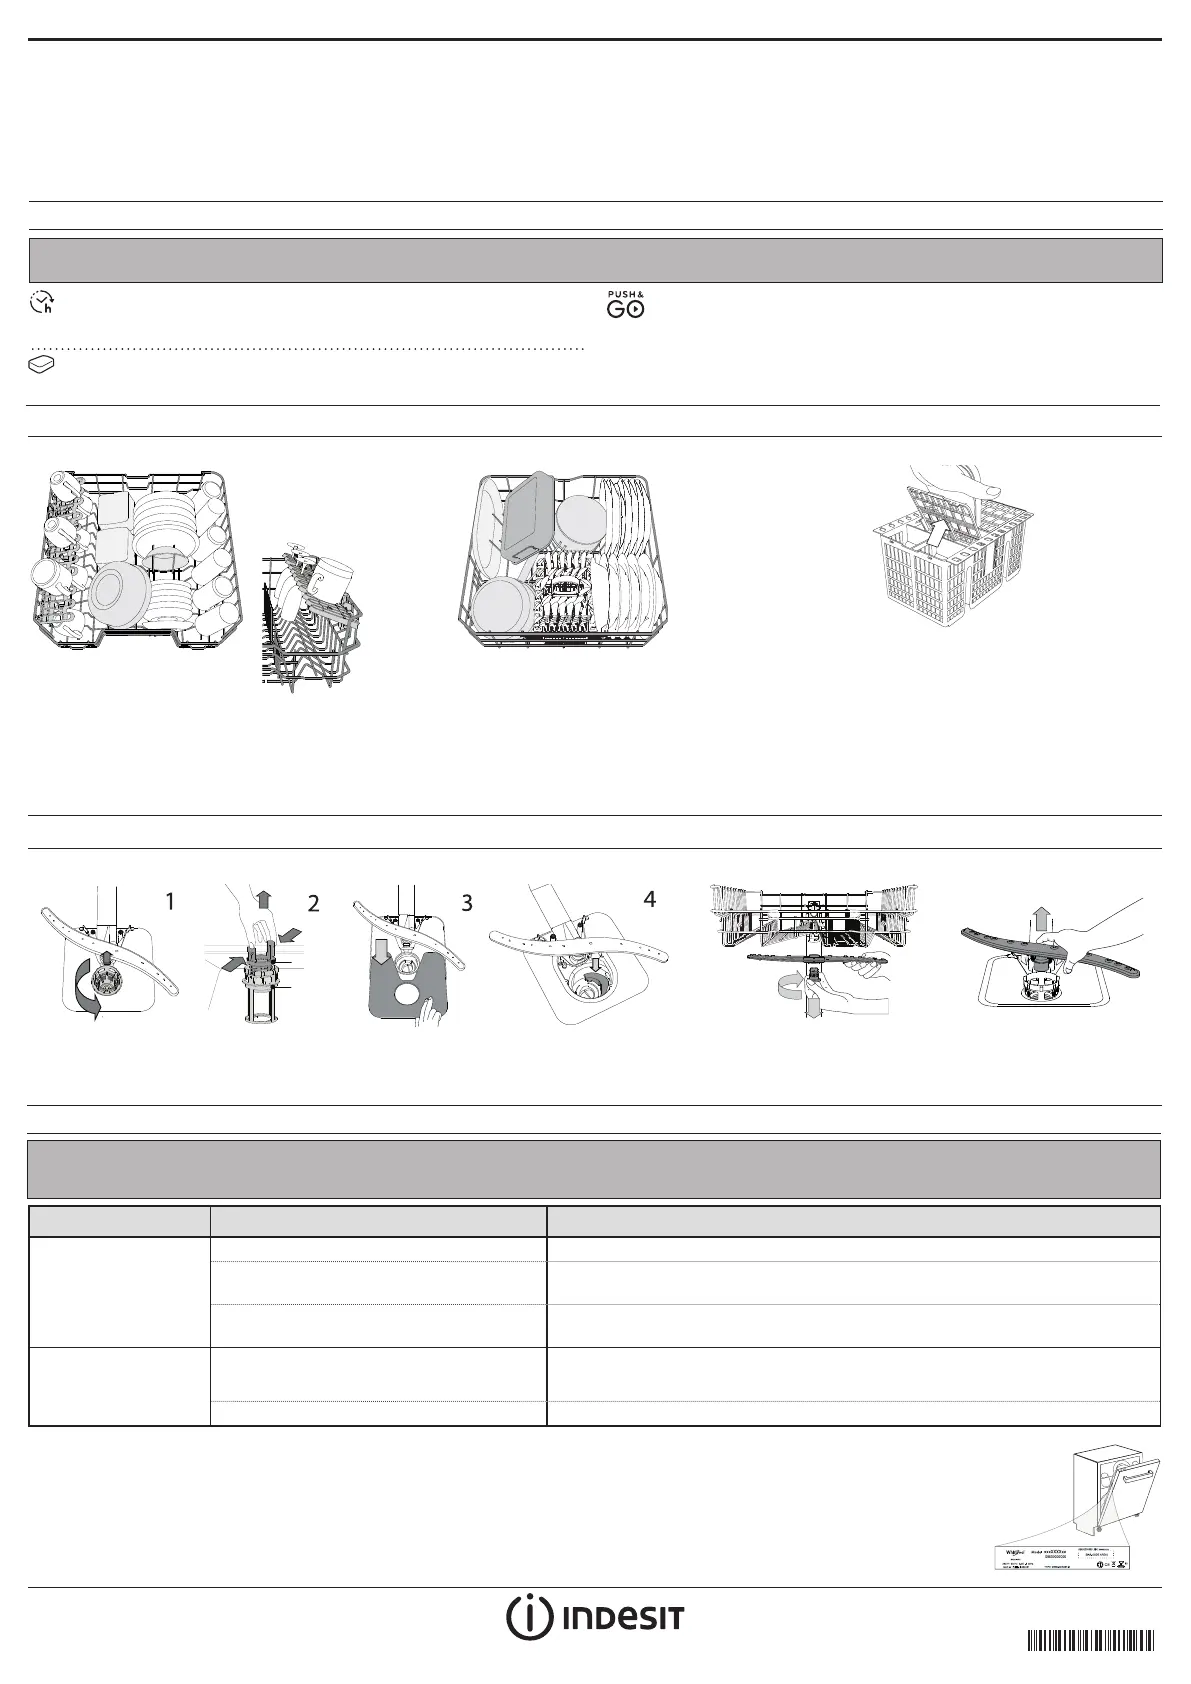
CUTLERY BASKET
The basket is equipped with top
grilles for improved
cutlery arrangement.
The cutlery basket should be
positioned only at the front of the lower rack.
Knives and other utensils with sharp edges must
be placed in the cutlery basket with the points
facing downwards or they must be positioned
horizontally in the tip-up compartments on the
upper rack.
LOADING THE RACKS
CAPACITY: 14 standard place-settings
More information in the Daily Reference Guide on website.
CLEANING AND MAINTENANCE
CLEANING THE FILTER ASSEMBLY CLEANING THE SPRAY ARMS
A
A
B
C
In case you nd foreign objects (such as broken glass, porcelain, bones, fruit seeds
etc.) please remove them carefully.
NEVER REMOVE the wash-cycle pump protection (black detail) (Fig 4).
To remove the upper spray arm,
turn the plastic locking ring in a
clockwise direction.
The lower spray arm may
be removed by pulling it
upwards.
UPPER RACK
(loading example for the
upper rack)
Load delicate and light
dishes: glasses, cups,
saucers, low salad bowls.
LOWER RACK
(loading example for the lower rack)
For pots, lids, plates, salad bowls, cutlery etc..
Large plates and lids should ideally be placed at
the sides to avoid interferences with the spray
arm. The lower rack has tip-up supports which
can be used in a vertical position when arran-
ging plates or in a horizontal position (lower) to
load pans and salad bowls easily.
FOLDABLE
FLAPS WITH
ADJUSTABLE
POSITION