CMF5U
3
The display menu system
The display menu system is divided into two levels, the conguration
level (10-second level) and the basic level.
The conguration level (10-second level)
This level is reached from the Base Display (see the section The
basic level below) by holding the encoder button depressed for 10
seconds. The 10-second level holds all the conguration menus.
Note: The controller must display the Base Display when pressing the
encoder knob to reach the 10-second level.
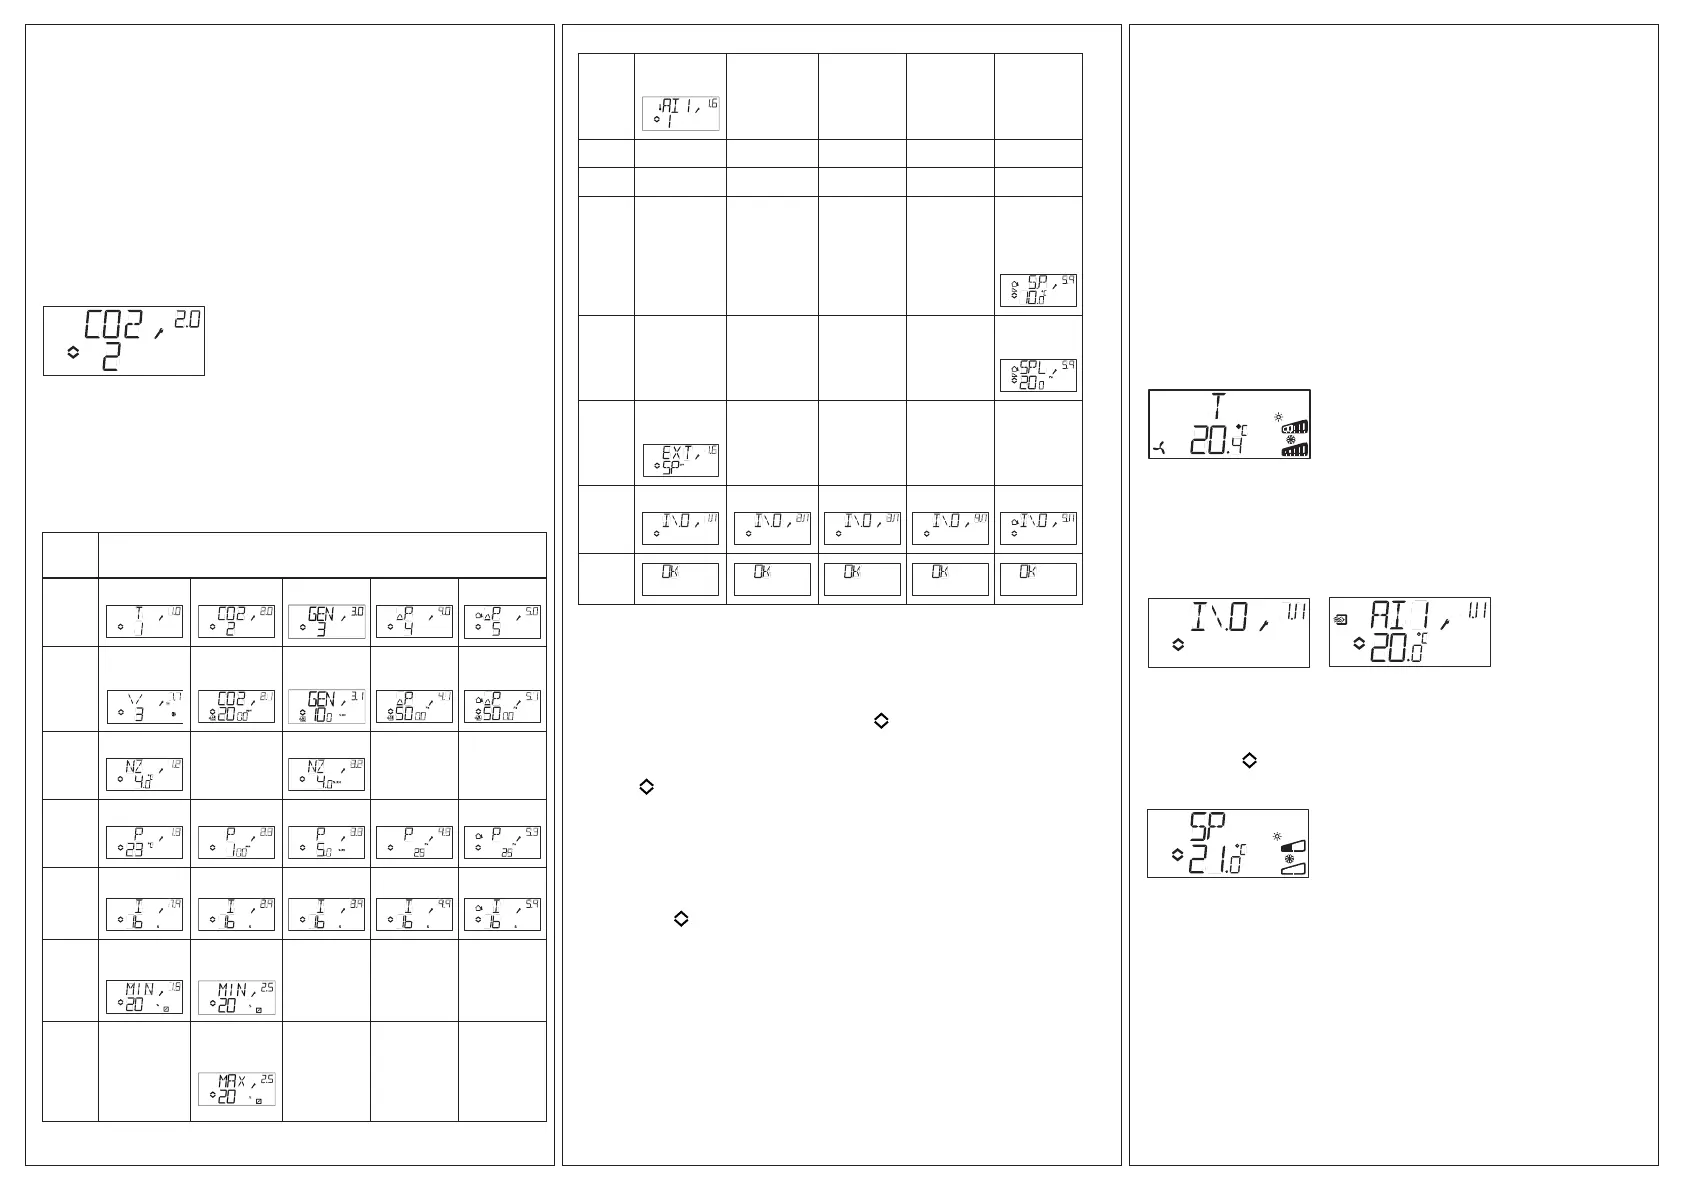
Table 2 below shows how the 10-second level is organised. When
you enter the 10-second level, you will see menu level 0. Here, you
choose the control mode. You navigate through the menus and con-
trol modes by turning and clicking on the encoder knob.
Table 2. Display menus in the 10-second level
Menu
level
Control modes
0
1
2
3
4
5
1
Output
signal
Transmitter
range UI1
Transmitter
range UI1
Transmitter
range UI1
Transmitter
range UI1
2
Neutr. zone
-
Neutr. zone
- -
3
P-band P-band P-band P-band P-band
4
I-time I-time I-time I-time I-time
5a
Damper
min.position
Output min.
limitation
- - -
5b
Output max.
limitation
- - -
6
Tempera-
ture scale
- - - -
7 - - - - -
8 - - - - -
9a - - - -
Startpoint
for outdoor
compen-
sation
9b - - - -
Max. com-
pensation
E
External
setpoint
11
I/O I/O I/O I/O I/O
Choose control mode in menu level 0 by clicking on the knob so the
“Menu holds changeable values” symbol (see the section Display symbols
below) starts ashing, and then turning the knob. When the control mode
you want to choose is displayed, click once more on the knob so that the
symbol “Menu holds changeable values” ( ) stops ashing.
When you have chosen the control mode, you move between the menu
levels by turning the knob when the symbol “Menu holds changeable
values” ( ) is not ashing.
In some cases, making a certain choice in one menu will mean that you
will only see certain other menus.
Example: To set the I-time for control mode 3 (General control), go to
menu 3.4. Click on the encoder knob. The symbol “Menu holds change-
able values” ( ) will start ashing. Change the value by turning the knob
and conrm the change by clicking on the knob.
To exit the 10-second level, go to menu level 12 (Menu OK), and click
on the encoder knob. You will be returned to the basic level (see below).
There is also a time-out function that will automatically exit the congura-
tion level after 5 minutes of inaction.
Storage of settings
All conguration settings become valid as soon as they are entered
by clicking the encoder knob. They are however not written to the
ash memory until you exit the conguration level either via the OK
menu or via the time-out function.
To exit the conguration level without saving the changes to ash
memory, cut the supply voltage when still in the conguration level. All
values will be kept as they were before you entered the conguration
level.
See the “CMF5U Manual” for more information about the
conguration menus in the 10-second level.
The basic level
The Base Display is shown when there is no operator activity.
I/O: By turning the knob counter clockwise when the Base Display is
shown, until the text I/O is displayed, and then clicking on the knob,
you can access a menu where you can look at the values and states
of all the inputs and outputs. To exit this menu, click on the knob and
then turn it clockwise and you will be returned to the Base Display.
Setpoint: When in the Base Display, a click on the encoder button
gives direct access to the Setpoint menu. To change the setpoint,
click on the encoder knob again. The symbol “Menu holds change-
able values” ( ) will start ashing. Change the value by turning the
knob and conrm the change by clicking on the knob.
External setpoint
Starting with revision R18, it is possible to either use an external
PT1000 setpoint device or to set the setpoint value via the display.
External setpoint can only be used for control mode 1 (temperature
control), and then between 0...40°C. For choice of internal or external
setpoint, go to menu 1.E, set EXT SP to ON for external setpoint or
OFF for internal. When using an external setpoint device, you can
only see the current setpoint in the setpoint menu. When using an
external setpoint device, the temperature range should therefore be
set to the lowest area.
 Loading...