Do you have a question about the Ingersoll-Rand SS4L5 and is the answer not in the manual?
Provides safe and reliable instructions for installation, operation, and maintenance of the air compressor.
Details the compressor's suitability for various tools and lists required accessories for specific applications.
Explains measurement units and standards, such as U.S. customary and metric conversions, used in the manual.
Highlights severe risks like carbon monoxide exposure and the unsuitability for breathing air applications.
Covers warnings for hot surfaces, moving parts, fire, explosion, high pressure, and electrical shock.
Specific warnings about high-pressure air, safety valve modifications, bursting risks, and electrical shock.
Guidance on selecting a clean, dry, and well-lighted indoor area with adequate space and accessibility.
Details ideal operating temperatures and precautions for cold or freezing conditions.
Considerations for humid environments and potential issues like sludge formation in the pump.
Advice on managing noise levels and potential solutions like vibration isolators or silencers.
Step-by-step guide for securely mounting the compressor to a solid, flat, and level surface.
Instructions for installing the air inlet filter, emphasizing not operating without it.
Guidelines for installing discharge and condensate piping, including material compatibility.
Requirements for condensate piping, disposal regulations, and proper routing.
Ensuring compatibility of motor rating, power supply, phase, and hertz for safe operation.
Guidance on selecting proper wire size and safety precautions for electrical installation.
Information on fuse ratings, circuit breakers, and a diagram of the wiring schematic.
Crucial instruction to add oil before operation and warnings about lubricant types.
Recommendation for using Ingersoll Rand synthetic compressor lubricant from start-up.
Details on using petroleum-based lubricants and their properties for compressor operation.
Step-by-step guide for filling the compressor crankcase with the correct amount of oil.
Information on continuous duty operation and the impact of lubricant type on usage limits.
Steps for the first-time startup, including pressure switch and service valve setup.
How to start the compressor for subsequent uses after initial setup.
Steps to follow when finishing operation, including bleeding air and draining condensate.
Daily, weekly, and monthly maintenance tasks for optimal performance and longevity.
Instructions for removing, cleaning, and installing a new air filter element.
Steps for draining and refilling the compressor oil, including cleaning the exterior.
Procedures for checking and adjusting belt tension and pulley alignment for optimal performance.
Addresses issues related to abnormal wear of pistons, rings, and cylinders, and their causes.
Diagnoses and resolves problems causing a drop in air delivery, such as leaks or filter issues.
Covers problems with the unit failing to reach or maintain operating speed due to various factors.
Addresses causes and solutions for excessive heat and noise during operation.
Troubleshoots issues with excessive starting and stopping cycles or failure to start.
Identifies and resolves air leaks, check valve failures, and excessive condensate problems.
Addresses causes of excessive oil usage, such as lubricant type or worn components.
Diagnoses and resolves causes of knocking or rattling noises, including belt and bearing issues.
Troubleshoots flickering lights, motor overloads, and starting failures related to electrical systems.
Covers issues related to moisture in the crankcase and the appearance of the lubricant.
Addresses oil pumping issues in the discharge air, caused by lubricant or component wear.
Diagnoses and resolves oil leaks from the shaft seal or crankshaft.
Troubleshoots issues with the safety/relief valve popping or malfunctioning.
Details the warranty periods for equipment and replacement parts.
Specifies conditions and factors excluded from the warranty coverage.
Outlines the extent of the company's liability and disclaims other warranties.
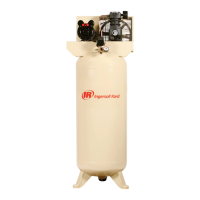
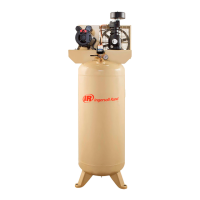
This document is the owner's manual for a Single Stage Reciprocating Air Compressor, Model SS4L5, manufactured by Ingersoll Rand. It provides comprehensive instructions for the installation, operation, and maintenance of the air compressor, ensuring safe and reliable use. The manual is available in English, Spanish, and French, indicating its international applicability.
The Ingersoll Rand Single Stage Reciprocating Air Compressor, Model SS4L5, is designed to generate compressed air for various applications. It is suitable for powering air tools, caulking guns, grease guns, and sandblasters. The compressor's core function involves drawing in ambient air, compressing it in a single stage using a reciprocating pump, and storing the compressed air in a receiver tank for later use. The unit is engineered for continuous duty operation when using synthetic lubricant, and for 60% continuous duty operation with petroleum lubricant. This means it can run for extended periods, providing a consistent supply of compressed air for demanding tasks.
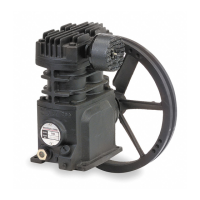
The compressor is equipped with several key components that facilitate its operation. An air inlet filter ensures that the air drawn into the pump is clean, protecting internal components from dust and debris. A pressure switch controls the compressor's operation, automatically starting and stopping the motor to maintain the desired pressure in the receiver tank. A safety/relief valve is a critical safety feature, designed to release excess pressure from the tank if it exceeds a safe limit, preventing potential rupture or explosion. An air outlet service valve allows users to connect air tools and accessories, regulating the flow of compressed air to the application. The unit also includes an oil fill plug and a sight glass for monitoring and maintaining the lubricant level in the crankcase, which is essential for the longevity of the pump. A manual drain valve at the bottom of the receiver tank enables the user to drain accumulated condensate, preventing corrosion and maintaining air quality.
The manual emphasizes the importance of proper installation and setup for safe and efficient operation. Before starting the compressor, users are instructed to ensure adequate lifting equipment is available for unloading and moving the unit, stressing that the compressor should only be lifted by its shipping skid and not by the motor's lifting eye. The installation section details how to select a suitable location, recommending a clean, dry, well-lighted indoor area with sufficient space for cooling airflow and accessibility. It also provides guidelines for operating temperatures, advising against use in extreme cold or heat to prevent damage and ensure optimal performance. For humid environments, the manual offers solutions to prevent moisture buildup, such as increased ventilation or the installation of a crankcase heater kit.
For permanent mounting, the manual provides a step-by-step procedure for securing the compressor to a solid, flat, and level concrete surface using foundation bolts and isolation pads. It explicitly warns against operating the unit on its shipping skid and highlights the importance of installing vibration isolation mounts or pads if included, to prevent mechanical failure and maintain warranty coverage.
Before initial start-up, the manual guides the user through filling the crankcase with the appropriate lubricant and setting the pressure switch to "OFF." It then instructs the user to fully open the service valve and run the unit for 30 minutes to ensure proper lubrication and prevent pressure buildup. After this initial run, the service valve is closed, allowing the tank to fill to cut-out pressure, at which point the motor will stop, indicating the unit is ready for use. For normal start-up, the process is simplified: set the pressure switch to "OFF," close the service valve, attach the hose and accessory, move the pressure switch to "ON/AUTO," allow the tank to fill, and then open the service valve. When finished, users are advised to set the pressure switch to "OFF," close the service valve, remove air tools, slowly bleed air pressure, and drain condensate from the tank.
The manual also addresses the use of accessories, such as air pressure regulators, air line filters, and in-line lubricators, which may be required depending on the specific application. It recommends contacting an authorized dealer for more information on these accessories.
Routine maintenance is crucial for the compressor's longevity and reliable performance, and the manual provides a detailed schedule for daily, weekly, monthly, and periodic checks. Daily or before each operation, users should check the lubricant level and fill as needed, and drain condensate from the receiver tank. Weekly maintenance includes checking for unusual noise and vibration, ensuring beltguards and covers are secure, keeping the area around the compressor clear, and inspecting the air filter element. Monthly tasks involve inspecting for air leaks using soapy water, checking the tightness of screws and bolts, and cleaning the exterior.
Periodic maintenance, typically every 3 months or 500 operating hours (whichever comes first), requires changing the petroleum lubricant while the crankcase is warm. For synthetic lubricant, this interval extends to 12 months or 2000 operating hours. The filter element should also be replaced at these intervals. The manual provides clear instructions for replacing the air filter element, including unscrewing the wing nut, removing the housing, withdrawing the old element, cleaning the element with air or vacuum, and installing a new one.
Oil changes are detailed, instructing users to remove the oil drain plug, allow the lubricant to drain into a suitable container, replace the plug, and then follow the filling procedures outlined in the operation section.
Belt adjustment is another critical maintenance task. The manual explains how to check belt tension by observing the slack side of the belt for a slight bow during operation. For tensioning, it describes loosening motor anchor screws, pushing the motor away from the pump, and retightening the screws. It also provides a more precise method using a tension gauge, specifying deflection in inches and corresponding minimum and maximum tension values. Proper pulley/sheave alignment and belt tension are emphasized to prevent motor overload, excessive vibration, and premature belt or bearing failure.
Finally, the manual includes a section on tank inspection, recommending a certified tank inspection within the first five years of compressor service and emphasizing that tanks not inspected within 10 years must be taken out of service. It warns against modifying or repairing rusted air receiver tanks, stressing that failure to replace them could lead to rupture or explosion. A comprehensive troubleshooting guide is also provided, listing common problems, their possible causes, and corresponding solutions, covering issues such as abnormal piston wear, air delivery drops, unit not coming up to speed, excessive heat, noise, and starting/stopping problems.
| Model | SS4L5 |
|---|---|
| Horsepower | 5 hp |
| Max Pressure | 175 psi |
| Number of Cylinders | 2 |
| Voltage | 230V |
| Pump Type | Cast Iron |
| Phase | 1 |