Do you have a question about the INOKIM QUICK 3 and is the answer not in the manual?
Details the new smartphone application for the scooter and its functions.
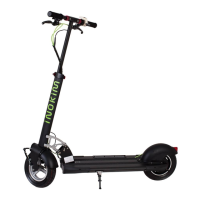
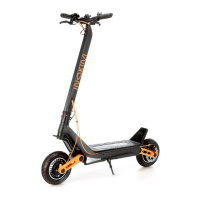
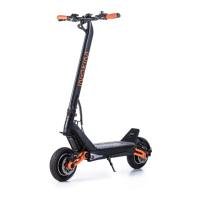
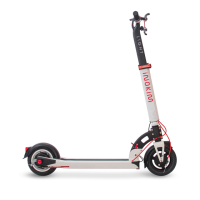
Covers the folding bar system, mechanism, and carry handle for ease of transport.
Highlights the 48V-13Ah Lithium Ion battery and the efficient hub motor.
Describes the 10-inch pneumatic tires, alloy wheels, and braking systems.
Includes reflective headlights, rear reflector with light, and anti-skid grips.
Mentions charger connector and parts removable for maintenance accessibility.
Details the quick folding mechanism and its self-locking release button.
Identifies the Inokim efficient integral brushless hub motor.
Describes the aluminum deck with carry handle and anti-skid grips.
Shows the rear disc brake assembly for stopping power.
Illustrates the location of the battery charger connector.
Shows the maintenance plastic cover, likely for access to components.
Details the throttle with LCD display and its various functions.
Illustrates the front brake lever and rear disc brake lever.
Shows the quick release mechanism for adjusting handlebar height.
Identifies the kickstand for parking the scooter.
Explains why reading the user manual is necessary for proper use and enjoyment.
Notes that moving parts like hinges and brakes require a short adjustment period.
Emphasizes rider responsibility for maintenance to reduce injury risks.
States the company is not liable for incidental or consequential damages from product use.
Advises to ensure the M button is fully inserted into the folding mechanism before riding.
Lists warnings like following laws, avoiding poor visibility, no stunts, and no passengers.
Stresses the importance of recording and keeping the scooter's serial number safe.
Provides instructions on how to find the scooter's unique serial number.
Details lifting the steering bar to release weight before pulling the M button.
Instructs to pull out the M button to initiate the folding/opening process.
Provides critical advice on releasing the M button correctly to avoid damage.
Instructs to firmly unfold and lock the folding mechanism securely.
Details unfolding the T-bar to complete the scooter's opening.
Warns about ensuring the M button is fully inserted for safety and system integrity.
Explains how to unfold and lock the handlebars with the red side rings.
Details opening, adjusting, and locking the quick release for handlebar height.
Guides on opening quick release, sliding, and locking the telescopic steering rod.
Highlights the unique folding mechanism's benefit for carrying, transport, and storage.
Instructs on pulling the M button and folding the steering rod until locked.
Suggests folding the T-bar at any stage for a more compact fold.
Lists important precautions for battery operation, like not operating while charging.
Warns against using a damaged battery and handling its leakage due to injury risks.
Explains how to connect the charger and interpret charging light indicators (Red/Green).
Provides tips to maximize battery performance through optimal charging cycles.
Warns about electrical shock hazards when performing maintenance while plugged in.
Advises against opening or tampering with the battery due to injury and toxic substance risks.
Stresses using only INOKIM-approved tools for charging the battery.
Describes the information displayed on the scooter's LCD screen.
Lists various functions controllable via the throttle, including speed and trip data.
Introduces the '+' button, ON/OFF button, and accelerate thumb button.
Explains how to power the scooter on and off using the throttle button.
Details the automatic shut down feature after a period of inactivity.
Guides on using the thumb throttle for acceleration and controlling speed.
Explains how to select different speed modes for varying riding conditions.
Guides on entering and navigating display modes settings.
Details how to adjust LCD backlight brightness levels.
Explains how to set custom speed limits for the scooter.
Describes how to enable and use cruise control for steady riding.
Explains how to set display units to kilometers or miles.
Details the photocell mode for automatic control of scooter lights.
Explains how to reset the trip distance counter.
Lists other display modes like ODO, battery voltage, and error codes.
Explains cruise control activation, deactivation, and safety implications.
Warns about regional requirements for safety devices and gear.
Specifies the recommended tire air pressure range for optimal performance.
Emphasizes the necessity of wearing a helmet while riding the scooter.
Outlines pre-ride checks for screws, nuts, and wheel rotation.
Advises checking brakes and overall mechanical function before each ride.
Recommends practicing in an open space initially to get familiar with the scooter.
Details the correct foot placement before starting to ride for balance.
Guides on how to accelerate smoothly without falling backward.
Advises against leaning on handlebars during acceleration or deceleration.
Suggests keeping one foot behind the other for improved stability and comfort.
Explains how to turn by mirroring skateboard/snowboard techniques.
Guides on using body weight for effective and safe braking.
Advises adjusting center of gravity to avoid falls during stopping.
Instructions to download the Inokim application from smartphone app stores.
Warns against independent repairs, which void the warranty and may cause damage.
Lists essential tools needed for performing quick maintenance tasks on the scooter.
Emphasizes unplugging and powering off the scooter before starting any repair.
Guides on placing the scooter on a stable surface with wheels in the air.
Details using a 3mm Allen key to open the rear plastic covers.
Explains gently disconnecting all motor connectors attached to wires.
Instructs using a 19mm ring key to disassemble motor nuts.
Advises remembering the order and placement of washers on the motor.
Illustrates opening rear plastic covers with a 3mm Allen key.
Advises sliding covers aligned with body lines, not pulling them.
Warns to align arrows on plugs when reassembling motor connectors to avoid damage.
Shows how to gently unplug the motor connector.
Guides on using a 19mm ring key to open motor wheel nuts.
Shows how to remove the washer from the motor wheel assembly.
Details disassembling nuts and washers from both sides of the motor wheel.
Explains carefully sliding out the motor wheel from the scooter.
Warns against placing the motor on the floor with the rotor touching ground.
Guides on using professional levers to dismount the tire from the wheel rim.
Advises slowly opening the tire using levers, being careful of the motor.
Instructs removing the inner tube to fix or replace it if needed.
Details placing the tire back on the rim using hands and lubricant.
Strictly prohibits using tools for placing the tire back on the rim.
Guides on sliding the motor back and checking washer order on both sides.
Notes to ensure inner washers are correctly in place during reassembly.
Details noting the external washer and its lug in the correct slot.
Explains the safety extension lock entering the slot on the motor hinge.
Guides aligning plastic cover lines with the scooter body lines.
Details sliding the plastic cover, ensuring both corners align.
Explains aligning the plastic cover hole with the body hole and screwing it.
Notes observing the aluminum profile seen through the plastic cover hole.
A message from the designer about the product, its evolution, and user experience.
| Top Speed | 25 km/h |
|---|---|
| Range | 40 km |
| Charging Time | 4-5 hours |
| IP Rating | IPX4 |
| Max Load | 100 kg |
| Tire Size | 8.5 inches |