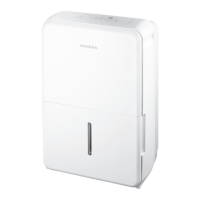
The Insignia 30-, 50-, or 70-Pint White Dehumidifier is designed for reliable and trouble-free performance, effectively removing excess moisture from your environment. This user guide covers models NS-DH30WH9-C, NS-DH50WH9, NS-DH70WH9, NS-DH50WH9-C, and NS-DH70WH9-C.
Function Description
The primary function of this Insignia dehumidifier is to reduce humidity levels in a room, creating a more comfortable and healthier living space. It operates by drawing in moist air, passing it over cooling coils to condense the moisture, and then releasing drier air back into the room. The collected water is stored in a removable bucket or can be continuously drained through a hose.
The dehumidifier features a control panel with several indicators and buttons to manage its operation:
- Full Indicator: Lights up when the water bucket is full and ready to be emptied, at which point the dehumidifier automatically turns off to prevent overflow.
- Defrost Indicator: Illuminates when the auto defrost function is active. This occurs when frost builds up on the evaporator coils, and the compressor temporarily turns off to allow the frost to melt.
- Continuous (Cont.) Button: Activates the continuous dehumidifying operation, allowing the unit to run without stopping based on a set humidity level, ideal for consistently damp environments.
- Turbo Button: Allows you to select either Turbo or normal fan speed. Setting the Turbo control to high provides maximum moisture removal, useful for quickly reducing high humidity levels. You can turn off Turbo once your preferred room humidity is reached.
- Timer Button: Used to set both Power On and Power Off timers, giving you control over when the dehumidifier starts and stops automatically.
- LED Display: Shows the current humidity level (ranging from 30% to 90%), the desired humidity level (set between 35% and 85%), and the auto start/stop time (0-24 hours) when setting the timer.
- Power Button: Turns the dehumidifier on and off.
- Filter Reset Button: Lights up after 250 hours of use to remind you to clean the air filter. Pressing this button after cleaning resets the timer and turns off the indicator.
- ± Buttons: Used to adjust the desired humidity level and to set the Power On and Power Off timers from 0 to 24 hours. Humidity levels can be set in 5% increments.
Usage Features
To ensure optimal performance and safety, proper setup and operation are crucial:
- Placement: Position your dehumidifier on a smooth, level floor, ensuring at least 8 inches (20.3 cm) of space on all sides and 16 inches (40.6 cm) on the side with the air outlet. This allows for proper ventilation and efficient operation. It is most efficient in a closed room but can help dehumidify a larger area with open doors. Avoid placing it near heat sources or in small, confined spaces. The unit should not be used in areas where temperatures fall below 41°F (5°C).
- Power Connection: Plug the dehumidifier's power plug into a grounded power outlet. Do not use extension cords or ungrounded adapters.
- Setting Humidity Level: After turning on the dehumidifier, use the – button for drier air (lower humidity) or the + button for damper air (higher humidity). The humidity level can be set between 35% and 85% in 5% increments.
- Timer Functionality: The dehumidifier offers flexible timer settings for automatic power on and off.
- Power On Timer: Press the Timer button until the "On" LED indicator lights up. Use the ± buttons to select the number of hours (0.5-24) before the dehumidifier automatically turns on. The setting is saved after the LED display returns to its previous state.
- Power Off Timer: Press the Timer button until the "Off" LED indicator lights up. Use the ± buttons to select the number of hours (0.5-24) before the dehumidifier automatically turns off. The setting is saved after the LED display returns to its previous state.
- Note that timer settings are for one-time use and will need to be reset each time. Turning the dehumidifier on or off manually, or setting the timer to 0.0, will cancel the timer function.
- Water Collection and Removal:
- Bucket Collection: When the water bucket is full, the "Full" indicator lights up, and the dehumidifier automatically turns off. Simply remove the bucket, pour out the collected water, and reinsert it. The dehumidifier will automatically restart once the bucket is back in place. If the bucket is removed while the unit is running, the LED display will show "P2," and the dehumidifier will stop.
- Continuous Draining: For continuous operation without needing to empty the bucket, you can attach a drain hose (not included) to the continuous back drain outlet. Remove the plastic cover, screw on the hose, and direct it towards a floor drain. Ensure there are no kinks in the hose to prevent water from stopping.
- Error Codes: The LED display may show specific codes to indicate issues:
- AS: Humidity sensor error. Unplug and replug the unit. If the error persists, contact customer service.
- ES: Evaporator tube temperature sensor error. Unplug and replug the unit. If the error persists, contact customer service.
- P2: Bucket is full or not in the correct position. Empty or correctly place the bucket.
- Eb: Bucket is removed or not in the correct position (for units with pump feature). Replace the bucket in the correct position.
Maintenance Features
Regular maintenance ensures the longevity and efficient operation of your dehumidifier:
- Before Maintenance: Always turn off your dehumidifier and disconnect its plug from the power supply before performing any cleaning or maintenance.
- Cleaning the Grill and Case: Use water and a mild detergent to clean the exterior grill and case. For the air intake, use a vacuum cleaner or a brush. Avoid splashing water directly onto the dehumidifier to prevent electrical shock, insulation deterioration, or rust.
- Cleaning the Bucket: Remove the bucket from the dehumidifier. Fill it with water and a mild detergent, swish the mixture around, then empty and rinse thoroughly. Allow the bucket to air dry or wipe it with a cloth before reinserting it. Clean the bucket every few weeks to prevent mold, mildew, and bacteria growth. Do not use a dishwasher.
- Cleaning the Air Filter: The air filter should be cleaned after 250 hours of use, indicated by the "Filter Reset" LED light.
- Remove the air filter by pulling it outwards.
- Wash the filter with water and let it air dry completely.
- Reinstall the filter and press the Filter Reset button to turn off the LED indicator.
- Caution: Never operate your dehumidifier without a filter, as this can damage the unit.
- Storing Your Dehumidifier: If you plan to store the dehumidifier for an extended period:
- Let it rest for one full day to ensure it is completely air dry.
- Clean the grill, case, bucket, and air filter.
- Wrap the power cord around the power cord buckle.
- Cover the dehumidifier with a plastic bag to protect it from dust.
- Store the unit upright in a dry, well-ventilated area.
This Insignia dehumidifier is designed to be user-friendly and effective in managing your home's humidity, with clear indicators and straightforward maintenance steps to keep it running smoothly.