C
Craig WaltonAug 17, 2025
How to fix no power on my Insignia NS-DRVCR?
- RRonald AndersonAug 17, 2025
If your Insignia DVD VCR Combo has no power, the power cord may be disconnected. Ensure the power cord is securely plugged into the wall outlet.
How to fix no power on my Insignia NS-DRVCR?
If your Insignia DVD VCR Combo has no power, the power cord may be disconnected. Ensure the power cord is securely plugged into the wall outlet.
Why is there no sound on my Insignia NS-DRVCR?
If there is no sound from your Insignia DVD VCR Combo, consider these potential causes: * The equipment connected with the audio cable is not set to receive recorder signal output. Select the correct input mode of the audio receiver. * The audio cables are not connected securely. Connect the audio cable to the jacks securely. * The power of the equipment connected with the audio cable is turned off. Turn on the equipment connected with the audio cable. * The AUDIO options are set to the incorrect position. Set the AUDIO options to the correct position.
What to do if my Insignia NS-DRVCR has no picture?
If you're experiencing an abnormal picture or no picture on your Insignia DVD VCR Combo, here are a few things to check: * Ensure the TV is set to receive the recorder signal output. Select the appropriate video input mode on the TV. * Verify the video cable is securely connected to the jacks. * Confirm that the recorder output setting and the TV resolution capabilities are matched. Check the TV’s capability, the mode of connections (S-Video or components), and the recorder Resolution setting. * Check the connection.
Why is my Insignia NS-DRVCR remote not working?
If the remote control for your Insignia DVD VCR Combo isn't working correctly, try the following: 1. Remove any obstacles between the remote control and the recorder. 2. Replace the batteries in the remote control with new ones. 3. Point the remote control at the remote sensor of the recorder. 4. Operate the remote control within 23ft (7m). 5. When using a VCR, first press the VCR button. When using a DVD, first press the DVD button.
What to do if my Insignia NS-DRVCR won't play?
If your Insignia DVD VCR Combo does not start playback, consider the following: * Ensure a disc or tape is inserted (make sure that the disc or tape indicator in the display window is lit). * Make sure you're using a playable disc (check the disc type and Regional code). * Place the disc with the playback side down. * Place the disc on the disc tray correctly inside the guide. * Clean the disc. * Cancel the Rating function or change the rating level, if it is set.
How to improve playback picture quality on Insignia DVD VCR Combo?
If the playback picture quality is poor on your Insignia DVD VCR Combo, consider these solutions: * Clean the disc. * Check the tuning and carry out tuning again. * Clean the video heads. * If the tape is a rental or was recorded on another VCR, use CH/TRK ( / ) for manual tracking adjustment while the tape is playing.
Why does my Insignia DVD VCR Combo skip channels?
If some channels are skipped when using CH ( / ) on your Insignia DVD VCR Combo, it may be because the skipped channels were deleted with the CH. Add/Del feature. Use the CH. Add/Del feature to restore channels.
How do I display my camcorder image on my Insignia NS-DRVCR DVD VCR Combo?
If the camcorder image is not shown on the TV screen when using your Insignia DVD VCR Combo, the recorder’s source may be set incorrectly. Use INPUT to select the correct input channel (AV1, AV2 or DV IN).
What to do if my Insignia NS-DRVCR DVD VCR Combo won't accept a video tape?
If a video tape cannot be inserted into your Insignia DVD VCR Combo, the cassette compartment may not be empty. Eject the tape.
Why is my camcorder image not showing on my Insignia NS-DRVCR DVD VCR Combo?
If the camcorder image is not shown on your Insignia DVD VCR Combo, the camcorder may be off. Turn the camcorder on and operate it correctly.
Explains the meaning of the symbol that may appear on the TV display during operation.
Lists symbols and their corresponding disc types applicable in the manual.
Details the characteristics of various recordable and playable disc formats.
Explains DVD regional codes and how they affect playback compatibility.
Details limitations and rules for recording video content, including copy protection.
Explains CPRM copy protection for 'copy once' broadcast programs.
Advises on legal guidelines for copying copyrighted material and product technology.
Discusses compatibility and potential issues with progressive scan picture output.
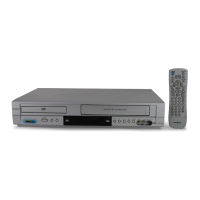
Identifies and describes the buttons and ports on the front panel of the recorder.
Details the various input and output jacks located on the back panel of the recorder.
Instructions for unpacking the recorder and verifying all components are present.
Guidance on connecting the recorder to a power outlet using the supplied polarized cord.
Instructions for connecting the recorder to an antenna or cable TV system.
Connects the recorder's video output to the TV's video input using a video cable.
Connects the recorder's S-VIDEO OUT to the TV's S-VIDEO IN using an S-Video cable.
Connects to TV's component input for high-quality progressive scan video.
Connects the recorder's audio outputs to the TV's audio inputs using audio cables.
Connects the recorder's RF OUT to the TV's antenna input using an RF coaxial cable.
Guides connection to amplifiers for stereo or digital multi-channel audio playback.
Instructions for connecting external components like VCRs or camcorders to the recorder.
Details how to connect a DV camcorder for recording and control.
Instructions on how to replace the AAA batteries in the remote control.
Procedure to set the recorder's RF output channel for TV tuning.
Steps to turn the recorder on and off and initiate the initial setup wizard.
Instructions for loading, playing, and stopping a video cassette tape.
Details specific playback controls for VCR tapes like EJECT and PAUSE.
Instructions for loading, playing, and stopping a DVD or other disc.
Describes playback functions for discs like FORWARD and OPEN/CLOSE.
Details controls like PAUSE, BACKWARD, FORWARD, and SKIP for tape playback.
Explains controls like PLAY MODE, CHAPTER, TITLE, ALL, TRACK, RANDOM, and OFF for disc playback.
Details additional disc playback controls like SKIP, ZOOM, TITLE, DISC MENU/LIST, and SUBTITLE.
Guide to navigating the Home Menu and Setup Menu for customizing recorder settings.
Options for selecting display language, audio formats, and subtitle languages.
Features for setting rating restrictions, passwords, and locking functions.
Settings for recording quality, disc formatting, finalization, and protection.
How to display current status and playback information about the loaded disc.
Instructions for switching between available TV audio signal options.
Details on time search, marker search, camera angle, and 3D surround sound effects.
Steps for playing DivX movie files and displaying DivX subtitles.
Instructions for playing audio CDs and MP3/WMA files, including requirements.
Guide to viewing JPEG image files, including photo file requirements.
Selecting tracks, files, or folders and choosing playback options for audio CDs.
Step-by-step guide to recording a TV program directly.
How to make an easy recording of a preset length without using the program timer.
Instructions for setting up scheduled recordings for up to 16 programs.
Details on recording from TV, including audio selection and stopping recordings.
Procedure to copy content from a DVD to a VHS tape using the DUBBING button.
Steps to copy content from a VHS tape to a DVD using the DUBBING button.
How to record from connected external components like camcorders or VCRs.
Guides connecting a DV-equipped camcorder for audio, video, data, and control signals.
Steps for recording from a digital camcorder connected to the front panel DV IN jack.
Introduction to editing video content using the Title List and Chapter List menus.
Detailed steps for navigating and using the Title List menu for editing and playback.
Explains editing concepts for VR mode DVDs, including titles, chapters, and parts.
Instructions on how to create chapter markers at specific points within a title.
Guide to selecting custom thumbnail pictures for titles in the Title List menu.
Steps for creating new playlists and adding titles or chapters to existing ones.
Procedure for deleting titles or chapters from a DVD, affecting available recording time.
Instructions on how to name original and playlist titles using the keyboard.
How to select a specific start point for playback within a title or chapter.
Function to protect titles from accidental rerecording, editing, or deletion.
Methods for dividing a title into two or hiding chapters/titles to skip them during playback.
Features for combining chapters and overwriting existing video recordings on discs.
Guidance on finalizing discs for playback on different DVD recorders or players.
Instructions for using the universal remote to control your TV, including entering manufacturer codes.
A list of language codes to input for initial settings like Disc Audio and Subtitle.
A list of area codes for selecting region-specific settings.
Guidelines for handling, storing, and cleaning discs to ensure optimal performance.
Instructions on how to reset the recorder to its default settings to resolve operational issues.
Details the product's warranty period, coverage, and claims procedure.
Includes FCC compliance statement and copyright information for the product.
| Brand | Insignia |
|---|---|
| Model | NS-DRVCR |
| Type | DVD VCR Combo |
| DVD Player Type | Standard |
| VCR Formats | VHS |
| Progressive Scan | Yes |
| Remote Control | Yes |
| Playable Media Format | DVD, CD |
| DVD Formats | DVD-R, DVD+R, DVD-RW, DVD+RW |
| Connectivity | Composite video output, S-Video output |
| Output Resolution | 480i, 480p |