The Instant Omni Plus is a versatile countertop appliance designed to function as both a toaster oven and an air fryer, offering a range of cooking capabilities. It aims to provide even and deep cooking results, leveraging rapid air circulation and innovative golden quartz heating elements for quick preheating and faster cooking compared to traditional ovens.
Function Description
The Instant Omni Plus supports a variety of cooking programs, including:
- Air Fry: This program is ideal for achieving crispy results with minimal oil, suitable for deep-fried favorites like fries, cauliflower bites, wings, and nuggets. It utilizes convection cooking to circulate hot air around the food.
- Roast: Designed for vegetable dishes, beef, lamb, pork, and poultry, the Roast function also employs convection cooking to ensure thorough and even roasting.
- Bake: For light and fluffy cakes, pastries, and scalloped potatoes, the Bake program provides consistent heat for baking.
- Toast: This function allows users to toast up to 6 slices of bread or bagel halves at a time without the need for flipping. It offers adjustable toast darkness levels from 1 to 5.
- Broil: The Broil program delivers direct top-down heat, perfect for melting cheese, crisping meat, and caramelizing fruits and vegetables.
- Warm: This setting is designed to keep food warm without overcooking or drying it out, maintaining an optimal temperature for serving.
- Reheat: Quickly and easily reheats leftovers, aiming for a perfect crunch.
- Dehydrate: Ideal for making homemade fruit leather, jerky, dried herbs, and vegetables, this program uses low heat over an extended period to remove moisture from food.
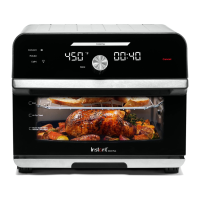
The appliance also features a rotisserie cooking capability, perfect for roasting whole chickens, tenderloins, and other items, ensuring a crispy, golden-all-over finish.
Usage Features
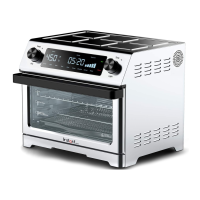
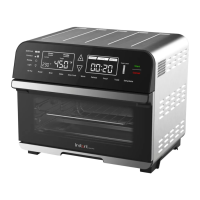
The Instant Omni Plus is operated via a control panel with a central dial and touch-sensitive fields.
- Initial Setup and Test Run: Before first use, a test run is recommended to familiarize users with the appliance's functions. This involves placing the cooking pan, plugging in the unit, waking it with the dial, setting temperature and time, and starting a program. The display shows "OFF" in standby, "On" during preheating, and "OPEN" when the door is open.
- Control Panel Interaction:
- Smart Programs: Users select desired cooking programs like Air Fry, Bake, Roast, Broil, Warm, Reheat, Toast, or Dehydrate.
- Temperature Field: Touch to select and then turn the dial to adjust the cooking temperature (displayed in °C or °F, which can be toggled).
- Time Field: Touch to select and then turn the dial to adjust the cooking time.
- Toast Level: For the Toast program, this field allows selection of darkness levels from 1 to 5.
- Control Dial: Used to toggle through options and confirm selections by pushing it like a button. It also wakes the oven from standby.
- Convect: Toggles between Hi (High) and Lo (Low) convection fan speeds, applicable during Roast, Broil, Bake, Reheat, and Dehydrate.
- Rotate: Activates or deactivates rotisserie mode, applicable during Air Fry, Bake, and Roast. Rotisserie mode automatically turns on when Roast begins.
- Start: Initiates a selected smart program.
- Cancel: Stops a smart program at any time and returns the oven to standby mode.
- Light: Turns the oven light on or off. The light automatically turns off after 1 minute.
- Status Bar: Displays the current cooking status (Preheating, Cooking, Keep Warm).
- On-the-fly Adjustments: During cooking, users can touch the time or temperature fields and turn the dial to adjust settings. Touching "Start" resumes cooking with the new changes, though these changes are not saved to the program's default settings.
- Custom Program Saving: Users can adjust a smart program's time and temperature and then touch "Start" to save these custom settings to the oven's memory.
- Resetting Programs: Individual smart programs can be reset to factory default settings by touching and holding the program key for 3 seconds. All smart programs can be reset by touching and holding "Cancel" for 3 seconds in function selection mode.
- Sound Control: In standby mode, pressing and holding the dial for 3 seconds toggles sounds on ("S On") or off ("SOFF"). Error alerts cannot be silenced.
- Rotisserie Operation:
- Setup: Unscrew setting screws from forks, push food onto the spit, slide forks onto both ends, insert prongs securely into food, and tighten setting screws.
- Positioning: Open the oven door, insert the pointed end of the spit into the rotisserie catch on the right, then lower the square end into the notch on the left.
- Cooking: Select Air Fry, Roast, or Bake, set temperature and time, then touch "Start." Touch "Rotate" to activate rotisserie mode.
- Removal: Open the oven door, position rotisserie lift hooks beneath the spit's arms, lift the left side slightly, move the spit left to remove from the catch, then pull the spit out. Use heat protection to unscrew forks and remove food.
- Cooking Tips:
- Preheating is an important step for Air Fry, Bake, and Roast programs.
- Oven-safe baking dishes can be used for baking.
- For coated foods, an egg wash with breadcrumbs is recommended over liquid batters.
- Spraying food with cooking oil helps seasoning stick.
- Soaking fresh-cut potato sticks in ice water and patting dry before oiling can yield crispier fries.
- Patting dry moist foods prevents excess steam and splatter.
- Monitor oil levels in the cooking pan during air frying to prevent smoke.
- Always place the air fryer basket on the cooking pan when inserting it into the oven.
- Parchment paper is recommended for lining the cooking pan instead of aluminum foil.
Maintenance Features
Regular cleaning and proper storage are essential for the Instant Omni Plus.
- General Cleaning:
- Always unplug the toaster oven and allow it to cool completely before cleaning.
- Avoid harsh chemical detergents, scouring pads, or powders.
- Ensure all surfaces are thoroughly dry before use and storage.
- Dishwasher Safe Parts:
- Cooking Pan: Can be lined with parchment paper or sprayed with non-stick spray for easier cleaning.
- Air Fryer Basket: Best cleaned with a bristled brush rather than a sponge or cloth.
- Oven Rack: Removable for cleaning.
- Rotisserie Spit, Forks, and Screws: Disassemble before cleaning. If machine washing, place small parts in a washable mesh bag.
- Rotisserie Lift: Clean as needed.
- Crumb Tray: Remove for cleaning. Ensure grease and food debris are fully removed to prevent smoking.
- Damp Cloth Only and Mild Dish Soap Parts:
- Cooking Chamber: Regularly check heating coil and walls for oil splatter and food debris. Commercial oven cleaner can be used for stubborn grease. Exercise care when cleaning around heating elements.
- Exterior: Wipe down with a dry cloth after cleaning to prevent streaking.
- Power Cord: Clean as needed. Use the power cord holder at the back of the toaster oven for storage; do not fold the cord.
- Safety Warnings for Cleaning:
- Do not immerse the appliance in water, rinse it under a tap, or wet the power cord prongs to avoid electrical shock.
- Without proper cleaning, food and grease splatter can build up around heating elements, posing a risk of smoke, fire, and personal injury.
- If smoke or smell occurs, touch "Cancel," unplug the appliance, and allow it to cool before cleaning.
- Troubleshooting: The manual provides guidance for common issues such as the oven not turning on, condensation, water dripping, oven light not working, and smoke. It also lists error codes (E1, E2, E3, E6, E7) which indicate a sensor error, advising users to contact Customer Care and not attempt repairs.