Do you have a question about the Instrumentarium Orthopantomograph OP100 D and is the answer not in the manual?
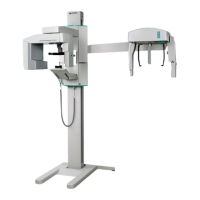
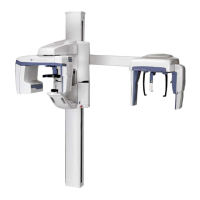
Overview of the OP100 D, its purpose, and related manuals.
Explains symbols and common abbreviations used throughout the manual.
Provides essential safety guidelines and recommendations for radiation protection.
Outlines the conditions under which the manufacturer assumes liability for the unit's operation.
Details available installation models and dimensions for the OP100 D and OC100 D.
Explains how the OP100 D can be operated from either side.
Covers site requirements like patient access area, radiation shielding, and location considerations.
Lists the necessary tools and hardware required for the installation process.
Provides step-by-step instructions for safely unpacking the column unit.
Details the procedure for unpacking the vertical carriage and its accessories.
Describes available installation options like base plate, wall mount short, and remote exposure button.
Instructions for mounting the wall bracket, including height and spacing requirements.
Steps for installing the main column unit, including base plate considerations.
Guidance on moving and mounting the vertical carriage onto the column.
Instructions for removing transportation bolts and securing the rotating unit.
Details the connection of vertical carriage cables, including warnings about voltage connection.
Steps for connecting and installing the control panel.
Instructions for wiring and installing the optional remote exposure button.
Instructions for unpacking the cephalostat head from its protective crate.
Details on fastening the cephalostat support before installing the arm.
Steps for routing cables and assembling the main cephalostat kit components.
Guidance on lifting and attaching the cephalostat assembly to the column.
Procedure for removing the protective cover of the cephalostat head.
Steps for removing transport supports for the ear holder, camera, and collimator.
Instructions for attaching and securing the camera holder onto the cephalostat head.
How to check and adjust the cephalostat arm and head for horizontal position.
Procedures for connecting the unit to the mains power supply, including voltage selection.
Steps for permanently wiring the unit to the branch circuit for mains voltage.
Covers site selection and necessary parts for connecting the PC system.
Instructions for removing and installing the panoramic camera.
Instructions for removing and installing the cephalostat camera.
Procedures for verifying and aligning the panoramic X-ray beam.
How to verify the panoramic image layer using a ball-pin phantom image.
Checks and adjustments for the unit's positioning and alignment lights.
Procedure for checking and adjusting the midsagittal light alignment.
Instructions for checking and adjusting the Frankfort FH light alignment.
Steps for checking and adjusting the layer light alignment.
Guide to adjusting the cephalostat collimator for proper beam path.
Procedure for checking and aligning the cephalostat X-ray beam.
Instructions for adjusting the secondary collimator horizontally and for tilt.
How to perform tests using specific images to verify alignment.
Steps to calibrate detection sensitivity using specific trimmers and exposure settings.
Procedure for calibrating the Automatic Exposure Control (AEC) system.
Instructions for aligning the ear rods for correct patient positioning.
How to adjust the laser light for horizontal alignment through ear rods.
Procedure for calibrating the nasion frequency using a frequency meter.
Steps for fastening the cephalostat head and collimator covers.
How to verify and adjust initial dose settings for optimal image quality and patient dose.
Performing a self-diagnostic image to check system functionality.
Explanation of how Automatic Exposure Control (AEC) signal-to-noise ratio is managed.
Verifying the correct operation of control and positioning panel functions.
Steps to convert the cephalostat unit from right to left-sided operation.
Steps to convert the cephalostat unit from left to right-sided operation.
Instructions to change the panoramic unit layout from right to left-handed.
Steps to reposition the positioning panel for a different unit layout.
Instructions for repositioning the control panel and its holder.
Steps to move the FH light projector for a different unit layout.
Procedure for repositioning the layer light projector.
Instructions to change the panoramic unit layout from left to right-handed.
Repositioning the positioning panel for a right-handed panoramic unit.
Repositioning the control panel and its holder for a right-handed unit.
Moving the FH light projector for a right-handed panoramic unit.
Repositioning the layer light projector for a right-handed panoramic unit.
Overview of repacking procedures for OP100 D and OC100 D units.
General instructions for repacking the OP100 D and OC100 D units.
Detailed steps for repacking the column and base plate components.
Instructions for safely repacking the cephalostat assembly and its accessories.
| Brand | Instrumentarium |
|---|---|
| Model | Orthopantomograph OP100 D |
| Category | Dental equipment |
| Language | English |