Do you have a question about the Intel NUC11ATKPE and is the answer not in the manual?
General safety and setup guidelines before starting installation.
Warnings and precautions to observe during installation.
Instructions on adhering to safety and regulatory compliance.
Step-by-step guide for installing SO-DIMM memory modules.
Step-by-step guide for removing SO-DIMM memory modules.
Step-by-step guide for installing an 80mm M.2 SSD.
Step-by-step guide for installing a 42mm M.2 SSD.
This document serves as a User Guide for the Intel® NUC Kit models NUC11ATKPE, NUC11ATKC4, and NUC11ATKC2, providing comprehensive instructions for their installation, configuration, and maintenance. The guide emphasizes safety precautions and regulatory compliance throughout the process, ensuring users can safely and effectively set up their Intel NUC.
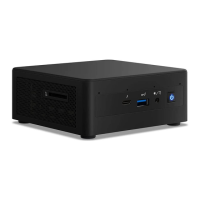
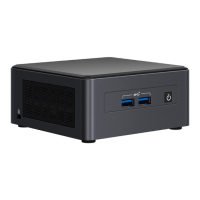
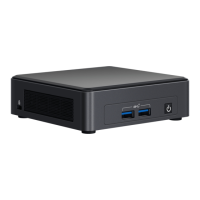
The Intel NUC Kit is a compact computing device designed for various applications, from home entertainment to office productivity. Its small form factor allows for flexible placement, including mounting behind a monitor or TV using an optional VESA bracket. The device supports essential components such as system memory and M.2 SSDs, which users can install or upgrade to customize their NUC's performance and storage capacity.
The Intel NUC Kit offers a user-friendly experience for assembly and initial setup. The process begins with opening the chassis, which involves unscrewing four corner screws on the bottom cover. This straightforward access allows users to install internal components.
For system memory, the NUC Kits NUC11ATKPE, NUC11ATKC4, and NUC11ATKC2 feature two 260-pin DDR4 SO-DIMM memory slots. Users can install one or two SO-DIMMs, with a recommendation to install a single SO-DIMM in the lower socket if only one is used. The installation process involves aligning the SO-DIMM's notch with the socket's key, inserting the module, and gently pushing down until the retaining clips snap into place. Removing SO-DIMMs follows a similar procedure, requiring users to spread the retaining clips to release the module.
Storage expansion is facilitated by support for both 80mm and 42mm M.2 SSDs. Installing an M.2 SSD involves removing a small silver screw from the metal standoff on the motherboard, aligning the M.2 card's notch with the connector's key, inserting the card, and securing it with the screw. For 42mm SSDs, the standoff needs to be moved from the 80mm to the 42mm position before securing the card.
Once internal components are installed, the chassis can be closed. Intel recommends hand-tightening the screws with a screwdriver to prevent over-tightening and potential damage.
An optional VESA bracket enhances the NUC's versatility, allowing it to be mounted on the back of a monitor or TV. The installation of the VESA bracket involves attaching it to the display using four small black screws provided in the box. Subsequently, two slightly larger black screws are attached to the bottom chassis cover of the Intel NUC. Finally, the Intel NUC slides onto the VESA mount bracket, securing it in place.
Connecting power to the Intel NUC involves selecting the appropriate country-specific power plug attachment, which may be included in the box. Users then connect the AC power cord to the device. Some models may not include a power cord, requiring users to purchase one separately. The power adapter typically uses a C5 type connector.
After the hardware setup, installing an operating system is the next step. The guide refers users to external resources for lists of Intel-validated Windows* operating systems and compatible Linux* versions. It also directs users to specific installation guides for detailed instructions on operating system setup.
Finally, keeping the device drivers and software up-to-date is crucial for optimal performance and stability. Users have two primary options: utilizing the Intel® Driver & Support Assistant (Intel® DSA) for automatic detection and updates, or manually downloading drivers, BIOS, and software from the Intel Download Center. Available drivers include those for Chipset Device Software, HD Graphics, Management Engine, Realtek* Ethernet, Intel® Wireless, Intel® Bluetooth, Intel® GNA Scoring Accelerator, Intel® Serial IO, and Realtek* High-Definition Audio.
The User Guide emphasizes several key maintenance practices to ensure the longevity and safe operation of the Intel NUC Kit. Before beginning any installation or modification, users are instructed to observe general precautions. This includes familiarizing oneself with computer terminology and safety practices, as well as regulatory compliance requirements.
A critical safety step before opening the computer or performing any procedures is to disconnect it from its power source and any network. Failure to do so can lead to personal injury or equipment damage, as some circuitry on the board may remain active even when the front panel power button is off.
To prevent damage from electrostatic discharge (ESD), users are advised to perform procedures at an ESD workstation, utilizing an antistatic wrist strap and a conductive foam pad. If a dedicated workstation is unavailable, wearing an antistatic wrist strap and attaching it to a metal part of the computer chassis can provide some ESD protection.
The guide also highlights the importance of following steps in the correct order and creating a log to record information about the computer, such as model, serial numbers, installed options, and configuration details. This documentation can be invaluable for troubleshooting or future upgrades.
When handling the internal components, users are cautioned about potential physical hazards, including sharp pins on connectors and circuit boards, rough edges and sharp corners on the chassis, and hot components such as SSDs, processors, voltage regulators, and heat sinks. Care must also be taken to avoid damaging wires, which could cause a short circuit. The guide stresses that all warnings and cautions instructing users to refer computer servicing to qualified technical personnel should be observed.
Regular updates of device drivers and software are presented as a maintenance feature. By keeping drivers current, users can ensure their Intel NUC operates with the latest performance enhancements, bug fixes, and security updates. This can be done conveniently through the Intel® Driver & Support Assistant or by manually downloading updates from the Intel Download Center. This proactive approach to software maintenance helps prevent compatibility issues and maintains system stability over time.
| Product Type | Mini PC |
|---|---|
| Processor | Intel Celeron N5105 |
| Processor Cores | 4 |
| Processor Threads | 4 |
| Processor Base Frequency | 2.0 GHz |
| Processor Max Turbo Frequency | 2.9 GHz |
| Number of Memory Slots | 2 |
| Maximum Memory Supported | 32 GB |
| Graphics | Intel UHD Graphics |
| Graphics Max Dynamic Frequency | 800 MHz |
| Video Output | HDMI 2.0b, DisplayPort 1.4 |
| Wireless | Intel Wi-Fi 6 AX201 |
| Bluetooth | Bluetooth 5.2 |
| Dimensions | 117 x 112 x 51 mm |
| Operating System Support | Windows 10, Linux |
| Memory Type | DDR4 |
| Storage | M.2 and 2.5" SATA Drive |
| Ethernet | Gigabit Ethernet |
| Audio | 3.5mm front audio jack, 3.5mm rear audio jack |
| M.2 Slots | 1 x M.2 2242/2280 (PCIe NVMe/SATA) |
| SATA Ports | 1 x SATA III |
| Included Accessories | VESA Mount |
| Power Supply | 65W |
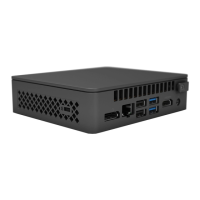
| Ports | USB, HDMI, Ethernet, Audio |