2 – DP6004 Intellitronix rev.04/10/20) www.intellitronix.com
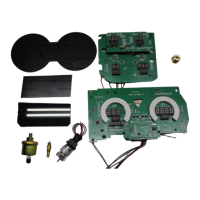
Assembly Drawing for Gauge Boards
DASH PANEL INSTALLATION INSTRUCTIONS
1. Remove all the gauges from the stock bezel and housing. Place the new circuit board into
the stock gauge housing. Secure into place with stock hardware.
2. Cut the two screw mounting posts (some models have three) back one inch on the
instrument side of the housing. Align the instrument circuit board with the housing and screw it
into place by utilizing the acrylic washers and two (2) stock screws.
3. Follow the wiring instructions in the next section and wire the circuit boards. At this point
you can utilize the wires from your existing harness or run separate wires to the senders.
4. Place the black factory gauge bezel over the top of the new digital circuit boards. Lay the
corresponding smoked acrylic lenses over top and cover with the clear stock lens. Mount the
back onto the housing with the existing stock screws and the corresponding screw holes.