Features
• Automatic or manual
operation. Push
ON/OFF
button to switch the
plugged in light(s) on or
off at any time.
• Program up to 14 on/off
time pairs per day
(maximum 98 automatic switch settings).
• Minimum setting interval 1 minute.
• A setting can be for a particular day of the week,
every day, only weekdays, only weekends, or every
day but Sunday.
• Random feature turns the times on/off within 15
minutes of each program setting.
• Batteries (AA alkaline) save the time and program
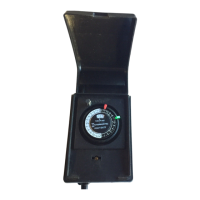
HB77 Programmable
Outdoor Timer
Installation and
Operating
Instructions
settings when the unit is
unplugged or there is a power
outage.
• Controls any 120VAC load up
to 15 amps.
Introduction
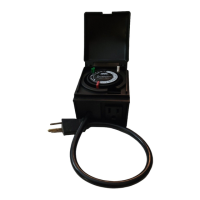
To activate batteries, remove battery
cover and pull plastic tab.
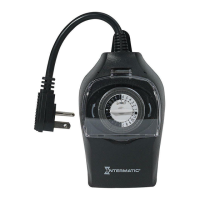
Simply plug the cord from the timer into
an electrical outlet (1), then plug your
incandescent lights into timer
(2).
The HB77 is then your programmable
timer
, random timer, countdown timer and
manual switch.
LOAD MAINTENANCE
WARNING DO NOT USE THE TIMER TO TURN OFF
POWER FOR MAINTENANCE (repairs, removing
broken bulbs, etc.). ALWAYS TURN POWER OFF AT
THE SERVICE PANEL BY REMOVING A FUSE OR
CIRCUIT BREAKER BEFORE DOING ANY CIRCUIT
REPAIRS.
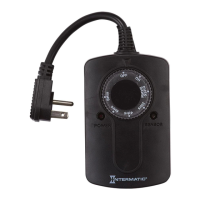
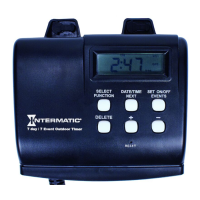
Controls
1. Display - lcd display
(reset display shown).
2. On light - red led is lit
when the HB77 is on.
3. RESET button - push
the RESET button with a
ball point pen to clear all
programming and the
clock.
4. TIME SET button -
push and hold to set the clock in On, Auto or Off modes.
5. ON/OFF button - push and release to manually switch
on or off at any time.
6. DAY button - use during time set to set the day of the
week, use during programming to set the day, weekend,
etc. setting.
7. HOUR button - use during time set or programming to
set the hour.
8. MIN button - use during time set or programming to set
the minute.
9. DS button - push and hold for a couple of seconds to
switch to or from daylight savings time.
10. PROG button - push and release to set or change
programmed on and off times.
11. MODE button - push and release to choose the
mode.
Displays
1. Daylight
savings symbol
indicates daylight
savings time
when present.
2. AM/PM
3. MO TU . . .
Day of the week.
4. 03:12 – Time.
5. On/Off display
On display. Usually displayed when On light is lit
and timer is on, during programming indicates an on
time is being programmed.
Of
f display (Usually
displayed when On light is off
and timer is off, during
programming indicates an off
time is being programmed.)
6. Program number – (1- 14)
7. Mode – Countdown Timer, Off, Auto, On, or Rand.
See Modes, next page, for specific mode displays.
1
2
4
How to set the
clock:
1. The mode must be On, Auto, or Off.
2. The plugged in light(s) can be on or off.
Note: If it is daylight savings time, push and hold DS
for a couple of seconds so the daylight savings symbol
appears.
If it is not daylight savings time, push and hold DS for a
couple of seconds so the daylight savings symbol is
off.
3. Push and hold TIME SET.
4. The blinking colon stays on (stops blinking).
While holding TIME SET:
a. Push and release DAY to change the day of
week.
b. Push and release HOUR to change the hour and
AM/PM.
c. Push and release MIN to change the minute.
Notes:
if you push and hold DAY, HOUR or MIN the display
changes quickly.
Seconds are set to 0 when the TIME SET button is
released if either the HOUR or MIN have been set.
Daylight Savings Time
In Off, Auto, or On mode,
push and hold DS for a
couple of seconds to switch
daylight savings time on or
off. The daylight savings
(S) symbol switches on or off and the time switches
one hour in the appropriate direction.