14
3 AFTER USE
3.1 CLEANING
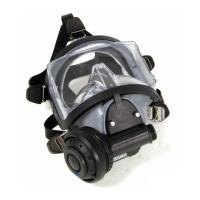
1. Remove the blank cover/microphone by unscrewing the two hand screws.[Fig. 14]
2. Remove the breathing valve by turning it clockwise. [Fig. 13]
3. Pressurize the apparatus.
4. Rinse the full face mask and the breathing valve in clean water. If the equipment is
very dirty, use a brush and a neutral cleaning agent.
CAUTION! MAKE SURE THAT ANY RESIDUES FROM THE CLEANING AGENT ARE FULLY REMOVED FROM THE
FULL FACE MASK / MOUTHPIECE.
5. Use the purge button to blow air through the breathing valve in order to remove
any water and dirt. Repeat a few times until the valve is clean and dry.
CAUTION! ALWAYS WEAR EAR END EYE PROTECTION TO PROTECT AGAINST HIGH NOISE LEVELS AND DUST
WHEN BLOWING AIR FROM CYLINDERS.
6. Close the pressure supply.
7. Press the purge button on the breathing valve to vent the apparatus.
8. Allow all parts to dry completely.
3.2 EXTENDED CLEANING / DISINFECTION
Interspiro recommends that full face masks and breathing valves used by more than
one person are cleaned and disinfected after each use.
CAUTION! MAKE SURE NOT TO MIX PARTS FROM DIFFERENT BREATHING VALVES WITH EACH OTHER. THE
BREATHING VALVE MUST BE ASSEMBLED USING THE SAME PARTS AFTER EXTENDED CLEANING / DISINFECTION.
1. Perform cleaning in accordance with point 1-4, in section 3.1.
2. Turn the locking ring counterclockwise and remove it. Remove the exhalation unit
[Fig. 15]
3. Press on the threads on the cover and remove the diaphragm assembly. [Fig. 16]
4. Disassemble the diaphragm assembly. [Fig. 17]
5. Lift the sealing spring with guide disc out of the cover.
6. Remove the locking nut. Use a nut spanner wrench (tool #95992-51) if needed.
7. Remove the valve insert. [Fig. 18]. Carefully wipe the valve insert with a soft cloth.
8. Remove the breathing valve from the breathing hose.
9. Clean / disinfect all the parts seen on the image. [Fig. 19]
CAUTION! HOLD A THUMB ON THE NON-RETURN VALVE IN THE BREATHING VALVE TO KEEP IT IN PLACE
DURING WASHING.
WARNING! THE VALVE INSERT ASSEMBLY SHALL NOT BE WASHED WITH WATER! IF THE VALVE INSERT
ASSEMBLY HAS BECOME MOIST IT MUST BE THOROUGHLY DRIED, OTHERWISE IT MAY FREEZE.