Do you have a question about the Iris Ohyama RNS-300 and is the answer not in the manual?
Periodically clean dust from the power plug. Insert plug thoroughly. Unplug before repair/moving.
Avoid damaging, bending, stretching, or twisting the power cord. Do not use damaged cords/plugs.
Avoid spraying liquids, vacuuming flammable substances, oil, steam, or dry dust. Avoid combustible areas.
Stop machine, turn off power, unplug immediately. Contact call center for repairs or abnormalities.
Do not disassemble or repair the machine yourself. Contact the store or call center for repairs.
Avoid using the machine in wet locations or immersing it in water to prevent fire or electric shock.
Prohibits vacuuming infectious waste to prevent disease spread.
Warning against operating the machine without the collecting tank installed.
Use the machine only for its intended cleaning purpose to avoid malfunction or fire.
Do not climb or lean on the machine, keep away from children to prevent injury.
Avoid placing the machine near flammable items or heat sources to prevent fire.
Do not operate with a clogged inlet port to prevent machine malfunction.
Stop the machine if the nozzle or hose is clogged to prevent damage.
Instructions on how to unplug the power plug safely, holding the plug, not the cord.
Use only clean tap water or alkaline ionized water under 40°C in the water tank.
Do not rinse art works, silk, fur, leather, wood furniture, or vulnerable surfaces.
Do not tilt or drop the machine when filled with water to prevent spills.
Stop the machine and drain waste water if foam accumulates in the collecting tank.
Use low foaming detergent diluted 20/1 with water. Test for colorfastness.
Machine may stop on deep pile carpet due to exhaust port clogging.
Do not vacuum dry dust, large volumes of powder, sand, sharp objects, plastic bags, or stockings.
Do not vacuum dry dust. Drain water in cold regions. Remove stuck substances from hose.
Ensure filters are correctly installed before use. Replace if broken or lost.
Device prevents overheating. Machine may not turn on immediately after exhaust outlet is closed.
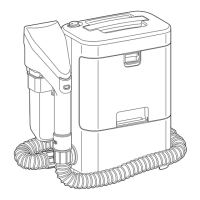
Identifies components of the main body: power switch, handle, cord hook, collecting tank, etc.
Lists included accessories: hand tool, vacuum hose, cord hook, cuffs, holder, and hose hook.
Fit the holder, hose hook, and cord hook to the main body of the machine.
Add tap water (approx. 300mL) to the clean water tank. Ensure cap is closed.
Insert the vacuum hose into the connection port and turn the cuff clockwise to lock.
Attach the hand tool to the opposite end of the vacuum hose and lock the cuff.
Hold the hand tool and squeeze the spray lever several times with the nozzle pointing down.
Fix the hand tool to its holder and the vacuum hose to the hose hook for moving.
Do not leave the hand tool hooked on the holder after use to prevent waste water dripping.
Turn power switch to OFF before inserting the power plug into the socket.
Turn the power switch to 'I (ON)' to start the machine.
Squeeze spray lever to vacuum water. Pull hand tool towards you, keep inlet port horizontal.
Pull hand tool towards yourself, place inlet port horizontal to vacuum remaining water.
Turn the power switch to 'O (OFF)' to stop the machine.
Turn power switch OFF, then unplug the power plug from the socket, holding the plug firmly.
Store the machine with empty tanks and removed hand tool. Perform maintenance before storing.
Do not put detergent in clean water tank. Test on fabric edge. Avoid solvents.
Use strong alkaline ionized water, baking soda, citric acid, or hypochlorous acid.
Avoid neutral kitchen detergent, strong alkaline or strong acid detergent.
Apply correct volume of detergent to carpet and scrub with the hand tool's cleaning brush.
Use tap water, hot water (40°C) is effective. Vacuum thoroughly to remove detergent residue.
Stop machine immediately if foam accumulates above the full water mark in the collecting tank.
Turn the power switch to 'O (OFF)' before draining waste water.
Release latches and pull the collecting tank towards you to remove it.
Remove the drain cap at the back of the collecting tank to drain waste water.
Rinse the tank with tap water by pouring water from the inlet at the back.
Close the drain cap securely and attach the collecting tank to the body until it clicks.
Remove the vacuum hose from the hand tool by turning it counterclockwise.
Open the clean water tank cap and drain water by pointing the inlet port down.
Conduct maintenance after stopping operation and unplugging. Do not wet the body. Avoid chemicals.
Wipe the body with a damp cloth. Use diluted kitchen detergent for stubborn dirt.
Clean accessories with water after use and dry thoroughly. Clean nozzle if anything is stuck.
Instructions on how to remove and install the transparent cover on the hand tool.
Clean the vacuum filter with water and dry in an airy, shady place before refitting.
Check the vacuum hose for holes. Clean or replace the vacuum filter if stuck.
Drain water, store in a dry place, and avoid temperatures below freezing.
Check power plug connection, frayed wires, or heat protection device tripping.
Check for stuck nozzles, broken spray lever, or incorrect power switch setting.
Verify collecting tank installation, float activation, or abnormal/stuck vacuum hose/filter.
Contact the sales shop or Iris Call Center if problems persist after troubleshooting.
Details on rated voltage, power consumption, suction power, capacities, dimensions, and weight.
Lists accessories provided with the machine: hand tool, vacuum hose, holder, hose hook, cord hook.
Information on purchase receipts, warranty period, repairs, and spare parts availability.
| Model | RNS-300 |
|---|---|
| Type | Ultrasonic Jewelry Cleaner |
| Tank Capacity | 300 ml |
| Frequency | 42 kHz |
| Cleaning Time | 3 minutes |