41
GB
The Rapid 101E is available with various types of magazine suitable for
staples with different wire thickness. Staples of different types are
designated 44 and 66. Always use original Rapid staples.
The Rapid 101E is designed for staples with a leg length of 6 and 8 mm. To
ensure proper stapling the leg length should be at least 3 mm longer than
the thickness of the stapling object.
The type of original Rapid staple that should be used is shown on the front of
the magazine.
ACCESSORIES
Insert stapler Rapid 252/101 for loop staples, and loop staples type Rapid
66/6R.
Stapling with loop staples can replace hole punching. See figure 8.
Markings on the work table indicate the position of the paper for different
hole patterns. There are marks for A4 format as well as A5, with hole centres
of 70 mm and 80 mm. There are also marks for Standard Rule format (US
size) with hole centres of 8˚” (216 mm).
The insert stapler for loop staples is fitted in accordance with the description
in the section “Replacing the insert stapler”.
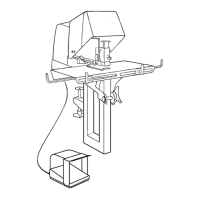
INSTALLATION
The Rapid 101E is installed as follows:
1 Position the machine at the edge of a stable table. The base should be
flush with the table edge.
2 Fix the machine on the table by tightening the clamp screw.
3 Check that the machine is stable and properly attached to the table.
4 Check that the machine is suitable for the electrical power supply
available (voltage and frequency) by reading the data on the rating plate.
5 Insert the machine’s plug into the electric socket.
OPERATION
Adjusting the work table for saddle stapling
When saddle stapling is required the work table should be angled down as
follows (see figure 3):
1 Release the locking handle (L) for the work table.
2 Angle the work table down.
3 Position the work table so that the two guide pins fit into the holes in the
work table.
4 Lock the work table with the locking handle.
 Loading...