NB:
*
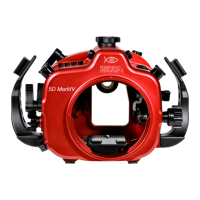
Remove any straps and eyelets from the camera before inserting it inside the
housing as seen on page 8.
1. Turn the locking lever on the tray to the left to unblock it.
2. Remove the camera tray from the housing by sliding it outwards.
3.
Attach the tray to the camera by tightening the screw to the tripod socket of the camera.
4. Install the camera by sliding the attached saddle along the rail in the housing until
it cannot go in any further.
5. Lock the camera into place by turning the sliding lever to the “lock” position.
6. For removal of the camera from the housing, reverse the above procedures.
7. Close the housing as described in section “Opening and Closing the Housing”.
INSTALLING THE CAMERA
The viewnder which comes with this housing is designed so that it can be removed
and re-installed by following the simple steps described below. INON X-2 viewnders
are compatible with this housing.
To remove the viewnder:
- Remove the retainer ring of the viewnder inside the rear half of the housing by
making use of the recess on the ring. If you encounter resistance insert small Allen
keys into the holes to gain more leverage;
- gently push the viewnder from the inside of the housing.
To re-install the viewnder:
- lightly coat the O-rings on the outer part of the viewnder with lubricant;
- push the viewnder from the outside of the housing until it cannot go in any further;
- place the retainer ring of the viewnder back from inside the housing and x the
ring with Allen key or similar device.
CHANGING THE VIEWFINDER
15