(ES)
● Los transformadores o cargadores de batería utilizados con el juguete
han de ser examinados regularmente para detectar deterioros en el cable,
clavija, envolvente y otras partes, y que en caso de tales deterioros, no
tienen que ser usados hasta que el daño haya sido reparado.
● Advertencia. No conviene para niños menores de 36 meses. El uso
indebido del transformador puede causar choque eléctrico.
● El juguete no tiene que ser utilizado más que con el transformador
recomendado.
● El transformador no es un juguete.
● Los juguetes susceptibles de ser limpiados con líquidos han de ser
desconectados del transformador antes de la limpieza.
● Las baterías son sólo para ser cargadas por adultos o por niños mayores
de 8 años.
(EN)
● Transformers or battery chargers used with the toy are to be regularly
examined for damage to the cord, plug, enclosure and other parts, and in
the event of such damage, they must not be used until the damage has
been repaired.
● Warning. Not suitable for children under 36 months. Misuse of
transformer can cause electric shock.
● The toy must only be used with the recommended transformer.
● The transformer is not a toy.
● Toys liable to be cleaned with liquids are to be disconnected from the
transformer before cleaning.
● Batteries are only to be charged by adults or by children at least 8 years
old.
(FR)
● Tout transformateur ou chargeur de piles utilisé avec le jouet doit être
régulièrement examiné afin de détecter d'éventuelles altérations du câble,
de la fiche, du revêtement et d'autres parties. S'il s'avère abimé, l'appareil
ne doit pas être utilisé avant que le défaut n'ait été réparé.
● Attention. Ne convient pas à des enfants de moins de 36 mois.
L'utilisation incorrecte du transformateur peut entraîner un choc électrique.
● Le jouet ne doit être utilisé qu'avec le transformateur recommandé.
● Le transformateur n'est pas un jouet.
● Les jouets susceptibles d'être lavés avec des produits liquides doivent
être débranchés du transformateur avant d'être nettoyés.
● Les piles doivent être rechargées uniquement par des adultes ou par des
enfants âgés de plus de 8 ans.
(DE)
● Die in dem Spielzeug verwendeten Transformatoren oder
Battereladegeräte müssen regelmäßig überprüft werden, um Schäden an
dem Kabel, der Muffe, Ummantelung und anderen Teilen festzustellen. Im
Fall von Schäden, nicht verwenden, bis die Schäden repariert sind.
● Achtung. Nicht empfehlenswert für Kinder im Alter von unter 3 Jahren.
Die unsachgemäße Verwendung des Transformators kann zu einem
Stromschlag führen.
● Das Spielzeug darf nur mit dem empfohlenen Transformator verwendet
werden.
● Der Trafo ist kein Spielzeug.
● Die Spielzeuge, die mit Flüssigkeiten gereinigt werden, müssen vor der
Reinigung vom Transformator genommen werden.
● Die Batterien dürfen nur von Erwachsenen oder Kindern über 8 Jahren
geladen werden.
(IT)
● I trasformatori e i caricabatterie utilizzati con questo giocattolo devono
essere controllati regolarmente per rilevare eventuali deterioramenti su
cavo, spinotto, involucro ed altre parti e se rilevati tali deterioramenti, non
devono essere utilizzati prima di aver riparato il danno.
● Avvertenza. Non adatto per bambini sotto i 36 mesi. L'uso improprio del
trasformatore può causare scariche elettriche.
● Il giocattolo deve essere utilizzato esclusivamente con il trasformatore
consigliato.
● Il trasformatore non è un giocattolo.
● I giocattoli che necessitano di pulizia con liquidi devono essere staccati
dal trasformatore prima della pulizia.
● Le batterie devono essere caricate solo dagli adulti o da bambini con più
di 8 anni.
(PT)
● Todos os transformadores ou carregadores de bateria utilizados com o
brinquedo devem ser examinados regularmente, para detetar possíveis
deterioros no cabo, ficha, carcaça encolvente e outras partes. Em caso de
deterioro, não utilizar o brinquedo até que os danos tenham sido
devidamente reparados.
● Atenção. Este produto não é recomendado para crianças com menos de
36 meses. O uso indevido do transformador poderia causar um choque
elétrico.
● O brinquedo deve utilizar-se exclusivamente com o transformador
recomendado.
● O transformador não é um brinquedo.
● Os brinquedos suscetíveis de serem limpos com líquidos devem ser
desconectados do transformador antes da sua limpeza.
● As baterias só devem ser carregadas por adultos ou por crianças
maiores de 8 anos.
(RO)
● Transformatoarele sau încărcătoarele de baterie utilizate cu jucăria
trebuie să fie examinate în mod regulat pentru a detecta deteriorări ale
cablului, mufei, carcasei şi altor părţi şi, în cazul detectării, nu trebuie
utilizate până când deteriorarea nu este reparată.
● Avertisment. Produsul nu este recomandat copiilor sub 36 de luni.
Utilizarea necorespunzătoare a transformatorului poate cauza şocuri
electrice.
● Jucăria nu trebuie utilizată decât cu transformatorul recomandat.
● Transformatorul nu este o jucărie.
● Jucăriile care pot fi curăţate cu lichide trebuie deconectate din
transformator înainte de curăţare.
● Bateriile trebuie încărcate doar de adulţi sau copii peste 8 ani.
(PL)
● Używane do zabawki transformatory lub ładowarki do baterii należy
regularnie sprawdzać, w celu wykrycia uszkodzeń w kablu, wtyczce,
obudowie i innych częściach, a w przypadku wykrycia uszkodzenia należy
zaprzestać ich używania do momentu jego usunięcia.
● Ostrzeżenie. Nieodpowiednie dla dzieci poniżej 36 miesiąca życia.
Nieprawidłowe użycie transformatora może spowodować porażenie
prądem.
● Do zabawki należy używać wyłącznie zalecanego transformatora.
● Transformator nie jest zabawką.
● Zabawki nadające do czyszczenia płynami należy przed czyszczeniem
odłączyć od transformatora.
● Akumulatorki powinny być ładowane wyłącznie przez osoby dorosłe lub
dzieci powyżej 8 lat.
(TR)
● Oyuncakla birlikte kullanılan adaptörler ve pil şarj cihazları, kabloda,
prizde, kaplamada ve diğer kısımlarda oluşabilecek hasarları tespit etmek
amacıyla düzenli olarak gözden geçirilmeli, hasar olması durumunda tamir
edilene kadar kullanılmamalıdır.
● Uyarı. 36 aylıktan küçük çocuklar için uygun değildir. Adaptörün yanlış
kullanımı elektrik çarpmasına neden olabilir.
● Oyuncakla, tavsiye edilen adaptörden farklı bir adaptör kullanılmamalıdır.
● Adaptör oyuncak değildir.
● Sıvı temizlik maddeleriyle temizlenebilen oyuncaklarda temizlik öncesi
adaptör çıkarılmalıdır.
● Piller sadece yetişkinler ve 8 yaşından büyük çocuklar tarafından şarj
edilmelidir.
(EL)
● Οι μετασχηματιστές ή φορτιστές μπαταριών που χρησιμοποιούνται με το
παιχνίδι πρέπει να εξετάζονται τακτικά για βλάβη στο καλώδιο, το βύσμα, το
περίβλημα κι άλλα μέρη, και σε περίπτωση ζημιών, δεν θα πρέπει να χρησι
μοποιούνται μέχρι που η ζημιά να επισκευαστεί.
● Προειδοποίηση. Δεν συνιστάται για παιδιά κάτω των 36 μηνών. Η κακή χ
ρήση του μετασχηματιστή μπορεί να προκαλέσει ηλεκτροπληξία.
● Το παιχνίδι δεν πρέπει να χρησιμοποιείται πολύ με τον συνιστώμενο μετα
σχηματιστή.
● Ο μετασχηματιστής δεν είναι παιχνίδι.
● Πριν από τον καθαρισμό, τα παιχνίδια που μπορούν να καθαριστούν με υ
γρά πρέπει πρώτα να αποσυνδέονται από τον μετασχηματιστή.
● Οι μπαταρίες να φορτίζονται μονάχα από ενήλικες ή από παιδιά άνω των
8 ετών.
(RU)
● Необходимо регулярно проверять трансформаторы или зарядные ус
тройства аккумуляторных батарей, используемые вместе с игрушкой,
для своевременного выявления повреждений шнура питания, вилки, к
орпуса и других частей. В случае обнаружения таких повреждений дан
ными устройствами нельзя пользоваться до тех пор, пока обнаруженн
ые дефекты не будут устранены.
● Внимание. Непригодно для детей младше 36 месяцев. Неправильно
е использование трансформатора может привести к поражению электр
ическим током.
● Разрешается пользоваться игрушкой только с рекомендованным тра
нсформатором.
● Трансформатор не является игрушкой.
● Перед мойкой игрушек, которые можно мыть с использованием жидк
остей, необходимо отсоединить их от трансформатора.
● Зарядка аккумуляторных батарей должна осуществляться только взр
ослыми или детьми старше 8 лет.
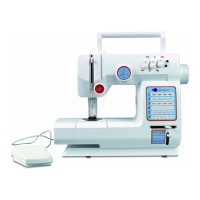
(EN) With your own sewing machine, discover how easy it is to design and sew
clothes for your dolls. Manual or with pedal. Carrying handle.
Warning:
-Product contains real needles. It should be used only in the presence of an adult to
monitor activity.Please keep this machine out of the reach of very young children.
Please read these instructions before using your new sewing machine.
-Ask an adult for help.
1. Parts of Your Sewing Machine
1.Foot Pedal
2.Pattern Selector Controller
3.Stitch forward and reverse controller (See diagram 1.a)
Slide Controller to left for stitch go reverse.
Slide Controller to right for stitch go forward.
4.Pattern controller
5.Handwheel
6.Slow / Fast speed control
7.Light switch
8.On / Off switch
9.Bobbin winder
10.Carrying handle
11.Take up lever
12.Tension dial
13.Needle shaft
14.Presser foot
15.Bobbin compartment
16.Drawer
17.Needle plate
18.Light
19. Bobbin winder switch
20.Adaptor socket
21.Spool pin (See diagram 1.b)
1. Assemble spool holder by snapping spool pin into spool stand.
2. Slide assembled spool holder into position on rear left of the machine as shown
until it snaps firmly into place. Place a spool of thread on the spool pin and then install
the spool cap on the spool pin as shown.
22.Presser foot lever
23.Thread anchor
24.Needle
25.Spool cap
2. Fitting the Batteries
WARNING: DO NOT USE RE-CHAREABLE BATTERIES (i.e. nickel cadmium)
We recommend the use of alkaline batteries.
Ensure that the on/off switch (8) is in the off position (pushed down).
Turn the sewing machine over and remove the cover to the battery compartment by
inserting a screwdriver into the slot and prising it open in the direction of the arrow, as
shown in diagram C. Ft 2 x 1.5 volt batteries (type R20, HP2 or D) in the
Compartment as show in diagram D. Replace the battery compartment cover.
Do not mix different types of battery (i.e. alkaline and zinc carbon) or old and new
batteries together. Always make sure that you dispose of old batteries carefully (ever
burn or puncture an old battery).
Always remove the batteries from the sewing machine if you are not going to use it for
a long time.
3. Using an Adaptor
An AC adaptor can be used as an alternative power source. It must have an output of
3.0 volts DC with a minimum current of 800mA (diagram E).
Parents should note that any safety isolating transformer to be used with the product
should be regularly examined for potential hazards such as damage to cable or cord,
plug endosure or other parts. In the even of such damage, the product must not be
used until the damage has been properly removed. Use an adaptor certified by your
local safely board.
The polarity (+,-) of the AC adaptor plug must be center pole positive (+). No
responsibility can be accepted for damage caused by incorrect use of any AC
adaptor.Batteries do not have to be removed when using an AC adaptor.
Adaptor is not included.
4. Winding the Bobbin
Push bobbin winder switch (19) down to raise bobbin winder. Remove empty bobbin
from case. Place bobbin on bobbin winder, aligning hole in bobbin with driving pin on
bobbin winder. You may have to turn the handwheel to help locate the driving pin.
Slide spool of thread on to spool pin. Install spool cap on spool pin. Pull thread from
spool and pass the thread through the circular thread guide (See diagram F). Slide the
fast / slow speed control up to slow. Push up the On/Off switch, then press the foot
pedal to start the bobbin winding. Help the bobbin wind evenly by guiding the thread
with a pencil as shown. Do not overfill the bobbin. When the bobbin winding has been
completed, take your foot off the pedal to stop the machine and cut the thread.
Remove the bobbin and lower the bobbin winder using the control in the spool pin
(21). Never join lengths of thread together when winding a bobbin.
5. Threading Your Sewing Machine
(Use cotton or polyester thread in this machine when the thread supplied has run out.)
Lower the presser foot (14) using the presser foot lever (22). Position the needle in its
highest position by moving the handwheel (5) in direction of the arrow.
After placing the spool of thread in the spool pin, pass the thread through the thread
guides as shown in the diagram G. (Make sure you place the thread between the
tension discs on the tension dial.)
The needle should be threaded from front to back (To use the threader, see diagram
H). To pull up the bobbin thread, lift the presser foot by using the presser foot lever.
Hold the thread from the needle at the front of the machine (see diagram I) and slowly
turn the handwheels in the direction of the arrow so the needle enters the needle plate
and comes up again. The needle will automatically pick up a loop of bobbin thread
which you can gently pull out from under the presser foot (see diagram J).
Pass both threads under the presser foot (14), between the forks and to the rear of
the machine for about 8cm (3 inches).
6. Changing the Bobbin
Slide off the bobbin compartment cover out (15) as shown (Diagram K) and place a
full evenly wound bobbin into the bobbin holder. Make sure the thread is wound on the
bobbin and placed in the bobbin holder in the machine so the thread is pulled in a
counter-clockwise direction. If the thread is being pulled from the bobbin in a
clockwise direction, turn the bobbin over. Gently pull out about 8cm (3 inches) of
thread from the bobbin and pull along slot 1 (see diagram on the bobbin
compartment). Pull the thread towards you and across through slot 2. Replace the
bobbin compartment cover, leaving the end of the thread outside, towards the right of
the cover as shown (Diagram L). Never operate the sewing machine with the bobbin
compartment left open.
7. Correct Positioning of Bobbin Holder
If possible, never attempt to remove the bobbin holder from the machine. If the bobbin
holder comes out or is removed, follow these steps to re-install. Follow the diagrams
below to properly place the parts and points where they belong. Put part “A” on the
bobbin holder under part “3” in the machine as shown. Make sure part “B” on the
holder is over part “1” on the machine. Press down on the front holder should be held
securely in place but still be free to move a little. If you encounter problems when you
try to sew, especially of the upper thread is not pulling the bobbin thread up or you
experience knotting in either threads, remove the bobbin case and repeat the
re-installation process.
8. Changing the Needle
ENSURE THE MACHINE IS SWITCHED OFF AND THE BATTERIES AND
ADAPTOR REMOVED.
Use the handwheel to raise the needle to its highest position.
Loosen the screw and remove the safety cover.
Lower the presser foot. Loosen the screw holding the needle in place with a
screwdriver and remove the old needle. Insert the new needle with a screwdriver and
remove the old needle. Insert the new needle with a screwdriver and remove the old
needle. Insert the new needle (Size 12/80 or 14/90) as far up into the needle holder as
it can go, with the flat side of the needle facing away from you and with the eye of the
needle straight toward you. Ensuring it does not fall into the sewing machine. Tighten
the screw with a screwdriver. Replace the safety cover and tighten the screw.
9. How to Sew
Most problems with any sewing machine are the result of imbalances in tension. Be
sure the thread can move through the various points in the run from the spool to the
needle freely with a little tension. Make sure the thread is not accidentally would
around any of the posts or points where it comes in contact with the machine. And,
make sure that the thread runs through the tension control so it is between the
spring-loaded disc and the body of the machine as shown. Lift the presser foot with
the presser foot lever (22). Place the material under the presser foot and lower the
lever. (Always make sure that the presser foot is lowered before starting to sew.)
Sew a stitch by turning the handwheel in the direction of the arrow, so the needle
enters the fabric. Push the on/ff switch (8) upwards to turn the power on and press the
foot pedal to start sewing.
Stop stitching before you reach the edge of the material by releasing the foot pedal.
Turn the top of the handwheel towards you until the needle is out of the fabric.
Pull a length of thread through the tension dial in order to release the tension on the
needle (see diagram M). Gently pull the material to the back of the machine and cut
the threads close to the fabric.
(If your machine jarns or the thread catches in the lower part of the sewing
mechanism you can remove the material by turning the handwheel gently in the
direction of the arrow until the fabric or thread can be removed from the machine.)
PROBLEMA
La máquina no se enciende al pulsar el
botón de encendido.
La máquina funciona pero no forma
puntadas.
La máquina está atascada y deja de
coser.
La tela no se puede retirar.
Las puntadas superiores no están
alineadas.
SOLUCIÓN
- Las pilas se han insertado de manera
incorrecta. Volver a insertar siguiendo
el dibujo del compartimento.
- Las pilas están gastadas.
Reemplazar con nuevas.
- Comprobar que el interruptor
principal está encendido.
- El transformador no es el correcto o
no está enchufado. Asegúrate de que
usas y enchufas el correcto.
- La máquina no está bien enhebrada.
Volver a enhebrar.
- La aguja no está bien enhebrada.
Comprobar que el hilo está insertado
de delante a atrás.
- La aguja está mal insertada.
Comprueba que está insertada recta,
desde la parte superior del soporte y
con la parte plana hacia atrás.
- Las pilas se han insertado de manera
incorrecta. Volver a insertar siguiendo
el dibujo del compartimento.
- La aguja está doblada/deformada.
Reemplazar con una aguja nueva.
ATENCIÓN: para retirar la tela
después de coser, primero girar la
manivela de izquierda a derecha,
elevar la aguja a la posición más alta,
elevar el pie de presión y retirar la tela.
Esto evita que se doble la aguja.
- La tela o telas son demasiado
gruesas. Seleccionar un material más
delgado.
- El hilo está enganchado en la bobina
inferior. Parar la máquina, retirar la
tapa de la bobina y cortar los hilos
enganchados para limpiar la zona del
cajón. Volver a enhebrar la bobina y
retomar.
- El pie de presión no está elevado.
Elevarlo.
- El hilo tiene demasiada tensión.
Liberar tensión del hilo y girar la rueda
de tensión de izquierda a derecha.
- La rueda de tensión está muy dura o
muy floja. Ajustar la rueda de tensión
como indica el manual.
15. Solución de problemas
10. How To Sew Pattern
Sew the stitch pattern. By turning the Pattern Controller (4) to the Correct position.
And slide stitch pattern selector (2) to extreme high/ low.
11. Checking the Quality of the Stitching
Diagram 1 shows a correctly sewn lockstitch. The upper and lower (bobbins) threads
connect in-between the layers of fabric. No adjustment is needed if your stitches look
like this.
Diagram 2 shows a stitch where the upper tension is too tight relative to the lower
thread. To correct this situation, you need to decrease the tension on the upper thread
or increase the tension on the lower thread. We do not recommend trying to change
the tension on the lower/bobbin thread. Decrease the tension on the upper thread by
turning the tension dial (12) counterclockwise. Turn the tension dial about 1/2 turn and
run another line of stitches. Adjust the tension dial again if required (looser or tighter)
until a result like that shown in Diagram 1 is achieved.
Diagram 3 shows a stitch where the tension on the upper thread is too loose relative
to the lower/bobbin thread. Increase the tension on the upper thread by turning the
tension dial clockwise. Turn the tension dial about 1/2 turn clockwise and run another
line of stitches. Adjust the tension dial again if required (looser or tighter) until a result
like that shown in Diagram 1 is achieved.
12. Safety box
The machine includes a transparent box that is meant to Project the hands from the
needle while sewing. To fix it, follow image 12. To remove an old needle with the
safety box fixed:
1. Lift the needle to its highest position turning the handle towards you in
counter-clock direction.
2. Lower the presser foot.
3. Loosen the screw and remove the box.
4. Loosen the screw that holds the needle, holding the needle in place and removing
the needle from the clamp.
13. Adjusting Thread Tension
As mentioned earlier, most of the problems that occur with sewing machines, both
adult and models for children like these come from imbalances in tension between the
upper and lower threads or from having one or both threads not run correctly.
14. Caring for Your Machines
Change the batteries when you notice that the machine is working at a slower speed
than usual.
Never use liquids to clean the machine - always use a dry cloth.
Never take the sewing machine apart - there are no serviceable parts inside.
Please do not try to open the lockstitch by yourself. All internal parts is being adjusted
before leave the factory.
Do not pull the fabric while stitching. The needle may bend or break and cause other
damage on the lockstitch.
Always disconnect any power supply and foot pedal when changing needles,
removing bobbin and cleaning the lockstitch.
Before using the adaptor, ensure that the voltage on the adaptor matches your
electrical supply. (Output of the adaptor should be DC 3V.)
WARNING: Product contains sharp needles and should be used under the direct
supervision of an adult.
15. Troubleshooting
(FR) Avec ta propre machine à coudre, découvre comme il est facile de créer et de
réaliser des robes pour tes poupées. Actionnée à la main ou à pédale. Anse de
transport.
Attention !
- Ce produit comporte de vraies aiguilles. À n'utiliser que sous la surveillance d'un
adulte.
Maintenir hors de portée des jeunes enfants.
- Lire ces instructions avant d'utiliser la machine.
1. Parties de la machine
1. Pédale
2. Sélecteur de modèles
3. Contrôleur de bâti vers l'avant et vers l'arrière (image 1.a) :
- gauche = en arrière
- droite = en avant
4. Sélecteur de modèles
5. Volant manuel
6. Contrôle de la vitesse : lent/rapide
7. Allumage/extinction de la lumière
8. Marche/arrêt de la machine
9. Bouton de bobinage
10. Anse de transport
11. Levier d'arrêt
12. Molette de tension
13. Axe de l'aiguille
14. Pied presseur
15. Compartiment des canettes
16. Tiroir pour les fils
17. Plaque à aiguille
18. Lampe
19. Bouton pour retirer la canette
20. Entrée adaptateur
21. Porte-bobine (image 1.b) :
1. Introduire la bobine dans le tube de fixation.
2. Glisser le porte-canette dans son logement à l'arrière de la machine comme le
montre l'image, jusqu'au déclic. Insérer une bobine sur l'axe et mettre le couvercle
comme on le voit dans l'image.
22. Élévateur du pied presseur
23. Ancrage du fil
24. Aiguille
25. Couvercle de la bobine
2. Installation des piles
ATTENTION : NE PAS UTILISER DE PILES RECHARGEABLES (p.ex. :
nickel-cadmium).
Il est recommandé d'utiliser des piles alcalines.
S'assurer que l'interrupteur soit sur « Arrêt ».
Retourner la machine et enlever le couvercle du compartiment des piles avec un
tournevis, en tournant dans le sens de la flèche de l'image C.
Insérer 2 piles de 1,5 V (type R20, HP2 ou D),
Ne pas mélanger des piles de différents types (alcalines et carbone-zinc), ni des piles
usées avec des neuves. Veiller au recyclage des piles usagées (ne jamais les brûler
ni les percer).
Toujours retirer les piles de la machine si celle-ci va rester longtemps sans être
utilisée.
CETTE MACHINE EST DÉJÀ POURVUE DE FIL, ELLE EST PRÊTE POUR UNE
PREMIÈRE UTILISATION. Bien s'assurer d'avoir enlevé les bandes plastique de
l'emballage avant d'utiliser la machine.
3. Utilisation d'un adaptateur secteur
Il est possible d'utiliser un adaptateur secteur, au lieu des piles. Celui-ci doit délivrer 3
volts CC, et supporter une charge d'au moins 800 mA (voir image E). Utiliser une
source d'alimentation certifiée. La polarité de l'adaptateur AC doit être positive (+).
Nous ne saurons être tenus responsables des éventuels dommages dus à l'utilisation
incorrecte d'un adaptateur secteur. Il n'est pas nécessaire d'enlever les piles pour
utiliser un adaptateur secteur. Adaptateur non compris.
Tout transformateur de sécurité utilisé avec la machine doit être fréquemment vérifié
pour éviter les risques potentiels tels qu'un câble d'alimentation, une prise, etc.
endommagés. Ne pas utiliser l'appareil avant d'avoir résolu ces problèmes.
4. Bobinage de la canette
Pousser le bouton du dévidoir (19) vers le bas pour soulever le dévidoir. Retirer la
canette vide du compartiment. Placer la canette dans le dévidoir, en alignant le trou
de la joue de la canette avec l'ergot d'entraînement du dévidoir. Il faut parfois faire
tourner un peu la machine pour trouver l'ergot d'entraînement. Insérer la bobine de fil
sur son axe. Dévider du fil depuis la bobine et le faire passer dans le guide circulaire
(image F). Mettre le bouton de vitesse sur « Lent ». Appuyer sur l'interrupteur
marche/arrêt et sur la pédale pour faire tourner la canette. Guider le fil avec un stylo.
Ne pas trop remplir la canette. Lorsqu'elle est suffisamment pleine, lâcher la pédale
pour arrêter la machine et couper le fil. Enlever la canette et abaisser le dévidoir à
l'aide de la commande. Ne jamais nouer deux tronçons de fil pour continuer à bobiner
sur une même canette.
5. Chargement du fil
Utiliser du fil de coton ou en polyester avec cette machine lorsque celui qui est fourni
sera terminé. Abaisser le pied-de-biche (14) à l'aide du levier (22). Tourner le volant
manuel (5) dans la direction de la flèche jusqu'à placer l'aiguille à son point le plus
haut.
Après avoir installé la bobine de fil sur son axe, faire passer le fil dans les guides
comme sur l'image G. Bien s'assurer de faire passer le fil entre les deux disques du
tendeur (12).
Il faut enfiler l'aiguille de l'avant vers l'arrière (pour utiliser l'enfileur, voir l'image H).
Pour remonter le fil de canette, lever d'abord le pied-de-biche à l'aide du levier.
Retenir le fil d'aiguille depuis l'avant de la machine (voir image I) et tourner
doucement le volant dans le sens de la flèche pour que l'aiguille traverse la plaque et
en ressorte. L'aiguille aura saisi automatiquement une boucle de fil de canette sur
laquelle vous tirerez doucement par-dessous le pied-de-biche (image J).
Passez les deux fils sous le pied-de-biche (14), entre les becs de la fourche et vers
l'arrière de la machine, et tirez une longueur d'environ 8 cm.
6. Pour changer la canette
Enlever le couvercle du compartiment de la canette (15) comme dans l'image K, et
installer une canette pleine dans le porte-canette. S'assurer que le sens
d'enroulement du fil, une fois la canette installée dans le porte-canette, est contraire à
celui des aiguilles d'une montre. S'il n'en est pas ainsi, retourner la canette. Tirer
doucement environ 8 cm de fil de la canette et tendre le fil le long de la fente 1 (voir le
dessin du compartiment de la canette). Tirer le fil vers soi en traversant la fente 2.
Remettre le couvercle du compartiment en place, en laissant dehors l'extrémité du fil,
vers la droite du couvercle, comme on le voit dans l'image L. Ne jamais faire tourner
la machine lorsque le compartiment de canette est ouvert.
7. Installation correcte du porte-canette
Dans la mesure du possible, ne jamais l'enlever de la machine. Si on devait l'enlever
ou s'il venait à tomber, réinstallez-le en suivant la procédure ci-dessous. Suivez les
dessins pour bien mettre chaque pièce à la bonne place :
- la pièce A du porte-canette sous la pièce 3 de la machine,
- la pièce B du porte-canette sur la pièce 1 de la machine,
- la pièce C du porte-canette sous la pièce 2 de la machine.
Pousser vers le bas dans le porte-canette. Elle doit rester en position horizontale. Si
des problèmes apparaissent en cousant, répéter cette installation.
8. Remplacement de l'aiguille
BIEN S'ASSURER QUE LA MACHINE SOIT ÉTEINTE ; ENLEVER LES PILES ET
DÉBRANCHEZ L'ADAPTATEUR SECTEUR S'IL Y A LIEU.
À l'aide du volant, amener l'aiguille à sa position la plus haute. Desserrer la vis et
enlever le couvercle de sécurité. Abaisser le pied-de-biche. Desserrer la vis avec un
tournevis en retenant l'aiguille en place, puis enlever l'aiguille usagée. Insérer l'aiguille
neuve (mesure : 12/80 ou 14/90) aussi haut que possible dans le porte-aiguille, le
côté plat de l'aiguille tourné vers l'arrière et le chas de l'aiguille regardant vers vous.
Prenez bien garde à ne pas laisser tomber l'aiguille dans la machine. Resserrer la vis
avec un tournevis. Remettre le couvercle et serrer la vis de celui-ci.
9. Comment coudre
Dans la plupart des machines à coudre, les problèmes qui se produisent sont dus au
mauvais réglage de la tension du fil. Assurez-vous que :
4.Le fil circule librement dans tous les points intermédiaires entre la bobine et
l'aiguille, légèrement tendu.
5.Le fil ne s'accroche pas accidentellement autour des guides ou des points où il est
en contact avec la machine.
6.Le fil passe bien dans le tendeur, entre le disque à ressort et le corps de la
machine.
Lever le pied-de-biche à l'aide du levier élévateur (22). Placer le tissu sous le
pied-de-biche et abaisser le levier (assurez-vous que le pied-de-biche soit toujours
abaissé avant de commencer à coudre).
Coudre un point en tournant le volant à la main dans la direction de la flèche ; l'aiguille
percera le tissu. Lever le bouton Marche/Arrêt (8) pour allumer, puis appuyer sur la
pédale pour commencer à coudre.
Cesser de coudre avant d'atteindre le bord du tissu, en lâchant la pédale.
Tourner le volant jusqu'à ce que la manivelle pointe vers vous : l'aiguille sortira du
pied-de-biche.
Tirer une longueur de fil depuis les disques de tension afin qu'il glisse librement dans
le chas de l'aiguille (voir image M). Déplacer la toile vers l'arrière de la machine et
couper le fil près du tissu.
(Si la machine se bloque ou si le fil bourre dans le mécanisme qui se trouve sous la
plaque où pénètre l'aiguille, le tissu peut être retiré en tournant d'abord le volant dans
le sens de la flèche pour relever l'aiguille en libérant le tissu).
Pour une bonne couture, déplacer la toile de la main gauche tout en tenant le fil de la
main droite.
10. Modèles disponibles
Choisissez le modèle souhaité dans le sélecteur de modèles (4) et faites glisser le
sélecteur (2) vers la position indiquée par les dessins.
11. Vérification des points
L'image 1 montre un point réalisé correctement : le fil d'aiguille et le fil de canette
s'entrelacent à l'intérieur des couches de tissu, ce qui indique un bon réglage des
tensions.
L'image 2 montre un point où la tension du fil d'aiguille est trop forte par rapport à
celle du fil de canette. Pour corriger ce problème, diminuer la tension du fil d'aiguille
supérieur ou augmenter la tension du fil inférieur (cette option est généralement
déconseillée). Pour diminuer la tension du fil d'aiguille, tourner la molette de tension
(12) dans le sens contraire aux aiguilles d'une montre. Relâcher d'un demi-tour et
refaire un essai de couture. Affiner le réglage si nécessaire (serrer o desserrer)
jusqu'à obtenir le résultat de l'image 1.
L'image 3 montre un point où le fil d'aiguille est trop lâche par rapport au fil de
canette. Augmenter la tension du fil d'aiguille en tournant la molette d'un demi-tour à
droite, puis refaire un essai de couture. Affiner le réglage si nécessaire (serrer o
desserrer) jusqu'à obtenir le résultat de l'image 1.
12. Boîtier de sécurité
La machine possède un petit boîtier transparent qui sert à protéger les mains de
l'aiguille pendant qu'on coud. Pour savoir comment le fixer, observez l'image 12. Pour
enlever une aiguille alors que le boîtier de sécurité est installé :
1. En tournant le volant dans le sens contraire aux aiguilles d'une montre jusqu'à ce
que la manivelle pointe vers vous, vous amènerez l'aiguille à son point le plus haut.
2. Abaisser le pied-de-biche.
3. Desserrer la vis et enlever le boîtier.
4. Desserrer la vis de fixation de l'aiguille sans lâcher celle-ci. Puis, sortir l'aiguille de
son logement.
13. Réglage de la tension du fil
Comme indiqué plus haut, la plupart des problèmes pouvant survenir avec une
machine à coudre, qu'il s'agisse des modèles pour adultes ou pour enfants, tiennent à
un déséquilibre entre les tensions des deux fils.
14. Maintenance de la machine
Changer les piles en cas de perte de puissance.
Ne pas utiliser de liquide pour nettoyer : nettoyage à l'aide d'un chiffon sec.
Ne pas démonter la machine : aucune réparation n'est possible par l'utilisateur.
Ne pas essayer d'ouvrir le compartiment de l'aiguille. Toutes les pièces internes sont
réglées en usine.
Ne pas tirer sur le tissu lorsque vous cousez. L'aiguille pourrait plier ou se casser.
Débrancher toujours la source d'alimentation et la pédale avant toute opération de
changement de canette, ou de changement ou de nettoyage de l'aiguille.
Avant d'utiliser un adaptateur secteur, vérifier le voltage de sortie : il doit être de 3
volts CC.
ATTENTION : ce produit comporte des aiguilles effilées, à n'utiliser que sous la
surveillance directe d'un adulte.
(CN)
● 玩具所用的转接器和电池充电器须定期检查电线、插头、外壳和其他部件是否
损坏,如果出现此类损坏,在修好前不要使用。
● 警告。 不适合 36 个月以下的儿童。 误用转换器可能会导致触电。
● 玩具不应使用非推荐的转换器。
● 转换器不是玩具。
● 可用液体清洗的玩具在清洗前必须断开与转换器的连接。
● 电池只能由成人或 8 岁以上的儿童进行充电。
(JP)
● おもちゃで使用する変圧器および電池は、コード、プラグ、外装部分、他の
部分の損傷の有無を定期的に検査し、損傷が発見された場合、修復されるまで
使用しないでください。
● 警告。 36ヶ月未満のお子様はご使用できません。 変圧器の使い方を誤ると
、感電の原因となります。
● 推奨以外の変圧器は使用しないでください。
● 変圧器はおもちゃではありません。
● 高感度のおもちゃを液体で洗浄する際は、洗浄の前に変圧器から取り外して
ください。
● 充電器は保護者、または8歳以上のお子様が充電してください。
23 4
 Loading...