EasyManua.ls Logo

JALL V18039 - User Manual

Default Icon
7 pages
Print Icon
To Next Page IconTo Next Page
Loading...
1
/
7
V18039 Alarm Clock Instructions
We value each and every one of our customers and promise to provide a lifetime warranty
service. Simply visit the following link to activate the lifetime warranty service.
www.jall-us.com
Missing accessories, incorrect color, or any other problems, please contact us:
ThreeDucksDirect@outlook.com
Front
AM/PM Indicator
AM/PM Indicator is for 12-hour system only.
Alarm Indicator
If you switch on one of the alarms, it will be on.
Humidity
This shows the current indoor humidity level, which is detected by a sensor and cannot be manually changed.
Temperature
This shows the current indoor temperature in Celsius or Fahrenheit, which is detected by a sensor and
cannot be manually changed.
Question and Answer IconNeed help?

Do you have a question about the JALL V18039 and is the answer not in the manual?

Summary

Front Panel Display Indicators

AM;PM Indicator

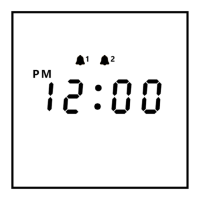
Shows AM/PM for the 12-hour system display.

Alarm Indicator

Indicates when an alarm is activated.

Humidity Display

Shows current indoor humidity level detected by sensor.

Temperature Display

Shows current indoor temperature in Celsius or Fahrenheit.

Back Panel Controls and Features

Time Setting and Mode Selection

Controls for setting time, 12/24H format, and alarm modes.

Volume, Temperature Unit, and Brightness

Buttons and wheel to adjust alarm volume, °C/°F, and brightness.

System Reset and Power Input

Includes reset button, CR2032 battery function, and power input.

Initial Setup and Configuration

Package Contents

Lists the items included in the product package.

Power Connection

Instructions on how to connect the alarm clock to power.

Time Setting Procedure

Step-by-step guide to set the year, date, and time.

12;24 Hour Format Selection

How to toggle between 12-hour and 24-hour display modes.

Alarm Setting and Modes

Instructions for setting alarms and selecting daily, weekday, or weekend modes.

Brightness Level Adjustment

Guide to adjust the display brightness using the scroll wheel.

Temperature Unit (°C;°F) Setting

How to switch between Celsius and Fahrenheit for temperature display.

Alarm Volume Adjustment

Steps to set the alarm volume level using the VOL button and scroll wheel.

Snooze Functionality

Explanation of how the snooze feature works and how to disable it.

Clock Reset Procedure

Instructions on how to reset all settings using the reset button.

Product Information and Troubleshooting

Product Features

Details on input and output voltage specifications.

Troubleshooting Common Issues

Solutions for problems like missing parts, temperature inaccuracy, display issues, and settings loss.

Overview

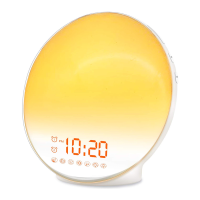
This document describes the V18039 Digital Alarm Clock, a versatile device designed for timekeeping, alarm functions, and environmental monitoring.

Function Description:

The V18039 alarm clock serves multiple functions:

  • Time Display: It displays the current time in either 12-hour (AM/PM) or 24-hour format.
  • Alarm Functionality: It features three independent alarms (Alarm 1, Alarm 2, Alarm 3) that can be set for different schedules: every day (MON-SUN), weekdays only (MON-FRI), or weekends only (SAT-SUN). Each alarm has an adjustable volume with five levels (V1-V5).
  • Snooze Feature: When an alarm goes off, pressing any button activates a 9-minute snooze. This function automatically shuts off after four consecutive uses.
  • Environmental Monitoring: The clock includes built-in sensors to display the current indoor humidity level (in %RH) and temperature (in Celsius or Fahrenheit).
  • Brightness Adjustment: The display brightness can be adjusted through six levels (L1-L6), ranging from 2% to 100%.

Important Technical Specifications:

  • Power Input: Type-C USB for power. It requires an input voltage of AC110V-240V, 50/60HZ, and an output voltage of DC5V / 500MA-2100MA. The original power cord and adapter are recommended, but a 5V 1A or 5V 2A adapter can be used as a replacement.
  • Battery Backup: A CR2032 battery is included to retain alarm settings and the current time during power outages, preventing the need for re-setting after power is restored.
  • Temperature Sensor: The internal temperature sensor provides indoor temperature readings. It's noted that due to internal electronic components, there might be a 1-2 degree difference compared to professional thermometers. A difference higher than 5 degrees warrants contacting customer support.
  • Humidity Sensor: An internal sensor detects and displays indoor humidity levels.

Usage Features:

  • Time Setting: Hold the "TIME" button, then use the scroll wheel to set the year, date, and time.
  • Volume Adjustment: Press the "VOL" button once, then use the scroll wheel to select one of the five volume levels (V1-V5).
  • Temperature Unit Switch: Press the "°C / °F" button to toggle between Celsius and Fahrenheit display. This button can also be used to exit the setting menu.
  • Alarm Setting:
    • Press an "Alarm" button (ALARM1, ALARM2, or ALARM3) once to turn the alarm ON or OFF.
    • Hold an "Alarm" button to enter the alarm setting mode. The alarm will be turned ON by default after setting.
    • Use the scroll wheel to set the alarm time.
    • Select the alarm mode (MON-SUN, MON-FRI, or SAT-SUN) using the Alarm Mode Switch.
  • 12/24H Display Switch: A dedicated switch allows easy toggling between 12-hour and 24-hour display modes.
  • Brightness Adjustment: In normal status, turn the scroll wheel to adjust the display brightness through six levels.
  • Reset Function: A "RESET" button (accessible with a small stick) is available to initialize the clock if it malfunctions.

Maintenance Features:

  • Lifetime Warranty Service: The product comes with a lifetime warranty. Activation is available by visiting www.jall-us.com.
  • Customer Support: For missing accessories, incorrect color, or any other problems, customers can contact Three DucksDirect@outlook.com.
  • CR2032 Battery Replacement: If the clock fails to restore settings after a power outage, the CR2032 battery may be drained and needs replacement. The battery shelf is located on the back of the clock.
  • Power Cord and Adapter: It is recommended to use the original power cord and adapter. If it's broken or missing, contact customer support for a replacement. Using a non-original power cord and adapter may cause malfunctions or damage.
  • Troubleshooting:
    • For dimming or flashing numbers, take a picture or video and contact customer support.
    • If the screen is not lit, try unplugging and reconnecting the power cord, then pressing the RESET button. If the issue persists, contact customer support.
    • Temperature sensor inaccuracies (beyond 5 degrees) should be reported to customer support.

JALL V18039 Specifications

General IconGeneral
BrandJALL
ModelV18039
CategoryAlarm Clock
LanguageEnglish

Related product manuals