This document outlines the features and operation of the V18050 Alarm Clock, a versatile timekeeping device designed for ease of use and reliability. The manufacturer offers a lifetime warranty service, which can be activated by visiting www.jall-us.com. For issues such as missing cables, incorrect colors, or other problems, customers are advised to contact ThreeDucksDirect@outlook.com.
Function Description:
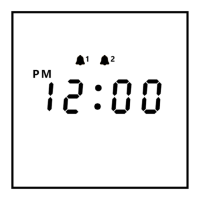
The V18050 Alarm Clock serves as a multi-functional time display and alarm system. It features a clear digital display for time, with options for both 12-hour and 24-hour formats. It includes two independent alarms (AL1 and AL2), each with customizable settings for time, ringing days (every day, weekdays only, or weekends only), and volume. The device also incorporates a snooze function for an additional 9 minutes of sleep, which automatically shuts off after 4 consecutive uses. A unique feature is its USB output port (5V 1A), allowing users to charge Android or Apple smartphones simultaneously. The clock's brightness is adjustable across six levels, ranging from 2% to 100%, to suit various lighting conditions. A CR2032 battery is included for memorizing settings during power outages, ensuring that the time and alarm configurations are retained even when the clock is unplugged.
Important Technical Specifications:
- Input Voltage: AC110V-240V, 50/60HZ
- Output Voltage: DC5V / 500MA-1000MA
- USB Output Port: 5V 1A (for charging external devices)
- Backup Battery: CR2032 (for setting memory, not for powering the display)
- Time Formats: 12H/24H
- Alarm Settings: Two independent alarms (AL1, AL2)
- Alarm Ringing Modes: MON-SUN (every day), MON-FRI (weekdays only), SAT-SUN (weekends only)
- Alarm Volume Levels: 5 levels (V1-V5)
- Brightness Levels: 6 levels (L1-L6), from 2% to 100%
- Snooze Duration: 9 minutes (automatic shut-off after 4 uses)
- Connectivity: USB Type C for power input, USB-A for charging output
Usage Features:
Powering On and Initial Setup:
- Connect the Type-C end of the provided power cord to the "Power Input" on the alarm clock.
- Connect the USB-A end to any unused 5V 1A or 5V 2A power adapter.
- The clock will power on, and the display will illuminate.
Time Setting (Year, Month, Date, Time):
- Enter Time Setting Menu: HOLD the "TIME" button for 3 seconds.
- Set Year: Turn the scroll wheel ("+" or "-") to select the correct "Year" value. Press "TIME" to confirm and proceed.
- Set Month and Date: Turn the scroll wheel to select the correct "Month" and "Date" values (e.g., July, 1). Press "TIME" to confirm and proceed.
- Set Time: Turn the scroll wheel to select the correct "TIME" value (hours and minutes). Press "TIME" to confirm and exit the time setting menu.
Standard Time or Military Time (12H/24H):
- Press the "TIME" button once to switch between 12-hour (Standard Time, e.g., PM 1:00) and 24-hour (Military Time, e.g., 13:00) formats.
Alarm Setting (AL1 and AL2):
- Turn Alarm ON/OFF: Press the "Alarm1" or "Alarm2" button once to toggle the respective alarm ON or OFF. An indicator light will illuminate when the alarm is ON.
- Enter Alarm Settings: HOLD the "Alarm1" or "Alarm2" button for 3 seconds. The alarm indicator light will flash, signifying entry into settings mode.
- Set Alarm Time: Turn the scroll wheel ("+" or "-") to change the "Alarm Time." Press the respective "Alarm" button to confirm and proceed.
- Select Alarm Mode (Ringing Days): Turn the scroll wheel to select the desired ringing mode:
- MON-SUN (1-7): Rings every day.
- MON-FRI (1-5): Rings on working days only.
- SAT-SUN (6-7): Rings on weekend only.
- Press the respective "Alarm" button to confirm and exit alarm settings.
Alarm Volume Setting:
- Press the "VOL" button to adjust the alarm volume. There are 5 levels to choose from: V1-V5.
Brightness Setting:
- Turn the scroll wheel to adjust the display brightness. There are 6 levels: L6 (100%), L5 (75%), L4 (50%), L3 (25%), L2 (10%), L1 (2%).
Snooze Setting:
- When the alarm goes off, press any button once to activate the snooze function, providing an extra 9 minutes of sleep. The corresponding alarm indicator light will flash.
- To turn off the snooze feature, press any button on the back of the clock twice. This will stop the flashing indicator light, and the alarm will sound again the next day.
- Note: The snooze function automatically shuts off after 4 consecutive uses.
Maintenance Features:
Resetting All Settings:
- Locate the "RESET" hole on the back of the clock.
- Use a needle or a small stick to push the "RESET" hole to reset all settings to their factory defaults.
CR2032 Battery for Setting Memory:
- The CR2032 battery (located on the back of the clock) is solely used for memorizing settings (time, alarms, brightness, etc.) during a power outage.
- It does not power the clock's display. The screen will not light up if the alarm clock is not plugged into a power source, even with a functional CR2032 battery.
- If the alarm clock fails to restore the current time after a power outage, the CR2032 battery may be depleted and needs replacement.
Troubleshooting:
- Missing Power Cord or Instructions: Contact the manufacturer via Amazon or email for a replacement.
- Exiting Setting Mode: If stuck in a setting mode, stop pressing buttons for 5 seconds, and the clock will automatically return to the time display.
- Time Not Restored After Power Outage: Replace the CR2032 battery on the back of the clock.