EasyManua.ls Logo

JBL Arena 180 - Speaker Placement; Left and Right Channel Setup; Wall-Mounting Arena 120

JBL Arena 180
10 pages
Print Icon
To Next Page IconTo Next Page
To Previous Page IconTo Previous Page
Loading...
PLACEMENT
ARENA
180/170/130/120-
LEFT
AND
RIGHT
CHANNELS
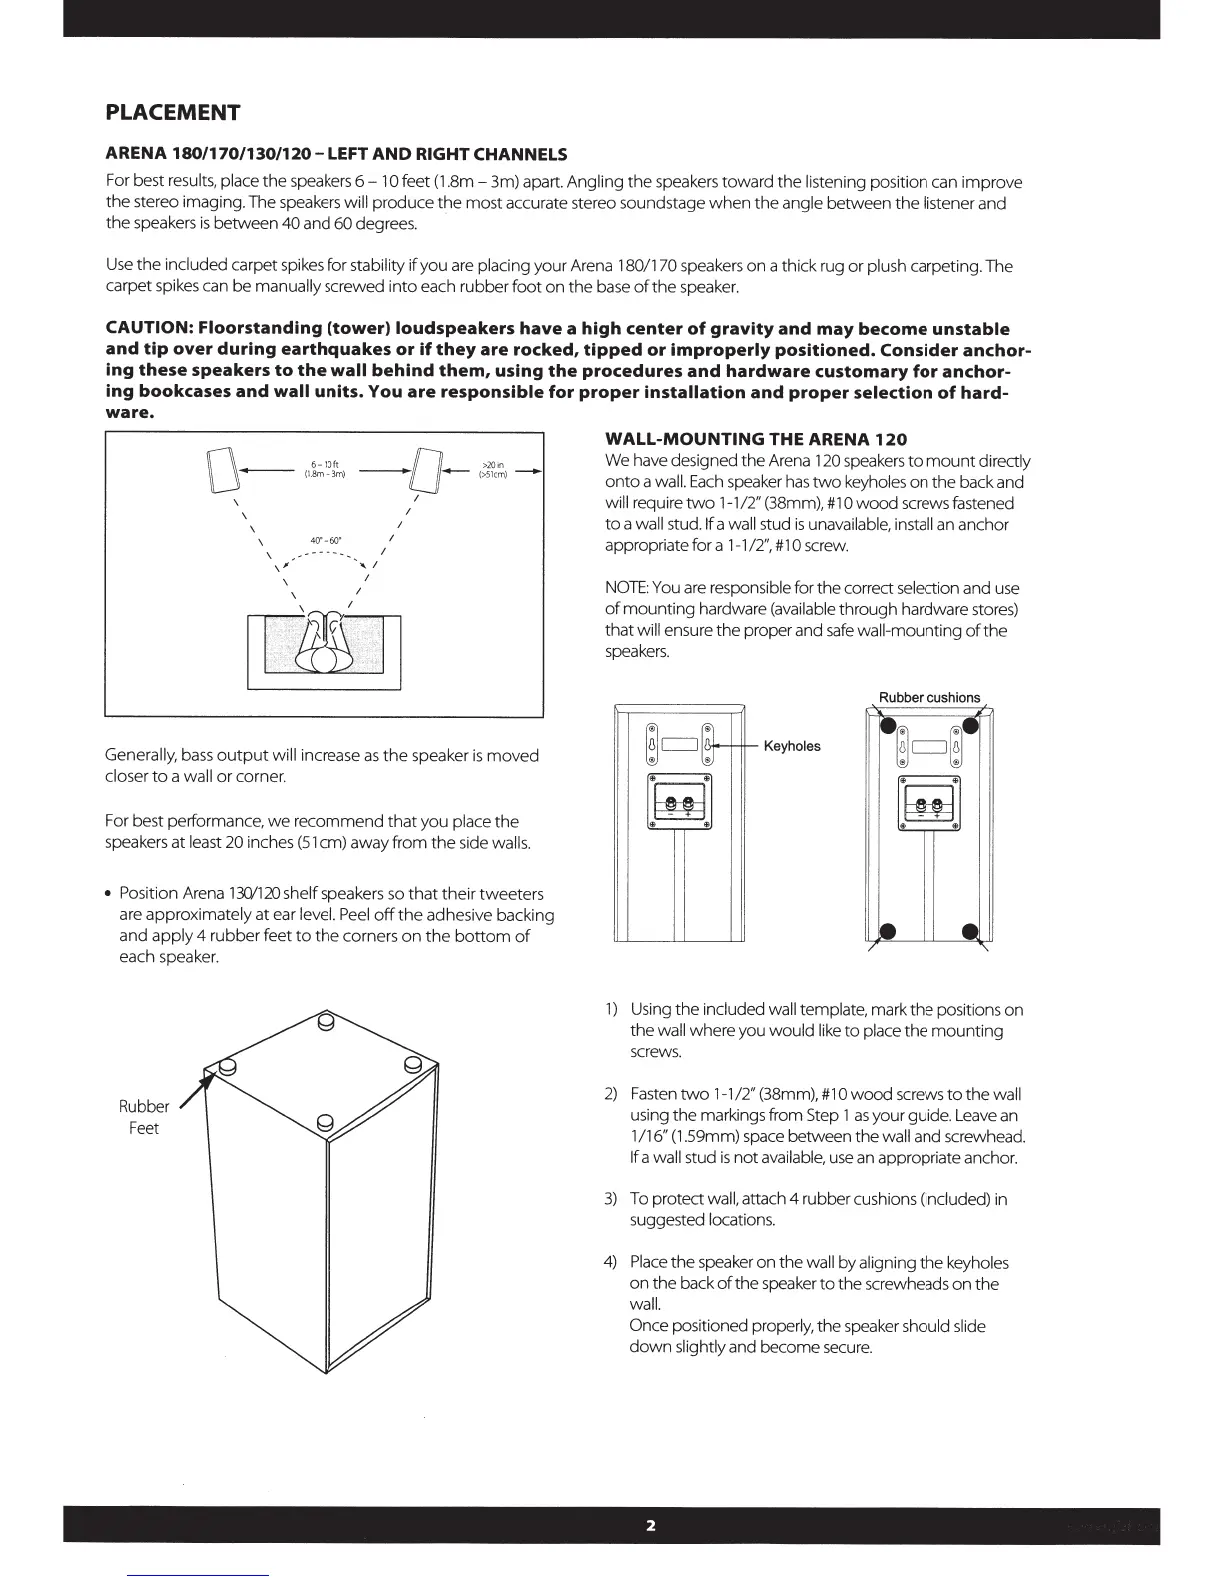
For best
results, place
the
speakers
6-
10
feet
(1
.
8m-
3m) apart.
Angling
the
speakers
tow
ard
the
li
stening
posi
tion
can
impro
ve
the
stereo imaging. The speakers
will
produce
the
most
accurate stereo soundstage
when
the
angle
between
the
listener
and
the
speakers
is
between
40
and
60
degrees.
Use
the
included
carpet spikes
for
stability
if
you are placing
you
r Arena
180/170
speakers
on
a thick rug
or
plush carpeting. The
carpet spikes can
be
manually
screwed
into
each rubber
foot
on
the base
of
the
speake
r.
CAUTION:
Floorstanding
(tower)
loudspeakers
have
a
high
center
of
gravity
and
may
become
unstable
and
tip
over
during
earthquakes
or
if
they
are
rocked,
tipped
or
improperly
positioned.
Consider
anchor-
ing
these
speakers
to
the
wall
behind
them,
using
the
procedures
and
hardware
customary
for
anchor-
ing
bookcases
and
wall
units.
You
are
responsible
for
proper
installation
and
proper
selection
of
hard-
ware.
[\
-
\
,,
\
6-10ft
(1.8m
-
3m)
40"
-
60
"
- 0-
" I
I
I
I
1
>20
in
(>51cm
) ____,..
Generally,
bass
output
will
increase
as
the
speaker
is
moved
closer
to
a
wall
or corner.
For best performanc
e,
we
recommend
that
you
place
the
speakers
at
least
20
inches (51 e
m)
away
from
the
side
wall
s.
•
Position Arena
130/120
she
lf
speakers so
th
at
th
eir
tw
ee
ters
are
approximately
at
ear
level. Peel
off
the
adhesive backing
and
apply
4
rubber
feet
to
the
corners
on
the
bottom
of
each speaker.
Rubber
Feet
WALL-MOUNTING
THE ARENA
120
We have designed
the
Arena
120
speakers
to
mount
directly
onto
a
wall.
Each
speaker
has
two
ke
y
ho
l
es
on
the
back and
will
require
two
1
-1
/2"
(38mm),
#1
0
wood
screws fastened
to a
wall stud.
lf
a
wa
ll
stud
is
unav
aila
ble, install
an anchor
appropriate for a
1-1/2",
#1
0
screw.
NOTE:
You are responsible for
the
correct
se
lection
and
use
of
mounting
hardware (available
through
hardware stores)
that
will
ensure
the
proper and
safe
wal
l-mounting
of
the
speakers.
~CJ&-
r-
Keyholes
[~]
1)
Using
th
e
included wa
ll
te
mpl
at
e,
mark
th
e posi
ti
ons on
the
wall
where you
would
like
to
p
la
ce
the
mounting
scre
ws.
2) Fasten
tw
o
1-1/2"
(38mm),
#1
0
wood
screws
to
the
wall
using
the
mar
kings from Step 1
as
your guide. Leave an
1/16"
(1.5
9mm
) space
between
th
e
wa
ll
a
nd
screwhead.
If
a
wall
stud is
not
ava
il
ab
l
e,
u
se
an
appropr
iate anchor.
3)
To protect
wall, attach 4
ru
bbe
r cushions
(included)
in
s
ugg
es
ted
locations.
4)
Pla
ce
the
speaker on
th
e
wall
by
aligni
ng
the
keyholes
on
th
e back
of
the
speaker
to
th
e
sc
re
wh
eads
on
the
wall.
On
ce
positioned
pr
ope
rl
y,
th
e speaker
should s
li
de
down
slightly
a
nd
become
sec
ur
e.