7
rotate the knob to enter the 4-digit password and then press to confirm.
• To edit paramters: when the LCD is unlocked and any menu button
(4) is pressed, short-press the knob to enter into the next level menu
or parameter. Short-press the knob to select a parameter. The selected
parameter will flash. Rotate the knob to edit the value.
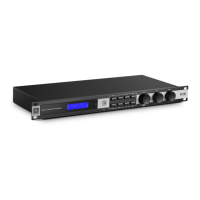
6. MIC: rotate the knob to adjust microphone volume.
7. MUSIC: rotate the knob to adjust music volume.
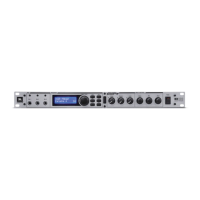
Rear Panel
1. MIC 1 & MIC 2: accepts 1/4” (6.35mm) microphone jack plug. A seperate
gain control is provided for each input.
2. MIC 3: accepts 1/4” (6.35mm) microphone jack plug. A gain control is provid-
ed.
3. OPTICAL: accepts digital signal input.
4. BGM: A pair of RCA connectors. Accepts analog input signal.
5. VOD: A pair of RCA connectors. Accepts analog input signal.
6. REC: A pair of RCA connectors. Connects to an audio recorder for karaoke
recording.
7. OUTPUT CHANNELS: include Right, Left, Center, Sub, Surround Right and
Surround Left output. All uses unbalanced XLR connectors to connect to
professional amplifiers or powered speakers.
8. VENTILATION OUTLET: For cooling-air ventilation. Do not block!
9. POWER SWITCH: Press to turn on or off the device.
10. POWER INLET: Accepts AC power using the power cable provided. Power
requirement: ~220VAC 50Hz.
Section 1 - Introductions