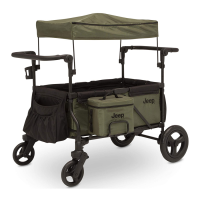
This document is an instruction manual for the Jeep Unlimited Reversible Handle Stroller, model number 12198.
Function Description
The Jeep Unlimited Reversible Handle Stroller is designed for transporting children and features a reversible handle, allowing the child to face either forward or backward. It is compatible with specific infant car seats, including Graco® SnugRide® Click Connect™, Evenflo® Embrace™ Select, and Evenflo® Nurture™ infant car seats (car seats are not included). The stroller requires adult assembly and is intended for use with children who have developed enough upper body control to sit without leaning forward. It includes a 5-point safety harness for securing the child.
Important Technical Specifications
- Model Number: 12198
- Car Seat Compatibility:
- Graco® SnugRide® Click Connect™ Infant Car Seat
- Evenflo® Embrace™ Select Infant Car Seat
- Evenflo® Nurture™ Infant Car Seat
- Weight Limit: Children weighing more than 50 pounds (22.62 kg) or over 42 inches (106.7 cm) tall may cause a hazardous unstable condition.
- Basket/Child Tray Weight Limit: The lower basket and child tray each have a maximum weight capacity of 3 lbs (1.36 kg). Exceeding this limit can lead to hazardous unstable conditions.
- Age Recommendation for Jogging Use: The child occupant should be at least 6 months of age for jogging use, and consultation with a healthcare provider is recommended.
Usage Features
Assembly:
- Adult assembly is required due to small parts.
- Parts include: Stroller Frame, Front Wheels (x2), Rear Wheels (x2), Child Tray, Rear Wheel Axle, Hub Caps (x2), Reversible Handle, Shoulder Pads (x2), Hardware (Metal Washers x6, Locking Clips x2).
- Opening the Stroller: Remove the plastic protection box from the reversible handle levers, release the locking latch clip on the right side, and lift the stroller until it "CLICKS" into a fully opened locked position.
- Attaching Rear Wheels:
- Slide one metal washer onto the rear wheel axle.
- Place the rear wheel onto the axle.
- Slide two metal washers onto the axle.
- Secure washers by inserting the locking pin into the wheel axle hole. Pull outward on each wheel to ensure security.
- Snap the hub cap into the center plastic spoke until it "CLICKS."
- Attach the rear wheel assembly to the frame tubes, aligning with the brake pedal, and push until they "CLICK" into a fully locked position.
- Attaching Front Wheels: Locate the front legs, attach one front wheel to the stroller frame leg, ensuring the swivel lock faces up. A "snap" indicates a locked position. Pull downward to confirm security. Repeat for the other side.
- Attaching Reversible Handle: Insert the handle into the stroller handle housing on both sides until it "CLICKS" into a fully locked position. Lift upward to ensure security.
- Attaching Canopy: Push both sides of the canopy posts inserts into the canopy housing until they "CLICK" into a fully locked position. To remove, press release buttons and lift.
Set Up and Use:
- Rear Back Wheel Brakes:
- To Lock: Apply downward pressure to the linked brake lever on the rear wheel axle.
- To Unlock: Gently lift up on the linked brake lever.
- WARNING: Always set brakes when not pushing the stroller, especially on hills or inclines, and never leave unattended.
- Front Wheel Brakes:
- To Lock: Apply downward pressure to the wheel brake on the back of the wheel.
- To Unlock: Gently lift upward on the wheel brake.
- Front Wheel Swivel Lock:
- To Lock: Apply downward pressure to the swivel lock on the front of the wheel.
- To Unlock: Gently lift upward on the swivel lock.
- Canopy and Sun Visor Adjustment:
- To Open: Pull the front edge of the canopy forward until fully opened. Lock by lifting the canopy lock downward.
- To Close: Push canopy lock on both sides and rotate backward.
- To Open Sun Visor: Grab the front edge of the sun visor and rotate forward until fully extended.
- Attaching and Removing Child Tray:
- To Attach: Rotate and align child tray posts with stroller tray posts. Slide into a fully locked position. Pull upward to confirm security.
- To Remove: Press release buttons underneath the child tray and pull upward.
- Seat Back Recline Positioning:
- To Recline: Pull the bar on the back of the seat upwards and rotate the seat downward.
- To Upright: Push the seat upwards until it "CLICKS" into a locked position.
- Adjusting Reversible Handle: Slide both release levers upward, then rotate the handle to the forward position until it "CLICKS." Lift to ensure security.
- Securing Seat Pad:
- Locate the plastic knob on the headrest frame and the plastic band on the seat pad headrest. Loop the band to the knob.
- Locate the two locking buttons on the seat pad and snap them into the lock slots of the stroller frame. Repeat on the opposite side.
- Leg Rest Adjustment: Press both buttons underneath the leg rest and rotate it upward or downward to adjust positioning.
- Adjustable Foot Rest (Front Facing Handle): Rotate the foot rest upward when using the front-facing handle.
- Securing Child (5-Point Safety Harness):
- Place the child in the stroller, positioning the crotch belt between their legs.
- Pull shoulder straps over the child's arms and shoulders, fastening both strap ends to the restraint system.
- Fasten both waist belts to the buckle on each side of the crotch belt until they "click."
- Check that the restraint system is securely attached by pulling it away from the child.
- To Tighten: Feed the anchored end of a waist belt up through the buckle to form a loop, then pull the free end. For shoulder straps, feed the top end through the plastic stay, then pull the bottom end down.
- To Loosen: Feed the free end of a waist belt up through the buckle to form a loop, enlarge the loop by pulling the end toward the buckle, then pull the anchored end to shorten the free end. For shoulder straps, feed the bottom end through the plastic stay, then pull the top end up.
- Note: Always ensure the restraint system is securely fastened after adjustment.
- Attaching Car Seats:
- Lock back wheels, recline the seat to its lowest position, and fold the canopy.
- Align the car seat with the child tray, angling feet first, and lower it into a locked position. Both Graco® and Evenflo® car seats lock in the center of the child tray.
- Secure the footrest side of the car seat to the stroller using the straps with velcro. Pull up on the car seat to confirm security.
- To remove, undo latches and unlock the car seat from the child tray.
Folding Stroller:
- Ensure the canopy is fully closed and the seat is fully reclined.
- Make sure the front wheel brake is facing forward.
- Lift the left side lever and hold upward while pressing the center handle button inward.
- Push the handle forward to close.
- Secure the stroller in the folded position by fastening the fold locking latch over the extended rivet on the lower frame tube.
Maintenance Features
- Cleaning Plastic Parts: Use a mild cleaning solution with warm water on a sponge or damp cloth.
- Cleaning Fabric: Hand wash fabric with a damp cloth and air dry. Do not use bleach.
- Lubrication: Use silicone or graphite-based lubricant to prevent squeaking in the wheels.
- Regular Checks: Regularly inspect the stroller for loose screws, worn parts, torn material, or stitching.
- Damage/Malfunction: Replace or repair parts as needed. Discontinue use if the stroller becomes damaged or malfunctions.
- Missing/Broken Parts: Never use if any parts are missing or broken. Contact the manufacturer for replacement parts and instructions. Never substitute parts.
- Wheel Security: Never use the stroller if any wheels are not in a fully locked position. Contact customer service for assistance.
Extended Warranty
Delta Children offers an extended warranty covering mechanical failure from normal use, items stopping due to normal wear and tear, and unexpected surprises. This warranty provides 2 years of protection. To register your product and add the extended warranty, visit https://www.deltachildren.com/pages/product-registration. The extended warranty is available in specific states only (Arkansas, Colorado, Delaware, District of Columbia, Georgia, Idaho, Illinois, Indiana, Iowa, Kansas, Kentucky, Louisiana, Maryland, Michigan, Mississippi, Missouri, Nebraska, Nevada, New Hampshire, New York, North Carolina, North Dakota, Pennsylvania, Rhode Island, South Dakota, Tennessee, Utah, West Virginia).
Customer Support
For any difficulties with assembly, missing parts, or usage, contact the Customer Experience Center directly:
- Phone: (646)-435-8726
- Email: gcs@DeltaChildren.com
- Website: www.DeltaChildren.com