Do you have a question about the Jeep WRANGLER 60001 and is the answer not in the manual?
Use mild soap and water to clean the wagon's fabric and frame.
Check for loose screws, worn parts, or torn material regularly.
Discontinue use if damaged; contact customer service for repair.
Covers mechanical failure from normal use and wear and tear.
Register product online for additional warranty information and details.
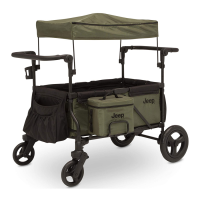
Components including rear wheels, front wheels, and rear wheel axle.
Includes wagon frame, canopy, and fabric liner.
Cup holder, handlebar cover, and car seat adapters.
Unfolding the wagon by unlatching and pulling it open.
How to attach rear wheels to the axle and the axle to the frame.
Instructions for removing rear wheels and the rear wheel axle.
How to attach and detach the front wheel to the wagon housing.
Steps for installing, removing, and folding the canopy.
How to engage and release the front wheel brake lock mechanism.
Instructions for engaging and releasing the rear wheel brake lock.
Mechanism to lock or unlock the front wheel's swivel function.
Technique for lifting and pulling the wagon over sidewalks and curbs.
How to adjust the handlebar height and ensure it locks securely.
Instructions for deploying and storing the sun shade.
How to attach, use, and store the mesh net.
Steps to install and remove the cup holder onto the frame.
Detailed steps to fold the wagon for compact storage.
Steps to position child and secure the 5-point safety harness.
How to adjust and tighten waist and shoulder straps for a snug fit.
How to adjust and loosen waist and shoulder straps for comfort.
Detailed steps to attach and detach the fabric liner and its straps.
Instructions for installing and removing shoulder straps for cleaning.
Steps to remove the seat pad for cleaning purposes.
How to attach the support bar tube to the wagon frame.
Steps to attach the car seat adapter housing to the support bar tube.
How to connect the 5-in-1 adapter to the car seat adapter.
How to attach Graco SnugRide® car seats to the adapter.
Using velcro straps to further secure the car seat.
Steps to safely remove the infant car seat from the adapter.
How to attach Chicco Keyfit 30™ car seats to the adapter.
Using velcro straps to further secure the car seat.
Steps to safely remove the infant car seat from the adapter.
How to attach Evenflo Nurture™/Embrace™ car seats to the adapter.
Using velcro straps to further secure the car seat.
Steps to safely remove the infant car seat from the adapter.
How to attach Britax B-Safe 35™ car seats to the adapter.
Using velcro straps to further secure the car seat.
Steps to safely remove the infant car seat from the adapter.
The device described in the manual is a Jeep Wrangler Stroller Wagon, model number 60001, manufactured by Delta Children's Products Corp. It is designed as a double occupant stroller wagon for two children and is compatible with various infant car seats, including Graco® SnugRide® Click Connect™ 30, 35, and 40, Evenflo® Embrace™ Select, Evenflo® Nurture™, Chicco® Keyfit 30™, and Britax® B-Safe 35™.
The Jeep Wrangler Stroller Wagon serves as a versatile transport solution for two children, offering features for comfort, safety, and convenience. It can be used as a traditional stroller wagon or adapted to carry an infant car seat, making it suitable for newborns and up when using the car seat adapter, or for children 6 months and older without the adapter. The wagon is designed for adult assembly and features a foldable frame for storage, a canopy for sun protection, and a mesh net for additional shade and insect protection. It includes a 5-point safety harness to secure children and a cup holder for convenience. The wagon is equipped with both front and rear wheels, with the front wheels having a swivel lock feature and both sets of wheels having brake mechanisms.