Do you have a question about the Jeep JE-C28L and is the answer not in the manual?
The device described in this manual is a Jeep Model: JE-C28L CITY ELECTRIC BIKE.
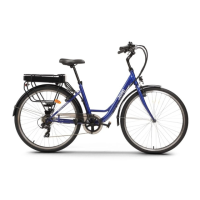
The Jeep JE-C28L is a power-assisted city electric bike designed for urban use. Its primary function is to provide motorized assistance to the rider, making pedaling easier and extending the range of travel. The electric power system works in conjunction with the rider's pedaling speed: the faster the rider pedals, the stronger the electric assistance, up to a limit of 25 km/h. If the rider stops pedaling, the motor will stop. The bike can also be used as a conventional bicycle without electric assistance, even if the lithium battery is not present.
The bike features an LCD display that shows various information, including battery output voltage, PAS (Pedal Assist System) level (0-9), headlight indication, speed (km/miles), and mileage (Total, Single, Maximum, Average). It has a push-assistance mode (6 km/h) for when the user needs to push the bike by hand. The bike is equipped with front and rear brakes, a derailleur for shifting gears, and a rear luggage rack.
Power On/Off: To turn on the display, press and hold the M button. Press it again to turn off the display. The display can be set to automatically turn off after a period of inactivity (01-60 minutes, with 00 meaning no auto-switch off).
Front Light: Press the button near the display to turn the front light on or off. The headlight icon on the display will indicate its status.
PAS Level Selection: When the display is on, use the "+" and "-" buttons to select the desired motor assistance level from 0 to 9. The display will show the current level.
Mileage and Speed Display: The M button can be used to cycle through different display modes: Single Mileage (TRIP), Total Mileage (ODO), Maximum Speed (MAXS), and Average Speed (AVG). The unit for speed and mileage can be changed between kilometers (00) and miles (01) in the "P1" setting.
Push-Assistance Mode: Press the "-" button to activate the push-assistance mode, which provides a constant speed of 6 km/h. This mode is intended for pushing the bike by hand and should not be used if the wheels are not in contact with the ground to avoid injury. Releasing the "-" button deactivates this function.
Gear Shifting: The bike features a derailleur switch. Press outward with your thumb to shift gears up, and press the downshift button to go down one gear at a time.
Handlebar Adjustment: The handlebar height can be adjusted by loosening the clamping screw with a 6 mm hex wrench and raising or lowering the stem. Ensure the minimum insertion mark is never visible. The tilt of the handlebar can be adjusted by loosening the stem screw-pivot with a 5 mm hex key. The handlebars should be correctly centered after adjustment.
Brake Adjustment: Brakes should be adjusted so that the brake surface contacts the brake disc tightly when the handlebar is clenched. The brake cable tension can be adjusted using the screw located at the brake handle (marked "A"). Turning the screw inward relaxes the cable, moving the brake shoe farther from the rim; turning it outward tightens the cable, moving the brake shoe closer to the disc. For disc brakes, ensure uniform clearance between the brake pad and disc (marked "D") by adjusting the screw (marked "A").
Pedal Assembly: The pedals are marked "L" for left and "R" for right. Both should be tightened in a forward position.
Saddle Adjustment: The saddle height can be adjusted by loosening the seat holder pipe clamp. Ensure the seat does not touch other components when in its lowest position and that the minimum insertion mark of the seat tube is not visible. The ideal riding height allows for a slight bend in the knee when the foot is at the bottom of the pedal stroke, or straight legs with the heel on the pedal for checking.
Pedaling Power: The electric power system activates after a full turn of the pedal. This protects the motor and controller. It is recommended to use pedal power when starting or climbing to conserve battery and motor life. The controller has overload protection that automatically cuts off power and restores it when the load returns to normal.
Battery Charging: The battery should be fully charged before the first use. It can be charged directly on the bike or removed for charging. Charging should occur in a safe, dry, and clean environment, and not below 0°C. Only the original charger should be used. Charging Procedure:
Battery Storage: For long-term storage, remove the battery from the bike and store it properly at an ambient temperature of 20-25°C. The battery should be fully charged every 2 months, even when not in use, to prevent loss of capacity. Do not store the bike below 0°C.
Bike Cleaning: Ensure the charging cable is disconnected and the bike is powered off. Wipe the bike with a soft, damp cloth and neutral detergent, then dry with a clean cloth. Avoid high-pressure water flushing to prevent damage to electronic components.
Battery Disposal: Lithium batteries contain dangerous substances and must be disposed of safely according to local recycling and environmental regulations. They should not be treated as common domestic waste or thrown into fire.
Product Disposal: The product and its electronic accessories should not be disposed of with household waste at the end of their life. They should be separated and recycled responsibly to promote sustainable reuse of materials.
Safety Checks Before Riding: Before each ride, check the tire pressure, ensure front and rear screws are tightened, confirm sufficient battery charge, and verify the brake system is adjusted. Also, ensure handlebars and saddle are adjusted correctly.
Transportation of the E-Bike:
Warnings: