The Jensen AirLink 2200 is a versatile wireless dual-band device designed to extend and manage your wireless network. It can function as a wireless repeater, an Access Point (AP), or an Access Point Client, offering flexibility to suit various networking needs. This device aims to improve wireless coverage, connect wired devices to a wireless network, or create a new wireless network.
Function Description
The primary function of the AirLink 2200 is to act as a wireless dual-band repeater. In this mode, it extends the coverage of an existing wireless network. If your current wireless router is dual-band (transmitting on both 2.4GHz and 5GHz frequencies), the AirLink 2200 can extend both networks simultaneously. This is particularly useful for eliminating Wi-Fi dead zones in larger homes or offices. The setup for repeater mode involves placing the device near your existing router, connecting to its default network, and then using a web browser to select the wireless network(s) you wish to extend. You can also choose to give the repeated network a new name.
Secondly, the AirLink 2200 can operate as an Access Point (AP). In AP mode, it functions as a wireless transmitter, creating a new wireless network. To use it in this mode, the AirLink 2200 must be connected to your existing wireless router or modem via a network cable. It will then broadcast a wireless network on both 2.4GHz and 5GHz frequencies. This mode is ideal for adding wireless capabilities to a wired network or for creating a separate wireless network. The device comes pre-configured with a unique network name and password, which can be found on the product label.
Thirdly, the AirLink 2200 can serve as an Access Point Client. In Client mode, it acts as a wireless receiver, allowing devices that do not have built-in wireless capabilities (such as older TVs, set-top boxes, or desktop computers) to connect to your wireless network via an Ethernet cable. This effectively bridges wired devices to your wireless infrastructure. Similar to repeater mode, setting up the device in client mode involves connecting it to your computer, accessing its web interface, and selecting the wireless network it should connect to.
Usage Features
The AirLink 2200 offers several features to enhance its usability and integration into your network:
- Dual-Band Support: The device supports both 2.4GHz and 5GHz frequencies. The 2.4GHz band is widely used but can suffer from interference due to many overlapping networks and other electronics. The 5GHz band offers faster speeds and less interference, making it suitable for bandwidth-intensive tasks. When operating in repeater or AP mode, it can extend or create networks on both bands, providing optimal performance.
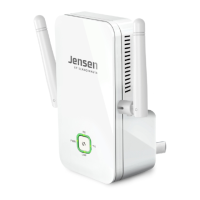
- Mode Selection Switch: A physical switch on the device allows you to easily select between AP, Repeater, and Client modes. This simplifies the configuration process, as the device's behavior is determined by this switch.
- Web-Based Setup: The setup process for all modes is primarily performed through a web browser (e.g., Internet Explorer, Chrome, Firefox) on a computer, smartphone, or tablet. This user-friendly interface guides you through the necessary steps, such as selecting networks and entering passwords.
- WPS (Wi-Fi Protected Setup): For quick and secure connections, the AirLink 2200 supports WPS. In repeater mode, you can connect it to your wireless router by pressing the WPS buttons on both devices. In AP mode, you can connect WPS-enabled devices (like printers) to the AirLink 2200 by pressing their respective WPS buttons. In client mode, you can connect the AirLink 2200 to your main wireless network using WPS. This eliminates the need to manually enter encryption keys.
- Network Name and Password Customization: In AP mode, you can change the default network names (SSIDs) and passwords for both the 2.4GHz and 5GHz networks through the web interface. This allows for personalized network identification and enhanced security.
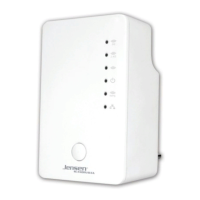
- LED Indicators: The device features several LED indicators (2.4GHz, 5GHz, WLAN status, Power, WPS, LAN port) that provide visual feedback on its operational status, signal strength, and connection activity. These LEDs are crucial for troubleshooting and optimizing placement. For instance, the 2.4GHz and 5GHz LEDs indicate signal strength (steady for excellent, slow flashing for poor, quick flashing for very poor) and connection status. The WPS LED indicates WPS activity (slow flashing for in progress, fast flashing for successful connection, quick flashing for error). The LAN port LED indicates active data transmission.
- Placement Guidance: The manual emphasizes the importance of optimal placement for the AirLink 2200, especially in repeater mode, to ensure it receives good signals from the main wireless router. It advises against placing the device inside cabinets, behind TVs, or near other equipment that generates electromagnetic radiation. The LED indicators are recommended for assessing signal quality during placement.
Maintenance Features
- Factory Reset: If you encounter problems with the AirLink 2200 or wish to set it up for a different network, you can easily reset it to its factory default settings. This involves plugging it into a power outlet, waiting 20 seconds, then pressing and holding the WPS button for 10 seconds. The WPS LED will flash to confirm the reset sequence, and after 30 seconds, the device will be ready for a new setup. This feature is invaluable for troubleshooting and reconfiguring the device.
- Troubleshooting Tips: The manual provides specific troubleshooting steps for common issues, such as the device not connecting to the network in repeater or client mode. These steps include checking placement, ensuring the correct wireless network is selected, and verifying the encryption key. It also recommends performing a factory reset if problems persist.
- Support Information: JensenScandinavia offers comprehensive support, including phone support and email assistance. Products come with a 12-month free support period. The manual provides contact numbers for various regions and outlines the information to include in email inquiries to ensure efficient help. This commitment to customer support helps users resolve any issues they might encounter.
- Firmware Updates (Implied): While not explicitly detailed as a user-accessible feature, devices of this nature typically receive firmware updates to improve performance, add new features, and address security vulnerabilities. Users would usually check the manufacturer's website for such updates.