EasyManua.ls Logo

Jensen MWR75 User Manual

Jensen MWR75
3 pages
To Next Page IconTo Next Page
Page #1 background imageLoading...
Page #1 background image
Figure A
Introduction
Thank you for choosing a Jensen product. The MWR75 Marine Wired Remote Control allows you to control
basic functions of Jensen Marine radios, including power, mode, volume, tuning, CD, CD changer and
satellite tuners.
Installation
1. Choose a mounting location on the instrument panel that will allow enough room behind the panel to run
the wired remote cables to the existing radio.
2. Cut a hole in the instrument panel using the supplied template. At least 2 ½" depth is needed to mount
the remote control.
Important: Do not mount unit where it can be submerged or subjected to high pressure spray.
3. I
nsert the remote control into the rubber foam gasket and then into the hole in the instrument panel.
Secure from the other side using the threaded ring, illustrated in Figure A.
MWR75 Wired Remote Installation Instructions
M
UTE
Question and Answer IconNeed help?

Do you have a question about the Jensen MWR75 and is the answer not in the manual?

Jensen MWR75 Specifications

General IconGeneral
BrandJensen
ModelMWR75
CategoryRemote Control
LanguageEnglish

Summary

Introduction

Installation

Mounting Location

Choose a location on the instrument panel that allows enough room behind the panel for wired remote cables.

Cut Mounting Hole

Cut a hole with at least 2 1/2" depth using the template. Do not mount where submerged or subject to high pressure spray.

Secure Remote

Insert the remote control into the gasket and panel hole, securing it with the threaded ring.

Wiring

Cable Routing and Extension

Route cables away from sharp objects and pinching points. Use extension cables and Y-adapters for extended reach or multiple remotes.

Operation

Remote Control Layout

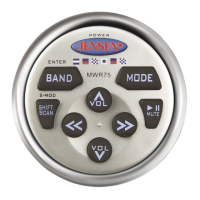
Diagram illustrating the functions of the MWR75 wired remote control, including Power, Volume, Mode, and Tuning.

Related product manuals