15
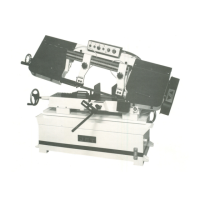
Blade-Table Squareness
1. The band saw blade must be perpendicular
to the table to ensure a straight cut. This
setting should be checked. Special blade
setting gauges can be purchased for this
type of inspection; however, it can also be
done using more common shop items, as
follows.
2. First “extend” the surface of the blade by
clamping a straight, flat object to the blade.
(Figure 16a uses a small, lightweight
aluminum ruler.) Use a lightweight clamp.
3. Place a square on the table and against the
ruler. The square should lie flat against the
ruler without a gap.
4. If there is a gap, loosen the bolt (Figure 16b)
on each blade guide assembly and rotate
the blade guide assembly until there is no
more gap between the square and the ruler.
5. Re-tighten the bolts.
6. After making this adjustment, be sure to re-
check other blade adjustments as noted in
your manual.
Adjusting Automatic Shut-Off
The saw should stop after the cut has been
completed:
• If the saw completes the cut and continues
to run, adjust the stop tip (A, Fig. 17) down.
• If the saw shuts off before the cut is
complete, adjust the stop tip (A, Fig. 17) up.
• If the saw stops cutting but continues to run,
adjust the stop bolt (B, fig. 17) down.
The saw is properly adjusted when the saw
shuts off just after the blade has finished the cut.
Adjusting the Vise
1. To open and close the vise use the
handwheel (C, Fig. 17).
2. The vise can be adjusted for square and
miter cuts. Loosen the hex cap bolts and
adjust the vise for the cut.
3. Adjust the blade guides so they are as close
as possible to the material without interfering.
4. There is a scale on the back side of the bed
to aid in setting up the vise for 90° cuts or a
particular miter. Hint: Always check the
vise setup with a combination square,
against the blade and vise, so that you can
verify the vise setting is correct.
Fig. 16a
Fig. 16b

 Loading...