13
Adjustments
Handwheel Adjustments
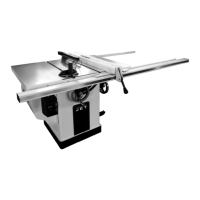
Referring to Figure 10:
The front handwheel (B) controls the raising and
lowering of the blade (blade height).
The side handwheel (D) controls the blade tilt. The
blade can be adjusted for a tilt between 90º
(vertical or a setting of 0º on the scale) and 45º left
tilt (D).
Blade height
1. Loosen the lock knob (A) on the front
handwheel (B).
2. Turn the handwheel (B) clockwise to raise and
counterclockwise to lower the blade.
3. Tighten the lock knob (A).
Blade tilt adjustment
1. Loosen the lock knob (C) on the side
handwheel (D).
2. Turn the handwheel (D) counterclockwise to
adjust the saw blade down to 45º left tilt. Turn
clockwise to adjust the saw blade to maximum
of 90º.
3. After selecting the position, tighten the lock
knob (C).
Insert Adjustment
Adjust the setscrews in the insert with a 2.5mm hex
wrench (Figure 11) to ensure that the insert is
stable and flush with the table top.
Miter Gauge
Referring to Figure 12:
1. Operate miter gauge by loosening the lock
knob (A) and turning the miter body (B) to the
desired angle. To move gauge beyond index
stops of 45 and 90, flip down the stop (C).
2. Adjust index stops by turning one of three
adjustment screws (D).
Note: Always make test cuts. Do not rely solely on
miter gauge indicator marks. There are holes in the
miter gauge body that will allow you to mount a
wooden extension fence.
Figure 10
Figure 11
Figure 12
 Loading...