INSTALLATION INSTRUCTIONS
1. Pump Location
The John Blue Squeeze Tube Pump should always be mounted even with or lower than the
fertilizer tank for accurate metering. The pump can be mounted to any flat surface. There is no
need to have the pump mounted in the middle of the equipment. The pump creates enough
pressure to place it at the end of the implement. Make sure all connections, filters and
couplings are tight so the pump can lift and pull product to it. The speed should not exceed 100
RPM.
Any shaft that turns in ratio to the ground can be considered to drive the pump. The pump only
requires a small amount of torque to turn it. Typically it is one of the seed shafts, which can be
used, but try to have it before the transmission so that if you change seed population the
fertilizer rate remains unchanged.
2. Pump Mounting
Two angle iron bars with holes are supplied and can be bolted to each side of the pump. Undo
the frame end plate bolts, match up the holes in the angle iron and retighten the nuts. The
hook bolts supplied can be used over the angle iron or the frame channel to bolt the pump to
your equipment.
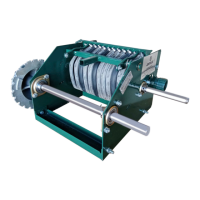
3. Pump Mounting of Combination Pumps
The mounting of combination and double pumps
is not different than what is described above as to
location and drive system. The exception is when
you want
to keep the starter fertilizer always at the same
rate and want to use the coned sprockets to
vary the nitrogen rates. Figure 1 shows this
type of system, where you drive both sides of
the pump.
(Picture A)
Special plumbing is needed because both manifolds will have product flowing to it. If two
different products are to be pumped, two independent plumbing systems must be used. As the
center manifold is fed through the chain it is important to check the clearance with the hose and
fittings used.
Note: The sprockets that come on
the side across from the coned
sprockets are not used and must
be removed.
(FIGURE 1)
 Loading...