4610, 4615, 4620P, 5610, 5610D, 5610L, 5610P, 5610Q, 5610VL,
5610VQ, 5611, 5611L, 5611Q, 5615, 5615L, 5615Q, 5620, 5620D, 5620P,
5620VP, 5620V, 5625, 5625P, EZ-1, FFET, SB1, SB1A, SB2, SB2A, SBW
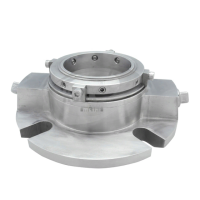
STANDARD CARTRIDGE SEALS
Installation, Operation & Maintenance Instructions
3
TYPE
Before start-up, ensure that all personnel and assembly
equipment have been moved to a safe distance so there
is no contact with rotating parts on the pump, seal,
coupling or motor.
Seal installation should be handled only by qualified
personnel. If questions arise, contact the local John
Crane representative. Improper use and/or installation
of this product could result in injury to the person and/
or harmful emissions to the environment, and may
affect any warranty on the product. Please contact
the company for information as to exclusive product
warranty and limitations of liability.
8. Maintenance
During operation, periodic visual external inspection of the seal should
be carried out. A measure of seal condition is the level of emission of the
process or barrier fluid and as no maintenance is possible while installed,
the seal should be replaced when emissions become unacceptable. It is
recommended that a spare seal be held in inventory to allow immediate
replacement of a removed seal.
ATTENTION Machine adjustments that involve axial movement of the
shaft may cause damage to the seal while installed.
Before attempting impeller clearance adjustment with a cartridge seal,
refit the spacers then loosen all the drive collar socket set screws. With
the shaft in its new working position, tighten with new socket set screws
and remove the spacers. Keep the spacers for future use.
For a component seal (non-cartridge), remove the seal, adjust the
impeller clearance then re-fit the seal at its correct working length.
8.1 Decommissioning the equipment
Ensure that the machine is made safe to work on by using a secured
isolation under the sole control of the person(s) working on the machine
and which includes the following:
•
The driver is fully isolated from the machine using an appropriate,
secured isolation method;
•
Any pressure is safely and fully released;
•
Any liquid is safely drained;
•
Any gas safely vented;
•
Any chemicals are safely and fully removed;
•
Any other energy storage is safely and fully released;
•
The isolation is proved to be effective at the point of work before work
is commenced.
If the machine has been used on toxic or hazardous
fluids, ensure that the machine is correctly
decontaminated and made safe prior to commencing
work. Remember that fluid is often trapped during
draining and may be present inside the seal chamber.
The machine instruction manual should be consulted to
check for any special precautions.
8.2 Removing the seal
NOTE Remove from the machine with care, the seal may be suitable
for reconditioning after service, if otherwise undamaged.
1. Referring to the machine instruction manual, dismantle the machine
sufficiently to expose the seal and the seal housing.
ATTENTION For a cartridge seal, the setting spacers must be refitted
before starting the removal procedure.
2. Deburr, clean and lubricate the shaft over which the seal will pass and
remove the seal unit in the reverse order to installation.
A mechanical seal must always be serviced after removal from the
machine. In order to maximise reliability and minimise safety risks, it
is strongly recommended that used seals are returned to John Crane
for rebuilding to as-new specification (essential for non-contacting gas
seals). Alternatively ask for John Crane service personnel to visit site. For
seal dismantling and assembly instructions, refer to John Crane.
See “Transportation and Storage” section regarding shipping.
NOTE It is recommended that a low pressure integrity test is carried
out after repair and before installation on the machine.
8.3 Spare parts
Only John Crane spare parts should be used to recondition seals.
It is advisable to stock on site sufficient spare seal cartridges or the
replacement parts shown on the installation drawing or as advised by
John Crane to allow immediate replacement of the seal in the machine.
The order codes for spare parts can be found in the parts list on the
installation drawing or from John Crane directly. In the case of non-
contacting gas seals, only complete cartridges should be stored.
The following data is necessary for spare part orders:
•
Part number
•
Quantity
9. Quality Assurance
This seal has been assembled in accordance with John Crane Quality
Assurance Standards and with proper machine maintenance and use
will give safe and reliable operation to the maximum recommended
performance as shown in any relevant approved John Crane publication.
10. Mechanical Seal Piping Plans
To create the optimum environment for the mechanical seal it is usually
necessary to add piping and sometimes extra equipment.
For advice on a specific application please contact John Crane.
For liquid lubricated seals, venting of air trapped around the seal faces
is essential for correct seal operation. For horizontal machines the best
method of automatically achieving this is a piping connection at top dead
center (TDC). For vertical machines a piping connection above the seal
faces is required.
 Loading...