BEST PRACTICES TO EXTEND
THE LIFE OF YOUR WATERCRAFT:
• Fight corrosion from day one
Use dielectric grease at all of the sockets and connections, including the
battery terminals and the circuit breaker connections. If any metallic
elements of the drive and/or watercraft have been exposed to saltwater
or brackish water, thoroughly rinse with freshwater upon return.
• Develop good battery charge/discharge habits
No matter which type you choose, the battery is likely the second
largest investment you will make in the watercraft. Learn what the
best possible habits are for extending its lifespan. Go to
www.oldtowncanoe.com/batteries for more information about
battery selection.
• Immediately address any damage that could lead to larger issues
Abrasions, nicks, and gouges on the watercraft are common.
Address any of these on metallic or powder-coated surfaces as soon
as possible. Tighten any elements that seem to be loosening or
backing out of their factory condition.
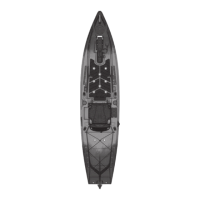
AUTOPILOT™ 120/136
INSTALLATION AND OPERATION:
• Before launch, mount drive to the
quick release bracket on the bow
side of the drive opening. The four
pins on the drive engage on this
plate. The top plate must latch fully
for proper installation (fig 8).
• Attach the deploy cable (fig 9).
• Plug the AutoPilot™ PowerDrive
System male plug into the drive
socket at the front end of the
console well. (Note the plug and
socket are keyed to maintain
proper polarity.)
• Attach Kill Switch Key to Kill
Switch Base on right side of seat.
Securely attach lanyard to your
person.
• After launch and when at adequate
depth, deploy the drive for
operation by aligning the motor
with the console opening, pulling
the deployment line handle located
to the left of the seat near the end
of the footrail (fig 10).
• Secure the deployment line into
the jam cleat to keep the drive
down in an operational position.
Drive must be fully down for
correct operation.
• To operate your AutoPilot™
PowerDrive system, thoroughly
read the i-Pilot Manual found at
www.oldtowncanoe.com/manuals
or refer to the Minn Kota website
www.minnkotamotors.com/learn/
technology/trolling-motors/i-pilot
for tutorial videos and other
documentation. Understand the
function and operation of all buttons
and modes of the i-Pilot Remote
before embarking on the water.
• Rudder Deploy/Stow is controlled
using the long lever found next to
the seat. Toggling the lever will
deploy or stow the rudder (fig 11).
(cont.)
AUTOPILOT™
120
AUTOPILOT™
136
106 POWERED
BY MINN KOTA
Getting Started With Your
Powered
Old Town Sportsman Watercraft
POWERED WATERCRAFT SAFETY:
Always have a personal flotation device and paddle with
you when taking out a powered watercraft.
Be especially careful when navigating in moving water,
near dams, waterfalls, and/or hazardous water conditions.
For more information on features, specifications, processes,
maintenance, and troubleshooting tips, visit
OLDTOWNCANOE.COM/SPORTSMAN
AUTOPILOT™ 120/136
INSTALLATION AND OPERATION (CONT.):
Steering The AutoPilot™ 120/136 :
• Steering of the boat is performed with the foot-steering rudder
pedals and/or the i-Pilot System.
• Lift orange pedal triggers to adjust foot pedals to a comfortable
sitting position with your legs extended and knees slightly bent.
• When the craft is moving forward, push the left pedal to steer left, or
push the right pedal to steer right.
• To steer with i-Pilot Remote, understand that the propeller only
provides forward thrust. To travel in reverse, the motor must be
turned 180 degrees.
• Caution should be used when operating the AutoPilot™ while standing
and while near dams, waterfalls, and/or moving water conditions.
For more information on the above or links to owners
groups for Old Town Sportsman watercraft, visit
OLDTOWNCANOE.COM/SPORTSMAN
FIG 10
FIG 11
FIG 8
FIG 9
WARNING: Operating, servicing and maintaining a recreational marine vessel can
expose you to chemicals including engine exhaust, carbon monoxide, phthalates, and lead,
which are known to the State of California to cause cancer and birth defects or other
reproductive harm. To minimize exposure, avoid breathing exhaust, service your vessel in a
well-ventilated area and wear gloves or wash your hands frequently when servicing this
vessel. For more information go to www.P65warnings.ca.gov/marine.