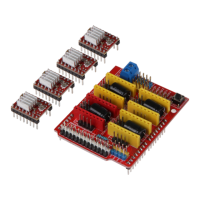
6. CONNECTING THE EXPANSION BOARD
The ARD-CNC-Kit1 supports the Arduino Uno and Arduino Uno compatible
boards.
The CNC expansion board is simply plugged onto your Arduino Uno. It needs
an additional power supply between 12 V and 36 V.
ATTENTION!!!
Pay attention to the correct orientation of the A4988 motor driver,
otherwise it will be damaged.
Place the motor driver on your CNC board as shown in the following
picture.
7. EXAMPLE CODE
On the following page you can have a code example with which you can
easily test your CNC kit. Please copy the code completely into your Arduino
IDE.
ATTENTION !!!
No end position detection, the motors do not stop automatically.
You must set the multimeter to the setting (V
DC voltage
). Next, you need to
attach the alligator clip cable with one side to the positive measuring tip of
the multimeter and with the other side to the metal of the screwdriver. With
the negative measuring tip of the multimeter, go to the nearest GND of the
PCB. Now you can read on your multimeter how much voltage is coming to
your motor driver. To increase the voltage you must turn the screwdriver
clockwise and to decrease the voltage turn it counterclockwise.