~
LJ
4
LJ
1
(~
-
OB
!
4
lJ
® Set the minute
Press and reliiase the STARTBUTTON to advance
one minute un til the
co
rr
ect minute appears.
After the minute is set, press
<!>
BU
TT
ON, the
Ye
ar
figure is
fl
ashing
au
to
ma
tica
ll
y.
@ Set the year
Press and release the S
TART
BU
ITON
to
advance
one year until
th
e correct year appears.
A
ft
er the year is set, pres
s<!>
BUTTO
N,
the Mon th
figure will appea
r.
® Set the mon
th
Press and release the STARTBUTTON to
ad
vance
one mon th
un
ti
l the correct mon
th
appears.
After the
mo
n th is set, press
<!>
BUTTO
N,
the Date
fig
ur
e is flashing a
ut
omatically.
® Set the date
Pre ss and re lease the ST
AR
T BUTTON to ad v
an
ce
one day
un
ti
l the correct
mo
n th appear
s.
After the day is set, press
<!>
BUTTON to exit the
setti
ng
mode.
Temperature
Taking
Hints
To ens
ure
that the
reading
al ways r
eflec
ts the body t
emperat
ure
a
cc
urately,
you
need
to
take
ac
count
of the foll
ow
ing factors whi ch
may
af
fect
an
accurate
reading.
1.
It
is
imp
or
tant
to know each indivi
dua
l's normal
tem
p
era
tur
e
wh en they are
wei
l.
Th
is is the on! y way to accurately diagn
ose
a fever. To determine
normal
temperatur
e, take
multiple
r
eadings
wh en healthy.
Re-mea
sure with a s
tand
ard
digital the
rmomet
er
for
conf
ir
mation.
2. U
ser
s must be
inside
for
30
minutes
before
taking
a
measureme
nt.
N
ot
e: Us ers and the ther
mometer
should
be
in the
same
ambient
t
emp
erature for at !east l 0 minutes be fore taking a r
ead
ing.
3.
Us
ers s
hould
not
drink
, eat,
or
be physi
ca
lly
ac
ti
ve su ch as
ba
thin
g, show
er
ing, sh
am
p
ooing
and
h
air
dr
ying
befo
re/while
tak
ing
the
me
asurem
ent. Rem
ove
hat and ha ir and
wa
it
10
minute
s
bef
ore
tak
ing
a r
eading
.
4. Oils
or
cosmetics on t
he
for
ehead
may
give
a lower
temper
at
ur
e
reading
th an
the
ac
tuai one.
Rem
ove
dirt
from the
forehead
be fore
taking a me
asur
ement. Wail at !east 10 minutes after washing the
f
ore
head a rea
before
ta
king
a r
ea
din
g.
5.
Holding
a
band
on the f
oreh
ead
for
an
y len
gt
h of
lim
e will
aff
e
ct
the tem
pe
rat
ur
e
read
ing.
6.
Do not
lake
temperature
ov
er
scar
tissu
e,
open
sores
or
a
bra
sio
ns.
7.
Do not u
se
the
thermomet
er on a
perspiring
or
swea
tin
g
forehead
,
as this may
affect
the
read
ing.
8. Don't
lake
a meas
urement
while
or
immediate
! y after
nur
s
ing
a
bab
y.
9.
Do
not use this
ther
mom
eter
outd
oors.
JO.
Do
not
take
tem
pe
ratures
with
thi
s th
er
m
omete
r
near
place
s
thal
ar
e
ver
y hot, such as
fireplace
s
and
stoves.
1
1.
The
probe
windo
w
of
the
thermometer
is the most de
licate
part
of the deviee.
Do
not touch the probe win do
w.
The
accuracy
of
the rea
ding
m
ay
be
aff
e
ct
ed if the probe w
indow
is
damaged
or
dirty.
12. If the ther
mometer
is
stor
ed in a significantly
different
environment than tes
ting
location,
pl
ac
e it in the tes
ting
location
for ap
pr
oxima tel y 30
minute
s
pr
ior to u
se
.
13.
It
is n
ot
in
tend
ed for
use
in
the
oxy
g
en
rich
env
ironment
and
pre
se
nce of
flammable
anesthetic
mixt
ur
e w
ith
air
, oxy
gen
or
ni trous
oxi
de.
Illustration
For
Use
.... To
mea
s
ure
forehead
temp
e
ratur
e:
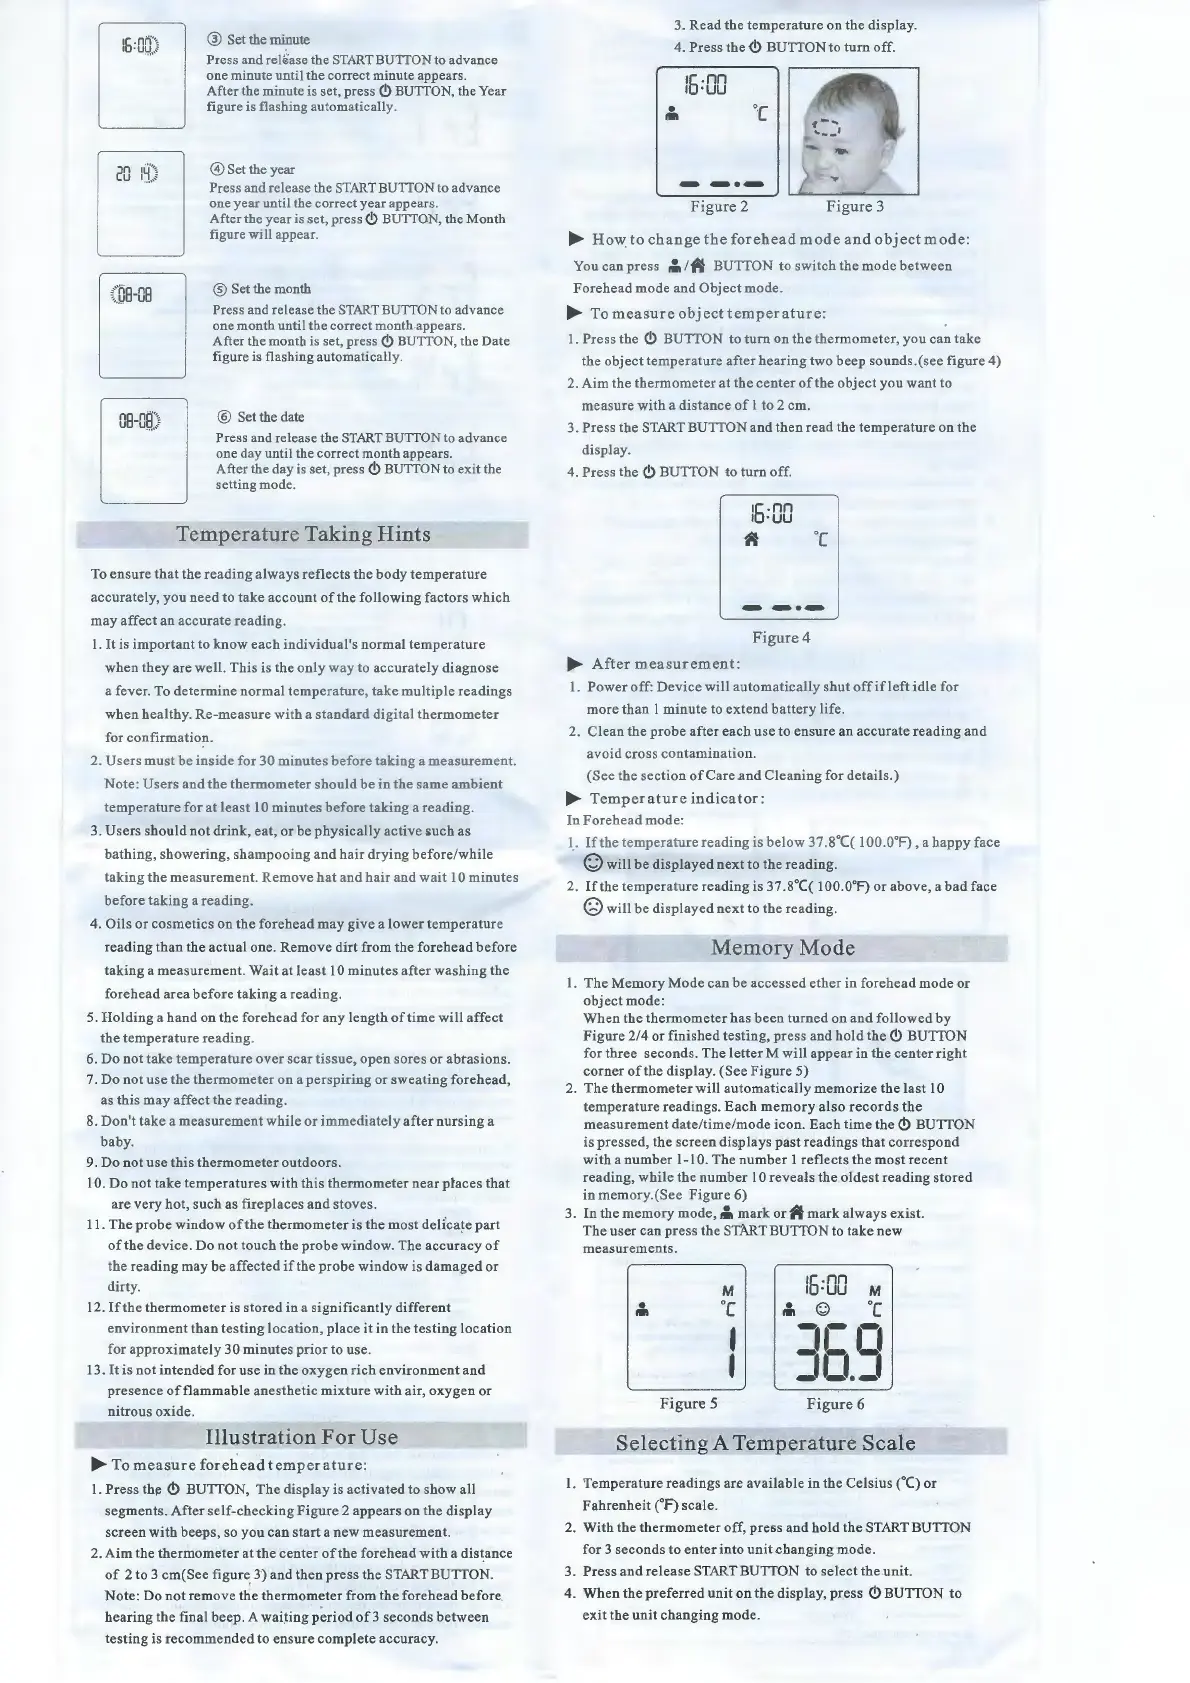
1.
Press
the
<!>
BUTTON,
The
dis
pla
y is acti
va
ted to sh
ow
ali
s
egments
. After
self-checking
Fi
gure
2 a
ppears
on the
display
s
creen
with
beep
s, so
you
can
star! a
ne
w meas
urem
ent.
2
Aim
the
thermometer
at
the
center
of
the forehead
wi
th a
distance
of
2 to 3
cm(See
figure 3)
and
th
en
pre
ss the START BUTTON.
Note:
Do
not rem
ove
the
thermometer
from. the
forehead
before
hearing
the
final
beep.
A
waiting
period
of3
second
s
between
testing
is
recommended
to ens ure
complete
accuracy.
3. Re
ad
the
temp
er
atur
e on the
displa
y.
4. Press the
<!>
B
UTION
to tu rn off.
....
Ho
\Y
to
change
the
forehead
mode
and
o
bj
ect
m
ode:
Y ou
can
pres
s
,;,
l
it
BUTTON to switch the mode
betwee
n
Fo
rehead
mode
and
Object
mod
e.
.... To
measure
obj
ect
t
emperature
:
1.
Pres
s the
<!>
BUTTON to tu rn on the ther
mome
ter, y ou
can
take
the
ab
ject
tempe
r
ature
after
hear
ing
two
beep sounds.(see fig
ur
e 4)
2. Aim the t
hermometer
at the
cente
r
of
the
abjec
t
you
want to
me
a sure w
ith
a
distance
of 1 to 2
cm
.
3.
Press
t
he
STARTBUTTON and then read the
tem
perature on the
disp
l
ay
.
4. Press the
<!>
BUTTON to tu rn off.
1
5.
nn
1 ·
uu
If
oc
Figure
4
....
Af
ter
meas
u
rement
:
1.
Power
off:
De
viee will au
tomaticall
y shut o
ff
if l
eft
idle for
more
th
an
1 minute to ex tend
battery
li
fe
.
2.
Clean
the
pro
be after each u
se
to ens
ur
e an ac
cura
te reading and
a void cross contam
in
ation.
(See the
section
ofCa
re
an
d Cl
ea
ning
for
d
et
ails.)
.... Tem
pera
tur
e i
nd
ica
tor
:
In
For
ehe
ad
mode:
l.
If
the
temperature
reading is below 37.8°
((
1
00.0
°F
),
a
happ
y face
Q will be displayed next to
the
reading.
2.
If
the
temper
ature rea
ding
is 3
7.8°((
1
OO.O
o
F)
or above, a
bad
face
Q will be
disp
layed next to
the
readin
g.
Me
m
oryM
ode
1. T
he
M
em
ory Mode can be
accesse
d
et
h
er
in foreh
ead
mode
or
ab
je
ct
mode:
Wh en the
thermomet
er
ha
s
be
en tu
rned
on and foll
owe
d by
F
igur
e 2/4
or
finished
tes ting,
pr
ess and h
old
the
<!>
BUTT
ON
for
thr
ee
second
s.
The
letter
M will appe
ar
in the center righi
co
rner
of the
di
splay. (
See
Figure
5)
2. T
he
thermometer
will
automaticall
y
memori
ze the las! 10
te
mperature
readings.
Each
memory
also
records
the
meas
urement
date
/time/
mode
icon. Each ti
me
the<!>
BUTTON
is pres
se
d, the
sc
reen
displays
past
readings
thal
corre
s
pond
with a nu
mber
1-10.
The
number
1
reflects
the
most
recent
rea
din
g, while the
number
10
reveals
the
oldest
reading
stored
in mem
or
y.(See Fi
gur
e 6)
3. In the
me
mory mode,
,;,
mark
or
if
mark al
ways
exi
st
.
The
user
can
pr
ess
the STÂRT BUTTON to
take
new
measurements.
•
,.,
Figure
5
M
oc
1
1
•
,.,
15.nn
1 ·uu
M
Q
oc
1 1
_1_1
JO.J
Figure
6
Selecting
A
Temperature
Scale
1.
Temperature
reading
s are av
ailable
in
the
Celsius ("C) or
F
ahrenheit
(F)
scale
.
2. With
the
thermometer
off
,
press
and
hold
the STARTBUTTON
f
or
3
seconds
to
enter
into
unit
changing
mode
.
3.
Press
and
release
START BUTTON to
se
lect
the unit.
4.
Wh
en the
preferred
unit
on the
display
,
press
<!>
BUTION
to
e
xit
the
unit
changing
mode.
 Loading...