Do you have a question about the JR ProPo Airskipper 50 and is the answer not in the manual?
Lists the components included in the assembly kit for the Airskipper 50 helicopter.
Details the key specifications of the Airskipper 50 helicopter, including dimensions and weight.
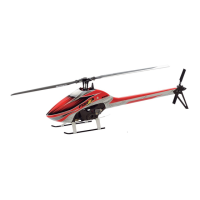
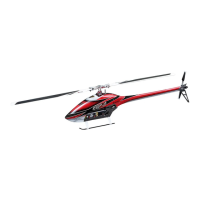
Provides an overview of the Airskipper 50 helicopter and its features for intermediate pilots.
Explains the meaning of DANGER, WARNING, and CAUTION symbols used throughout the manual.
Emphasizes that R/C helicopters are not toys and require practice, advising beginners to seek help.
Details critical safety measures for handling model helicopter fuel, emphasizing flammability.
Explains how to use the manual, including threadlock application and hardware identification.
Lists all additional components and systems required to complete the Airskipper 50 assembly.
Provides guidance on selecting a compatible radio system for CCPM control, including specific models.
Lists all necessary tools that are not supplied with the Airskipper 50 kit.
Explains the importance and application of threadlock to prevent critical components from loosening.
Visual guide to identify all hardware components (screws, nuts, washers) by size and type.
Step-by-step instructions for assembling the clutch bell and main shaft bearing block.
Instructions for assembling the tail drive pinion and associated bearing block.
Detailed instructions for assembling the MPM B-1 lever system.
Instructions for assembling the MPM B-2 mixing lever mechanism.
Instructions for assembling the main and tail drive gears, emphasizing correct meshing.
Steps for assembling the fuel tank, including fuel tubing and fittings.
Instructions for assembling the CCPM swash control levers.
Detailed steps for assembling the CCPM swash control arms.
Instructions for assembling the MPM elevator arm.
Steps for installing the gyro tray and crossmembers.
Detailed instructions for assembling the CCPM upper main frame, Part 1.
Continued instructions for assembling the CCPM upper main frame, Part 2.
Instructions for assembling the MPM upper main frame.
Continued instructions for assembling the MPM upper main frame, Part 2.
Detailed steps for assembling the lower main frame of the helicopter.
Instructions for joining the upper and lower main frame sections.
Steps for installing the landing gear system onto the helicopter frame.
Assembly of the main drive gear, emphasizing precise gear meshing for smooth operation.
Explains the critical role of proper gear meshing for smooth rotation and preventing damage.
Instructions for assembling the engine cooling fan and related parts.
Steps for attaching the clutch assembly to the cooling fan hub.
Instructions for installing the engine mount and engine.
Further steps for engine installation, including critical adjustments.
Steps for installing the fuel tank and its related components.
Instructions for assembling the CCPM swashplate.
Instructions for assembling the MPM swashplate.
Steps for installing the washout assembly.
Instructions for installing the swashplate and washout links for CCPM.
Instructions for installing the swashplate and washout links for MPM.
Instructions for assembling the center hub and center yoke.
Steps for assembling the main blade holders.
Further instructions for assembling the main blade holders, including thrust bearings.
Instructions for assembling and installing the V Seesaw.
Steps for assembling and installing the seesaw arms.
Instructions for installing the main rotor head assembly.
Steps for installing the flybar and flybar control arms.
Instructions for assembling and attaching the flybar paddles and weights.
Detailed instructions for installing the control rods and universal links.
Steps for preparing the tail gear case and related components.
Instructions for installing the tail gear case onto the tail boom.
Instructions for assembling the tail rotor center hub.
Steps for assembling the tail blade holders.
Instructions for installing the tail pitch control lever.
Steps for attaching the vertical tail fin to the helicopter.
Instructions for installing the tail boom, including belt tensioning.
Instructions for assembling the tail boom braces using epoxy.
Further steps for tail boom brace assembly, including clamps and crossmembers.
Instructions for assembling the tail control rods and bushings.
Steps for attaching tail rod guides and the tail fin.
General instructions for installing servos, emphasizing rubber grommets.
Specific instructions for installing the throttle servo.
Instructions for installing the CCPM servos onto the main frame.
Instructions for installing the MPM servos onto the servo tray.
Steps for installing the receiver, gyro, battery, and wiring management.
Procedure for initializing the radio system and selecting the model.
Guide to setting the swashplate type (e.g., 3 servos 120°).
Configuration of swashplate type, servo reversing, and travel adjust.
Adjusting servo travel values for proper control response.
Diagram and explanation of CCPM servo connections to the receiver.
Steps for preparing and installing servo arms, including centering and sub-trim.
Instructions for connecting CCPM servo linkages with specific distances.
Instructions for connecting MPM servo linkages, emphasizing precise lengths and alignment.
Detailed steps for connecting the pitch-to-aileron linkage for MPM.
Instructions for adjusting the throttle linkage for proper engine control.
Steps for installing the rudder linkage.
Instructions for installing the CCPM swash control lever B.
Instructions for installing the washout stopper.
Steps for installing protective seals and attaching the fiberglass body.
Guidance on attaching the helicopter body and managing antenna lead.
Procedures for balancing the main rotor blades for stable flight.
Introduction to making final adjustments for optimal helicopter performance.
Procedure to ensure the swashplate is perfectly level for optimal control.
Adjusting servo travel to correct pitch-to-aileron mixing for level flight.
Adjusting servo travel to correct pitch-to-elevator mixing.
Adjusting servo travel for low pitch positions to correct mixing.
Ensuring correct neutral settings for MPM servo horns.
Fine-tuning rudder and throttle servo movement using Travel Adjust.
Using sub-trim to achieve precise servo horn centering.
Configuring dual rates and exponential for flight control feel.
Setting up the throttle hold function for autorotation landings.
Adjusting gyro gain for stable tail rotor control and proper operation.
Ensuring the gyro is configured for the correct direction of compensation.
Setting main rotor blade pitch angles for different flight modes.
Fine-tuning rudder travel after initial test flights.
Adjusting pitch curves for hover, stunt, and autorotation.
Setting throttle curves for optimal engine performance and rotor RPM.
Adjusting engine mixture and specific CCPM mixing functions.
Verifying all components, controls, and systems are correctly installed and functional.
Procedure for adjusting main rotor blade pitch angles to ensure equal tracking.
Verifying bolt security, threadlock application, and blade attachment after assembly.
Critical checks before first flight, including fuel, blade condition, and radio range.
Safety rules to follow while flying the helicopter, including proximity and blade height.
Post-flight inspection for loose parts, damage, and component security.
Adjusting trim levers, pitch curves, and throttle curves after initial test flights.
Fine-tuning hovering pitch and swash travel for optimal performance.
Instructions for cleaning and applying decals to the helicopter body and fin set.