22
23
User Manual JUICE BOOSTER 2 [JTJB2-EU2R*] V 3.2User Manual JUICE BOOSTER 2 [JTJB2-EU2R*] V 3.2
DE
DE
EN
EN
FR
FR
IT
IT
ES
ES
PT
PT
NL
NL
DA
DA
SV
SV
NO
NO
FI
FI
EL
EL
CS
CS
HU
HU
PL
PL
HR
HR
SR
SR
SK
SK
SL
SL
RO
RO
BG
BG
TR
TR
RU
RU
UK
UK
HE
HE
AR
AR
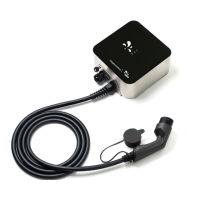
· Always change out the mains adapters in a dry place.
The adapters are connected and disconnected via the
JUICE CONNECTOR safety connecon:
JUICE CONNECTOR safety connector. (Connects to
the JUICE BOOSTER 2)
Plug and press together unl an audible click is heard.
Important: Ensure that you hear and feel the connecon
snap into place!
Mechanical guides only allow connecon in the correct
posion (orange dots provide orientaon for correct
alignment).
Disconnect the connectors by pulling back the retain-
ing ring on the JUICE CONNECTOR safety coupling. This
safety coupling is part of the mains adapter.
Protecve end caps (always t the caps in place when
the device is not in use, as they protect against ingress of
dust, moisture and other harmful substances). The JUICE
CONNECTOR is only waterght when fully plugged in.
Charging from domestic or industrial
power outlets
Select the ng mains adaptor.
Connect the JUICE CONNECTOR of the JUICE
BOOSTER 2 to the JUICE CONNECTOR of the mains
adapter, as described above.
Plug the mains connector into the power source socket
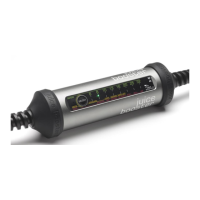
All the LEDs ash yellow while the BOOSTER 2
performs its self-test.
The device is ready for operaon within approx. 3
seconds.
The detected charging current intensity (AM-
PERE) is displayed in green.
The set operang mode (MODE) is displayed for
30 seconds by ashing yellow LED.
If the ampere charge value and the operang
mode are in the same posion, the LEDs ash
yellow and green alternately.
Check, if the charge current intensity is correct.
Note: The charge intensity can be reduced within the
rst 30 seconds aer connecng the BOOSTER 2 to the
vehicle by pressing the SELECT buon.
Plug the vehicle-end coupling into the vehicle’s charg-
ing connecon socket.
The charging process begins automacally.
The sequenal ashing orange LEDs indicate
that charging is in progress.
A green LED connues to display the set charge intensity.
The charge process ends.
If only the green LED displaying the charge
intensity is lit, the vehicle has properly ended the
charge process.
If charging at rst fails to start automacally, it’s possible
that a seng in the vehicle has scheduled charging for a
certain specic me of day.
Changing the charge intensity (AMPERE)
· Press the SELECT buon (before plugging the vehi-
cle-end connector into the vehicle charging socket, or
within 30 seconds aer plugging it in).
The green LED begins to ash, indicang
that the device is ready to change the charge
intensity.
Press the SELECT buon as many mes as necessary
unl the LED is at the desired amperage.
· Pressing the buon again aer posion 6 amperes
causes the LED to jump back to the maximum value
dened by the given adapter in use.
· Reducing the charge intensity is always recommended
for old installaons and connuous operaon. This may
also be necessary if mulple e-cars are being charged at
outlets that share fuses, or where the outlets are fused
for and specically state lower amperage values.
· For safety reasons, the charge intensity cannot be
increased beyond the charge intensity determined by
the JUICE BOOSTER 2.
· The selected seng will be saved automacally aer
approx. 5 seconds.
The LED then displays the selected ampere
value in solid green.
The JUICE BOOSTER 2 saves the last charge intensity
seng used with a parcular mains adapter, and that set-
ng is restored aer any power interrupon or when the
device is plugged in again with the same adapter.
Changing the operating mode (MODE)
· Press and hold down the SELECT buon for approx. 5
seconds (before plugging the vehicle-end connector
into the vehicle charging socket, or within 30 seconds
aer plugging it in).
All LEDs will briey ash yellow, aer which
the currently set operang mode will ash
yellow in rapid sequence, thereby signalling
that it’s ready to change the operang mode.
· Set the desired operang mode by pressing the SELECT
buon repeatedly unl the desired mode is reached.
The selected seng will be saved automacally
aer approx. 5 seconds. The selected operang
mode is then displayed in slowly ashing yellow.
For operaon in all countries except the UK, France and
Norway.
This mode must be selected for charging in the United
Kingdom and France (as it limits the Schuko plug to 10 A or
8 A / 14 A for GreenUp).
This mode, and only this mode, must be selected for charg-
ing in Norway (congures the device for use in earth-free
IT networks).
⚠
Disables the device’s internal earth conductor check. This
mode may only be used once you have checked to verify
that the electrical installaon and earthing have been
correctly connected.
Unbalanced loads and other inadequacies in the grid
can result in the earth conductor check detecng an
irregularity with the earthing despite it being correctly
connected. For technical reasons, this circumstance can-
not be resolved in any other way. This situaon has been
repeatedly observed in Italy, among other places. For your
safety, reset the operang mode to STANDARD
once you are charging from a dierent socket.
Charging your vehicle at public
charging stations
Select the ng adapter (Type 2 or Type 3).
Connect the JUICE CONNECTOR of the JUICE
BOOSTER 2 to the JUICE CONNECTOR of the adapter,
as described above.
Plug the connected adapter into the charging staon.
Couple the vehicle-end connector of the JUICE
BOOSTER 2 to the vehicle’s charging socket.
Release the charging process at the charging staon, or
pay, as needed.
The charging process begins automacally.
The sequenal ashing orange LEDs indicate
that charging is in progress.
Stopping the charging process
Stop the charging process at the controls inside the
vehicle.
This releases the lock on vehicle’s charging coupling.
If you are charging the vehicle at a charging staon, the
lock at the charging staon is likewise released.
First disconnect the connector coupled to the vehicle,
then unplug the connector plug from the power socket or
the charging staon.
Maintenance and cleaning
· Disconnect the JUICE BOOSTER 2 from the power
socket and the vehicle.
· Only clean the outside of the device. Use a so, slightly
damp or anstac cloth.
· Do not use any detergents or chemical agents to clean
the device.
Maintenance
The device basically requires no maintenance.
Note that connectors and couplings are sensive,
high-performance parts, and their contacts must always
4
1
2
3
EN
 Loading...