Do you have a question about the JUKI AMS-224EN/IP-420 and is the answer not in the manual?
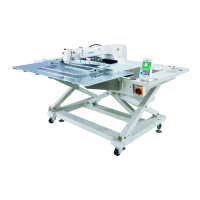
| Stitch Type | Lock stitch |
|---|---|
| Sewing Area | 220mm x 420mm |
| Stitch Length | 0.1 mm ~ 12.7 mm |
| Thread Trimmer | Yes |
| Work Clamp | Standard |
| Air Pressure | 0.5 MPa |
Detailed technical specifications of the sewing machine, covering dimensions, speed, and capabilities.
Step-by-step instructions for setting up the sewing machine and its accessories.
Essential steps before operating the sewing machine, including lubrication and setup.
How to adjust the needle and bobbin thread tension for optimal sewing.
Fundamental procedures for operating the sewing machine during sewing.
Basic steps for starting and performing sewing operations with the machine.
Comprehensive guide to operating the IP-420 control panel for the sewing machine.
Step-by-step guide to the fundamental operations and startup procedures of the IP-420.
Detailed explanation of the display screens related to sewing shape selection.
How to select and determine the desired sewing shape or pattern for operation.
Instructions for modifying various parameters like scale, tension, and speed.
How to adjust settings like thread tension and presser height for needle entry.
Troubleshooting steps for issues encountered during sewing product setup.
Detailed layout and functions of the screen during pattern button selection.
Instructions for modifying stored data within a selected pattern button.
Explanation of the display interface when using combination sewing features.
Steps for creating and managing combined sewing patterns from multiple data.
Details of the display screens when the simple operation mode is active.
How to modify memory switch settings to customize machine functions.
Procedures for handling errors related to X/Y motor position slips.
A comprehensive list of memory switch items, their ranges, and edit units.
General maintenance procedures and adjustments for the sewing machine.
A comprehensive list of common sewing troubles and their solutions.