Do you have a question about the JUKI HZL-G220 and is the answer not in the manual?
Explains servicing procedures for double-insulated products, requiring qualified personnel and identical replacement parts.
Explains the meaning and purpose of warning marks and pictographs used to ensure safe operation of the sewing machine.
Instructions for connecting the power supply when using the start/stop button instead of a foot controller.
Step-by-step guide for connecting and operating the machine using the foot controller.
Explains how to adjust sewing speed using the speed controller and foot controller.
Details the function and positions of the presser foot lifting lever for different sewing needs.
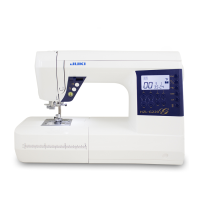
Identifies and explains the operational buttons and screen elements specific to the G220 model.
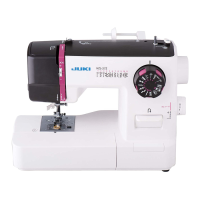
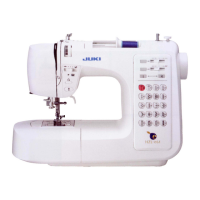
Identifies and explains the operational buttons and screen elements specific to the G120 model.
Explains buttons for selecting, adjusting, and storing stitch patterns and letters.
Covers buttons for stitch length, zigzag width, and automatic lock stitch/thread trimming.
Step-by-step guide on how to remove and attach the presser foot to the machine.
Instructions for detaching and reattaching the presser foot holder assembly.
Details the standard presser feet included and their primary uses.
Lists and describes various optional presser feet for specialized sewing tasks.
Instructions for removing the bobbin, setting the thread spool, and preparing for winding.
Step-by-step process for winding thread onto the bobbin correctly.
Detailed steps for threading the needle with thread, including guidance on needle and thread selection.
Steps for safely removing and attaching a sewing machine needle.
Guidance on selecting and purchasing the correct needles for various fabric types.
Guide to selecting from the machine's practical stitch patterns, including diagrams.
Covers selection of buttonhole, quilt, decorative stitches, one-point patterns, and letters.
Details specific patterns for buttonholes and quilting applications.
Covers selection and use of decorative stitches, one-point patterns, and alphabetic characters.
Instructions for initiating and concluding sewing with a straight stitch.
Explains using the thread trimming button or face plate cutter for finishing stitches.
Guidance on sewing the edges of thick fabrics using specific machine operations.
Techniques for altering stitch direction and applying lock stitches at the end of seams.
Explains how to use the combined lock stitch and thread trimming function on the G220 model.
Details the automatic lock stitch function available on the G120 model.
Instructions on how to modify the width of the zigzag stitch during sewing.
Guidance on changing the stitch length for zigzag patterns.
Details three variations of the overcasting stitch for preventing fabric fraying.
Explains the use of a 3-point zigzag stitch for overcasting edges.
Steps for preparing fabric, including folding and basting, for blind stitch application.
Final steps and considerations for completing the blind stitch, including positioning.
How to fine-tune the needle's entry point for optimal blind stitch results.
Overview of different buttonhole types supported by the machine and their applications.
Steps for setting the presser foot and measuring buttonhole length using the button holder.
Detailed steps from fabric placement to starting and stopping buttonhole sewing.
Instructions on how to open sewn buttonholes using a seam ripper.
How to modify the width of buttonhole stitches using the zigzag width adjustment button.
How to change the seam density or stitch length using the stitch length adjusting button.
Steps for preparing the fabric and attaching the zipper foot before sewing zippers.
Detailed instructions for sewing a lapped zipper into a garment seam.
Step-by-step guide for inserting zippers using the centered method.
Guidance on applying interlining and performing test sewing for accurate letter and pattern stitches.
Instructions on how to stitch letter patterns and notes on sewing speed variation.
Advice on trimming excess threads from jump stitches for a neat finish.
Steps for attaching and adjusting the wide table accessory for larger projects.
How to use the quilt guide for sewing parallel lines at consistent distances.
Method for quilting along fabric seams using a special presser foot.
Using a walking foot to quilt layers evenly, preventing fabric shifting.
| Type | Computerized Sewing Machine |
|---|---|
| Stitch Selection | Dial |
| Number of Stitches | 180 |
| Maximum Stitch Width | 7mm |
| Maximum Stitch Length | 5mm |
| Needle Threading System | Automatic |
| LCD Display | Yes |
| Free Arm | Yes |
| Bobbin Type | Drop-in |
| Presser Foot | Snap-on |
| Voltage | 120V/230V |