ENGLISH - 5 -
The AUTOSTORE menu does not appear when your TV has
been turned on once. In this case, use the LANGUAGE,
COUNTRY and AUTOSTORE items in the INSTALL
menu to make the initial settings. For details, see Install
(Installation) Menu on page 9.
If you want to do the initial settings later, press PICTURE
button to turn the menu off.
1. Press
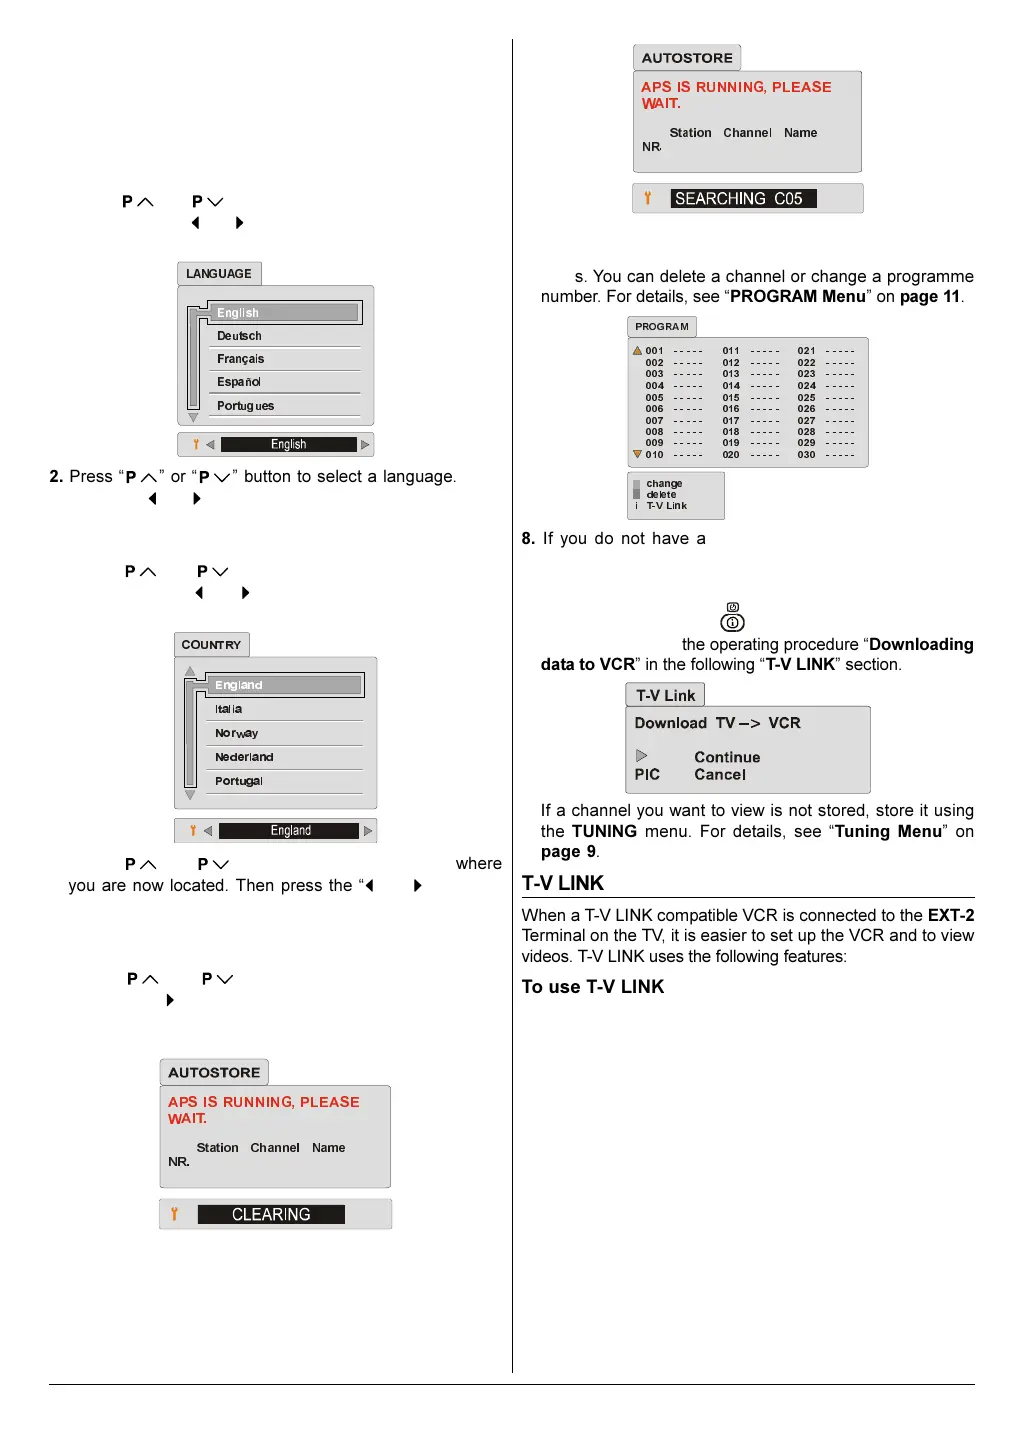
or button to select LANGUAGE item.
Then press the
or button to enter the LANGUAGE
sub-menu.
(QJOLVK
'HXWVFK
)UDQoDLV
(VSDxRO
3RUWXJXHV
/$1*8$*(
2. Press or button to select a language. Then
press the
or button to store it.
3. Press the MENU button to return to the AUTOSTORE
menu.
4. Press
or button to select COUNTRY item.
Then press the
or button to enter the COUNTRY
sub-menu.
(QJODQG
,WDOLD
1RUZ D\
1HGHUODQG
3RUWXJDO
&28175<
5. Press or button to select the country where
you are now located. Then press the
or button to
store it.
6. Press the MENU button to return to the AUTOSTORE
menu.
7. Press
or button to select Continue item.
Then press
button to start the AUTOSTORE function.
The AUTOSTORE function automatically stores the re-
ceived channels in your TV's programme numbers.
$ 36, 65 81 1 ,1*3/($6(
:$,7
6WDWLRQ &KDQQHO1DPH
15
$36,65811 ,1*3/($6(
:$,7
6WDWLRQ&KDQQHO1DPH
15
APS: Automatic Programming System
After the AUTOSTORE is finalized, PROGRAM menu ap-
pears. You can delete a channel or change a programme
number. For details, see PROGRAM Menu on page 11.
FKDQJH
GHOHWH
79/LQN
352*5$0
L
8. If you do not have a T-V LINK compatible VCR, press
PICTURE button to exit the menu.
If you have a T-V LINK compatible VCR connected to the
EXT-2 terminal, press
button to display T-V LINK
menu. Then follow the operating procedure Downloading
data to VCR in the following T-V LINK section.
If a channel you want to view is not stored, store it using
the TUNING menu. For details, see Tuning Menu on
page 9.
T-V LINK
When a T-V LINK compatible VCR is connected to the EXT-2
Terminal on the TV, it is easier to set up the VCR and to view
videos. T-V LINK uses the following features:
To use T-V LINK functions:
A T-V LINK compatible VCR means a JVC video cassette
recorder with the T-V LINK logo, or with one of the following
logos. However, these VCRs may support some or all of the
features described earlier. For details, see your VCR instruc-
tion manual.
Q-LINK (a trademark of Panasonic Corporation)
Data Logic (a trademark of Metz Corporation)
Easy Link (a trademark of Phillips Corporation)
Megalogic (a trademark of Grundig Corporation)
SMARTLINK (a trademark of Sony Corporation)
Downloading data to VCR:
The VCR will automatically download the registered data on
the TV channels from the TV. This means you do not need to
set up the programme channels on your VCR manually.
01-ENG-2835-AK52-1512UK-16-9-(AV-28GH1&BUF&SUF).p65 21.05.2003, 15:025


 To Next Page