Installation/Connection
A
warning
•
The
unit
can
only
be
used
with
a
12
V
DC
power
supply,
negative
ground
.
•
Disconnect
the
battery's
negative
terminal
before
wiring
and
mounting
.
•
Do
not
connect
Battery
wire
(yellow)
and
Ignition
wire
(red)
to
the
car
chassis
or
Ground
wire
(black)
to
prevent
a
short
circuit.
•
Insulate
unconnected
wires
with
vinyl
tape
to
prevent
a
short
circuit.
•
Be
sure
to
ground
this
unit
to
the
car's
chassis
again
after
installation.
A caution
•
For
safety's
sake,
leave
wiring
and
mounting
to
professionals.
Consult
the
car
audio
dealer.
•
Install
this
unit
in
the
console
of
your
vehicle
.
Do
not
touch
the
metal
parts
of
this
unit
during
and
shortly
after
use
of
the
unit.
Metal
parts
such
as
the
heat
sink
and
enclosure
become
hot.
•
Do
not
connect
the
8
wires
of
speaker
to
the
car
chassis,
Ground
wire
(black),
or
in
parallel.
•
Mount
the
unit
at
an
angle
of
less
30°.
• If
your
vehicle
wiring
harness
does
not
have
the
ignition
terminal,
connect
Ignition
wire
(red)
to
the
terminal
on
the
vehicle's
fuse
box
which
provides
12
V
DC
power
supply
and
is
turned
on
and
off
by
the
ignition
key.
•
After
the
unit
is
installed,
check
whether
the
brake
lamps,
blinkers,
wipers,
etc.
on
the
car
are
working
properly
.
• If
the
fuse
blows,
first
make
sure
the
wires
are
not
touching
car's
chassis,
then
replace
the
old
fuse
with
one
that
has
the
same
rating.
Basic
procedure
1 Remove
the
key from
the
ignition switch, then disconnect
the
8 terminal
of
the
car battery.
2 Connect
the
wires properly.
See
"Wiring
connection".(~
20)
3 Install
the
unit
to
your car.
See
"Installing the unit (in-dash
mounting)".(~
right column)
4 Connect
the
8 terminal
of
the
car battery.
5 Reset
the
unit.(~
4)
I
Check
the supplied parts for installation
beforehand.(~
21)
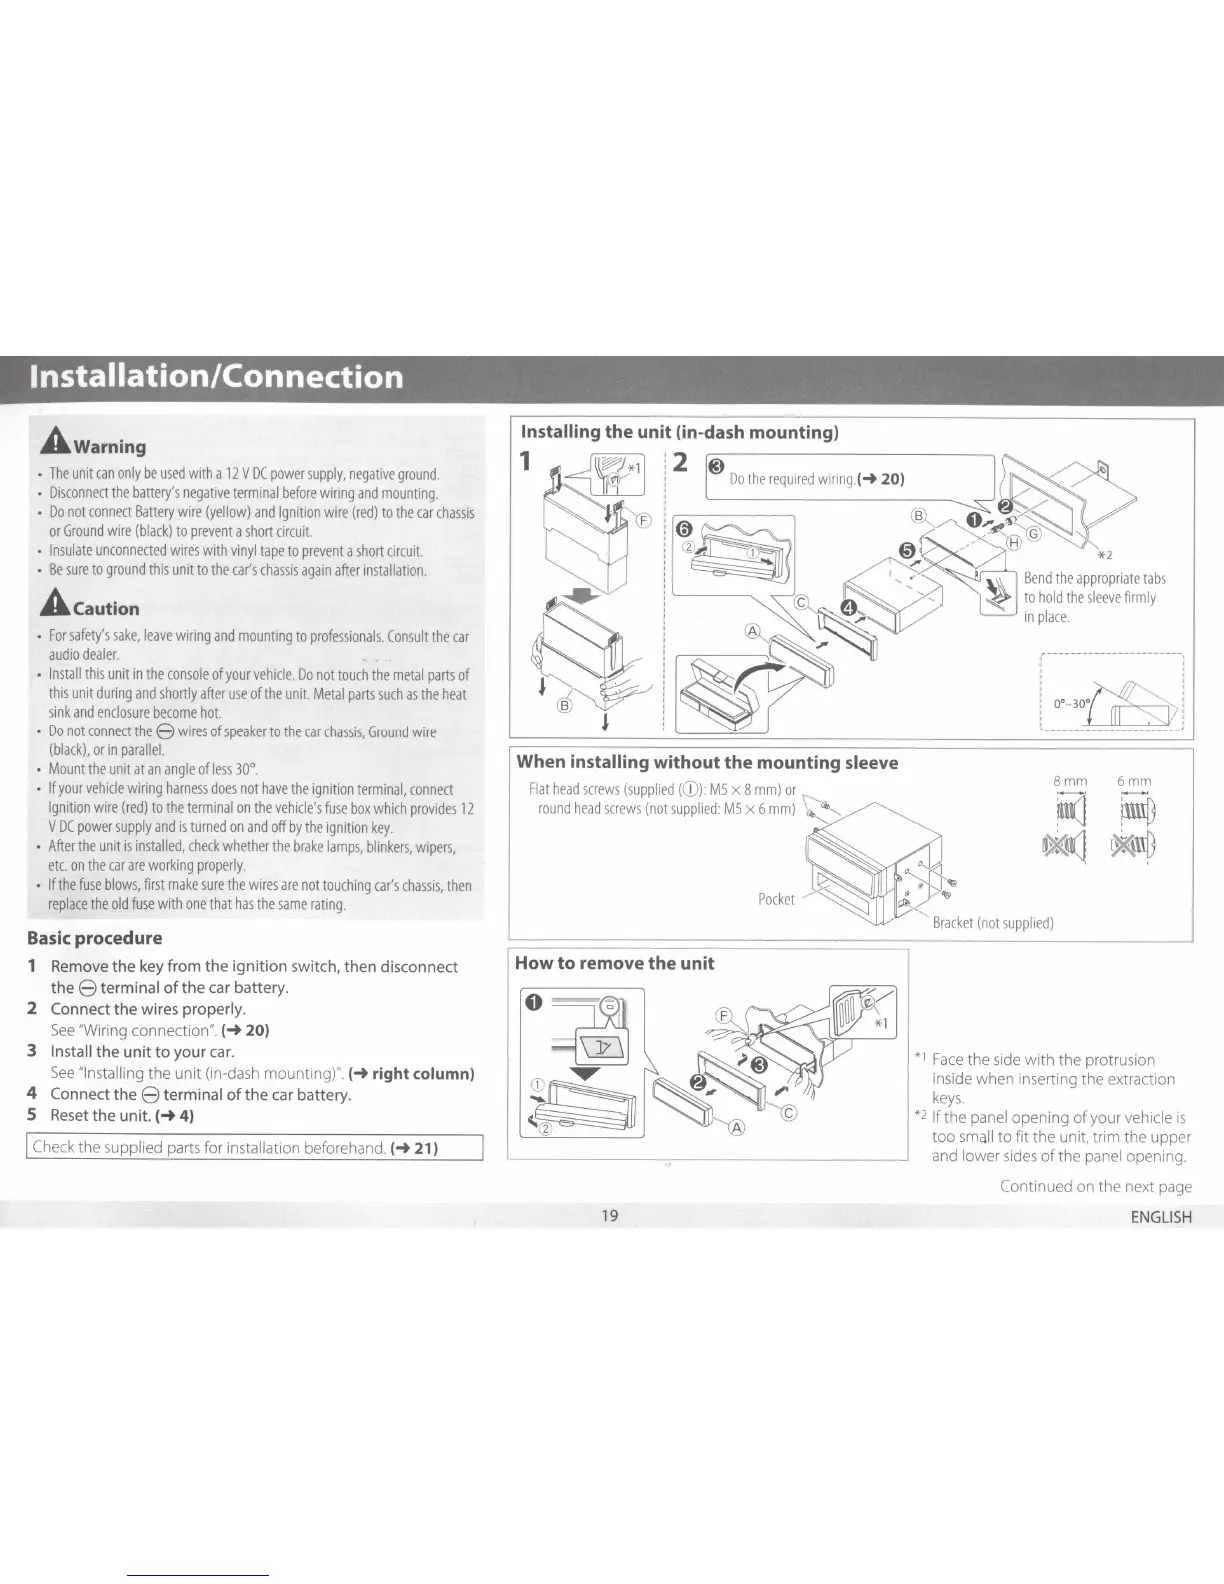
1
@)
Do
the
required
wiring.
(~
20)
When installing
without
the
mounting sleeve
Flat
head
screws
(supplied
((])):
MS
x 8
mm)
or
\"'--...
round
head
screws
(not
supplied:
MS
x 6
mm)
\.,
t4>-....__
'-...
How
to
remove
the
unit
19
Bend
the
appropriate
tabs
to
ho
ld t
he
sleeve
firm
ly
in
place
.
r-----------------------
~
I I
I I
I I
I I
:~
:
l
0°-30~
l
'-----------------------'
Bmm
6mm
~
...........
~
~(}
~mD
*1
F
ace
t
he
side
with t
he
prot
rus
ion
inside when inserting t
he
extraction
keys.
*2 If the
panel
opening of your vehicle is
too
small
to fit the unit, trim the upper
and
lower
sides
of
t
he
panel
openi
ng.
Con
tin
ued
on the next
page
ENGLISH
 Loading...