ENGLISH
B
Light green
Vert clair
Зеленого цвета
VIDEO OUT
(see diagram
/voir le diagramme /
см. схему )
DIGITAL OUT
(see diagram
/
voir le diagramme /
см. схему )
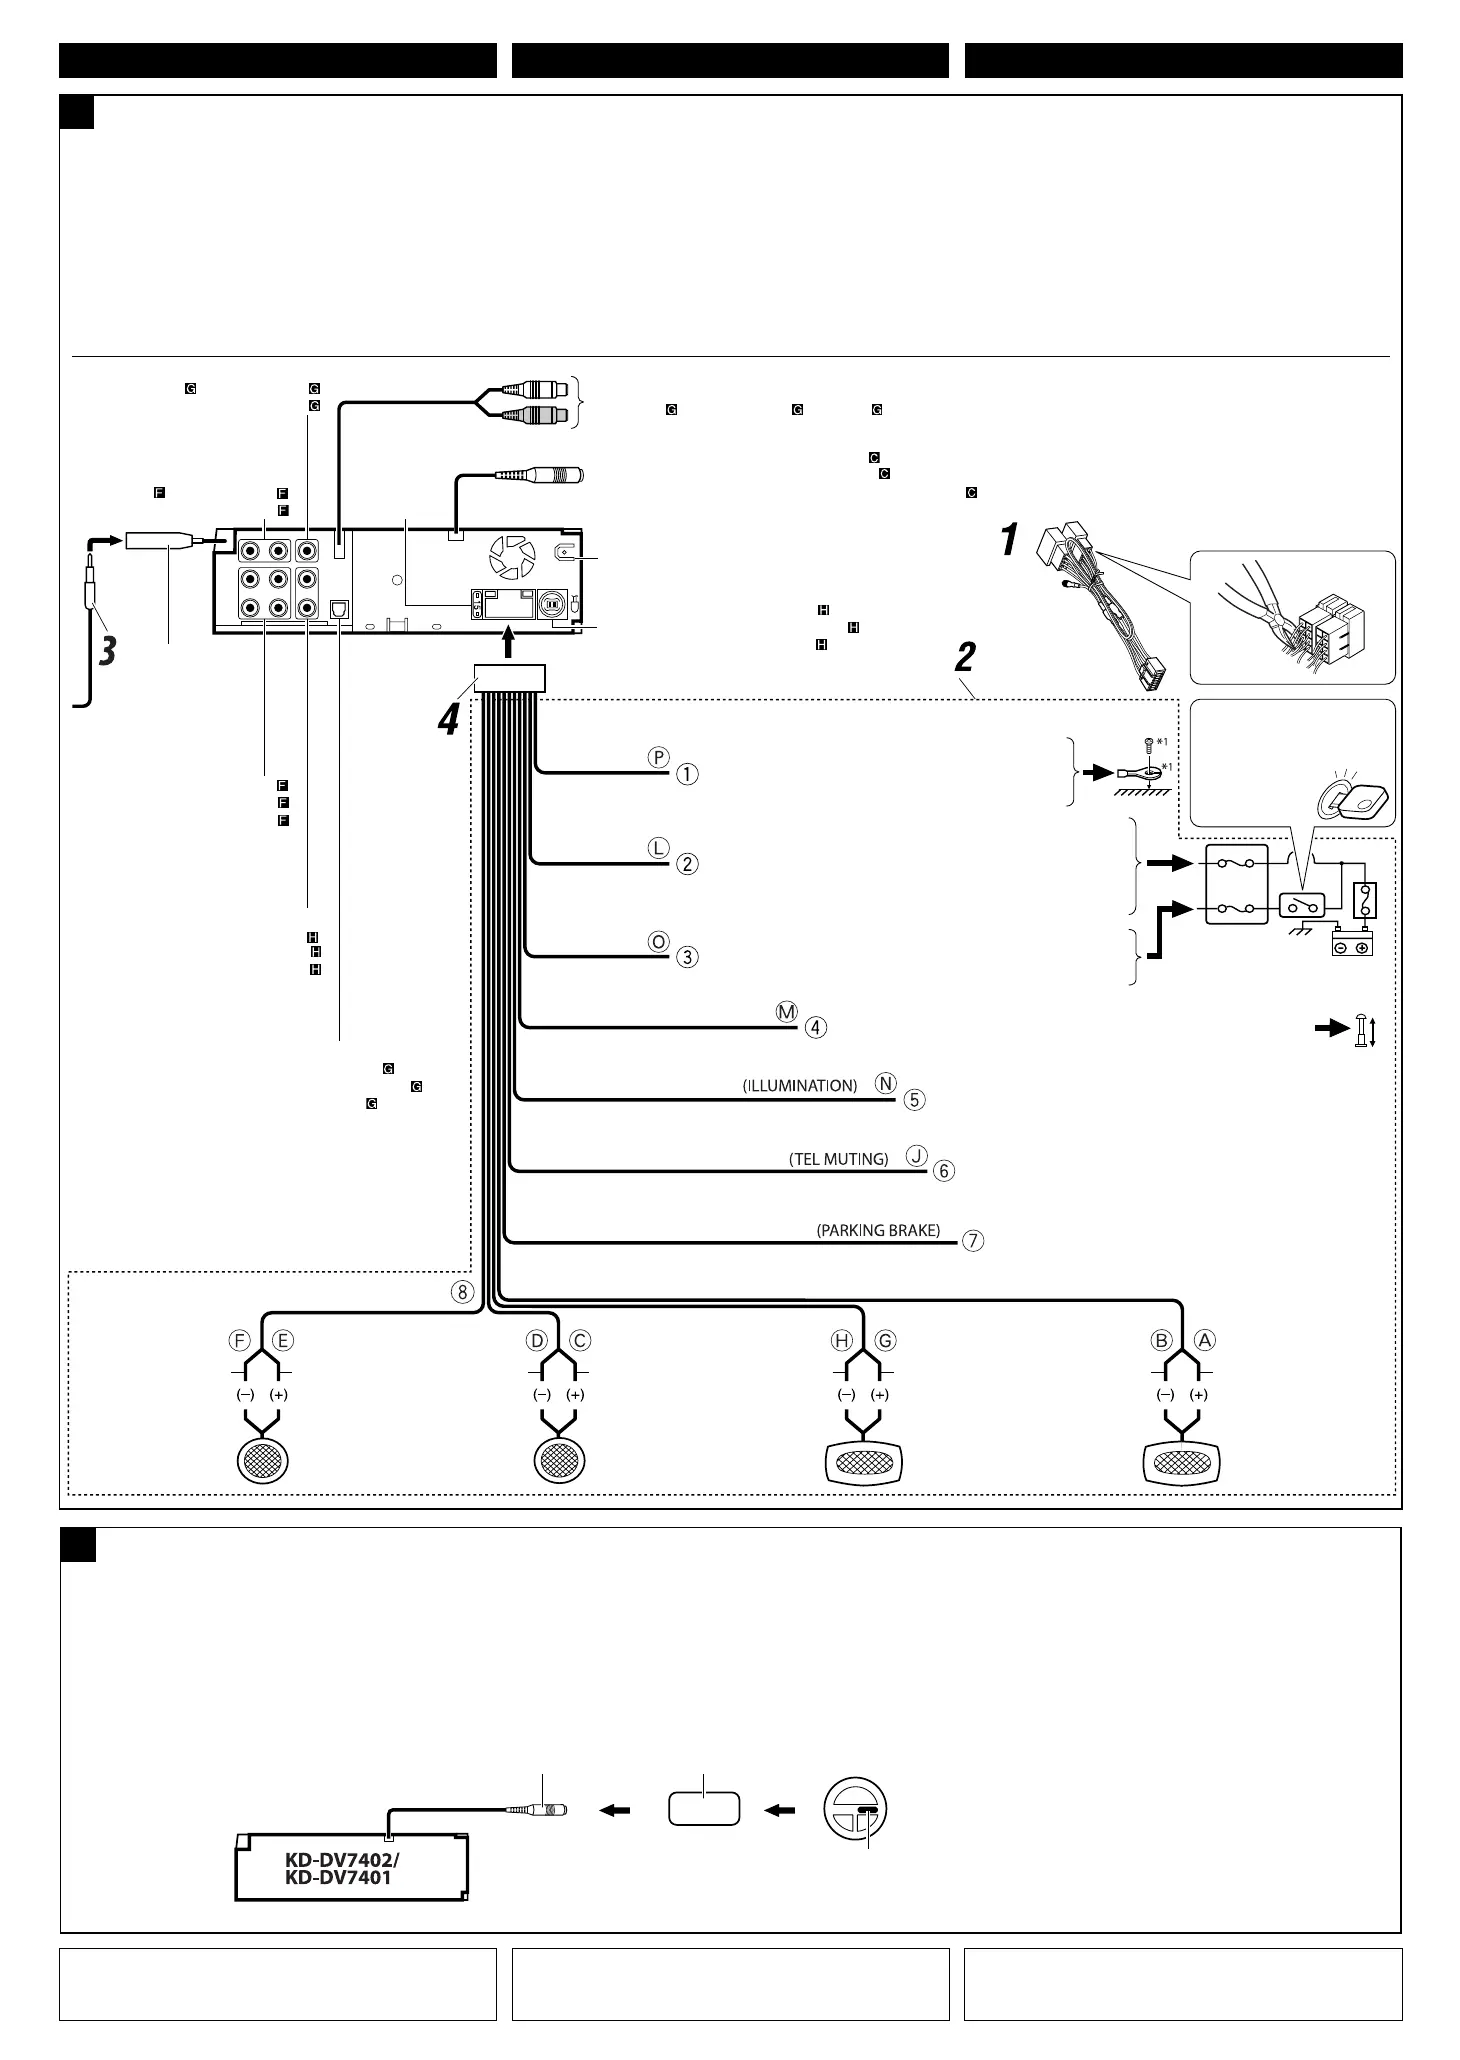
Before connecting: Check the wiring in the vehicle carefully.
The leads of the power cord and those of the connector from the car
body may be different in color.
1 Cut the ISO connector.
2 Connect the colored leads of the power cord in the order
specified in the illustration below.
3 Connect the aerial cord.
4 Finally connect the wiring harness to the unit.
To parking brake, metallic body or chassis of the car
Au frein de stationnement, corps métallique ou châssis du véhicule
К стояночному тормозу, корпусу или ходовой части автомобиля
*
1
Not supplied for this unit.
*
2
Before checking the operation of this unit prior to installation, this
lead must be connected, otherwise power cannot be turned on.
РУССКИЙ
Connections without using the ISO connectors /
Connexions sans l’utilisation des connecteurs ISO
/ Подключение без использования
разъемов ISO
Перед началом подключений: Тщательно проверьте
проводку в автомобиле. Неправильное подключение может
привести к серьезному повреждению устройства.
Жилы силового кабеля и жилы соединителя от кузова
автомобиля могут быть разного цвета.
1 Обрежьте разъем ISO.
2 Подсоедините цветные провода шнура питания в
указанном ниже порядке.
3 Подключите кабель антенны.
4
В последнюю очередь подключите электропроводку к устройству.
Left speaker (front)
Enceinte gauche (avant)
Левый громкоговоритель (передний)
Right speaker (front)
Enceinte droit (avant)
Правый громкоговоритель (передний)
Left speaker (rear)
Enceinte gauche (arrière)
Левый громкоговоритель (задний)
Right speaker (rear)
Enceinte droit (arrière)
Правый громкоговоритель
(задний)
Purple
Violet
Пурпурный
Purple with black stripe
Violet avec bande noire
Пурпурный с черной полосой
Green
Vert
Зеленый
Green with black stripe
Vert avec bande noire
Зеленый с черной полосой
Gray
Gris
Серый
Gray with black stripe
Gris avec bande noire
Серый с черной полосой
White
Blanc
Белый
White with black stripe
Blanc avec bande noire
Белый с черной полосой
Black
Noir
Черный
Blue with white stripe
Bleu avec bande blanche
Синий с белой полосой
Red
Rouge
Красный
Yellow
*
2
Jaune *
2
Желтый *
2
To metallic body or chassis of the car
Vers corps métallique ou châssis de la voiture
К металлическому корпусу или шасси автомобиля
To a live terminal in the fuse block connecting to the car battery (bypassing
the ignition switch) (constant 12 V)
A une borne sous tension du porte-fusible connectée à la batterie de la voiture
(en dérivant l’interrupteur d’allumage) (12 V constant)
К разъему фазы в блоке предохранителя (минуя блок зажигания)
(постоянный 12 В)
Ignition switch
Interrupteur d’allumage
Переключатель зажигания
Fuse block
Porte-fusible
Блок предохранителя
To an accessory terminal in the fuse block
Vers borne accessoire du porte-fusible
К вспомогательному разъему в блоке предохранителя
To the remote lead of other equipment or power aerial if any (200 mA max.)
Au fil de télécommande de l’autre appareil ou à l’antenne automatique s’il y en a une
(200 mA max.)
К удаленному проводу другого оборудования или антенны (макс. 200 мА)
Brown
Marron
Коричневый
To cellular phone system
À un système de téléphone cellulaire
К системе сотового телефона
15 A fuse
Fusible 15 A
Предохранитель
15 A
Rear ground terminal
Borne arrière de masse
Задний разъем заземления
LINE OUT (see diagram )
(voir le diagramme
)
(см. схему
)
FRANÇAIS
Avant de commencer la connexion: Vérifiez attentivement le
câblage du véhicule.
Le fil du cordon d’alimentation et ceux des connecteurs du châssis de la
voiture peuvent être différents en couleur.
1 Coupez le connecteur ISO.
2 Connectez les fils colorés du cordon d’alimentation dans l’ordre
spécifié sur l’illustration ci-dessous.
3 Connectez le cordon d’antenne.
4 Finalement, connectez le faisceau de fils à l’appareil.
2nd AUDIO OUT
(see diagram / voir le diagramme / см. схему )
*
1
Non fourni avec cet appareil.
*
2
Pour vérifier le fonctionnement de cet appareil avant installation, ce fil
doit être raccordé, sinon l’appareil ne peut pas être mis sous tension.
To car light control switch
À l’interrupteur d’éclairage de la voiture
К контрольному переключателю освещения автомобиля
Orange with white stripe
Orange avec bande blanche
Оранжевый с белой полосой
SW
(Subwoofer/Caisson de grave/
Низкочастотный динамик)
(see diagram /voir le diagramme /
см. схему )
LINE IN
(see diagram
/
voir le diagramme /
см. схему )
Aerial connector
Connecteur d’antenne
Разъем антенны
To external components (see diagram
)
Aux appareils extérieurs (voir le diagramme
)
К внешним устройствам (см. схему
)
To steering wheel remote controller (see diagram
)
Pour la télécommande de volant (voir le diagramme )
Вход рулевого пульта дистанционного управления (см. схему )
Connecting to the steering wheel remote controller / Connexion de la télécommande de volant / Подключение к рулевому пульту
дистанционного управления
If your car is equipped with the steering wheel remote controller,
you can operate this unit using the controller. To do it, a JVC’s
OE remote adapter (not supplied) which matches with your car is
required. Consult your JVC IN-CAR ENTERTAINMENT dealer
for details.
C
Si votre voiture est munie d’une télécommande de volant, vous pouvez
commander cet autoradio en utilisant la télécommande. Pour le
faire, un adaptateur pour télécommande au volant JVC (non fourni)
correspondant à votre voiture est nécessaire. Consultez votre revendeur
d’autoradio JVC pour les détails.
Steering wheel remote input
Entrée de la télécommande de volant
Вход рулевого пульта дистанционного управления
OE remote adapter *
1
Adaptateur pour télécommande au volant *
1
Aдаптер рулевого пульта дистанционного управления OE
*
1
Steering wheel remote controller (equipped in the car)
Télécommande de volant (installée dans la voiture)
Рулевой пульт дистанционного управления
(устанавливаемый в автомобиле)
Если автомобиль оборудован рулевым пультом
дистанционного управления, его можно использовать для
управления данным устройством. Для этого необходим
адаптер рулевого пульта дистанционного управления JVC
OE (не поставляется), подходящий для Вашего автомобиля.
За более подробной информацией обратитесь к поставщику
автомобильных аудиосистем компании JVC.
*
1
не входит в комплект поставки
*
2
Перед проверкой работы устройства подключите этот провод,
иначе питание не включится.
Instal4-6_KD-DV7402_007A_f.indd 4Instal4-6_KD-DV7402_007A_f.indd 4 2/19/08 5:34:04 PM2/19/08 5:34:04 PM
 Loading...